Has anyone installed Fiero seats in their car?

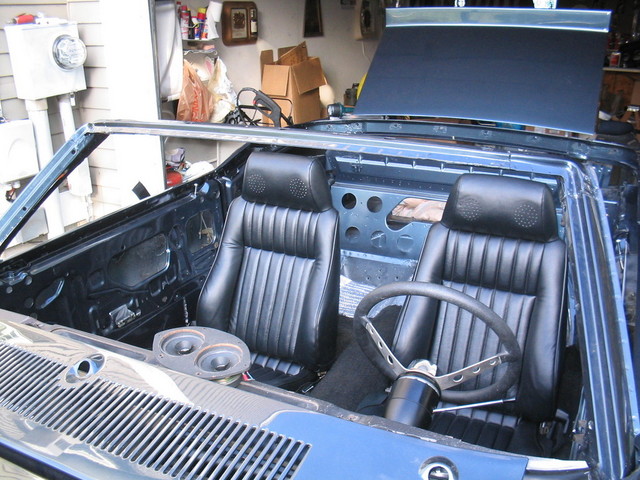
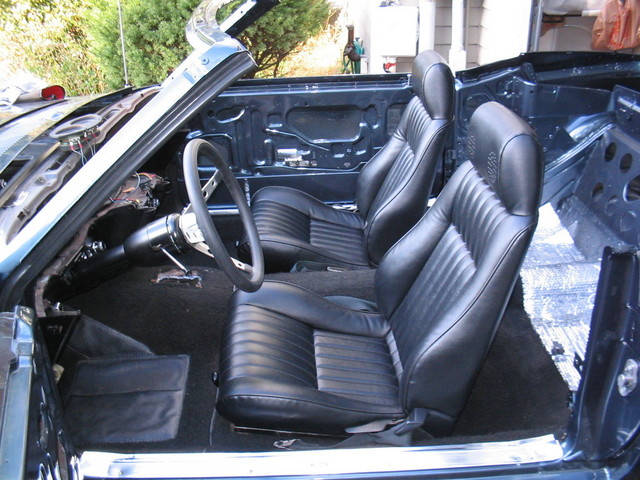
Sounds good, I'd like to see the Supra seats. I've seen 1990 Supra seats installed in a 65. Part of the appeal of the Fiero seats, though, is the availability of MrMike's upholstery kits for that exact seat. He has the reupholstery kit down to a science and the money is reasonable. Once you need to hire a local upholstery shop to recover the seats, the costs seem to increase quickly. If MrMike weren't selling his kits, I'd probably end up with a different set of seats. Did you recover the front and/or rear seats?
 
  • Sponsors (?)


Brackets are done

...I look forward to seeing how you tackle it...

I finally finished the 2 brackets the other day. There was some trial and error, and the guys at the paint shop showed me how to weld. I still need some practice with that... :rolleyes:

I used the top portion of the stock Fiero brackets including the handles and springs. The large spring with the plastic cover I relocated to under the seat, instead of on the side of it (thought it looked better that way). We cut two slices for each bracket that are higher in the back than the front. These make up some of the slope of the seat and allow for an attachment to the bottom brackets by welding. For bottom brackets, I went with the square brackets from a set of Corbeaus I had handy. I used grade 8 bolts through the bracket holes, and welded them in and ground down the heads so they are now studs. For anyone else doing this, forget the corbeau brackets; they are ill fitting in this app and clearly are made to fit many cars. Make a smaller square bracket instead. I also degreased the brackets, etch primed them, painted them satin black. Then I greased them with lithium grease. Still not permanently installed in the car yet though.
 
Looks really nice!!! I am a little confused though. The way you made the box bracket couldn't you have just used the whole Fiero track?

When I first tried to tear apart the Fiero brackets I got no where but frustrated fast. I would have needed a drill press to get those monster rivets out. After a day of F'n with them and not wanting to go through grinding and welding parts that would never be seen I just changed my plan for the easy route. Especially once I realized that anything longer that a stock track could hang off the seat riser and into the back.
 
I suppose I could have used the whole Fiero bracket but this allowed me to adjust the baseline tilt of the seat bottom to my liking, and it looked better being symmetrical rather than the Fiero's crooked feet.

The rivets came out easy with an electric grinder on the heads and then a few whacks with a big hammer. I preferred weld rather than rivets, but rivets are probably fine.

The corbeau box concept is the best idea I think, but like I had said welding another one up a little smaller would be the "perfect" solution. This bracket does hang over the edge in the back maybe an inch, which wouldn't ever be seen anyway since it's completely under the seat. I figured it would make the base stronger by increasing the footprint a bit. I like the seat w-a-y back.

Hopefully the "next guy" that does this swap comes up with the perfect solution.

:)
 
I don't think there is a perfect solution really unless someone stumbles on a completely universal adjustable bracket or exhausts a massive junk yard search until they stumble on a set that matches the fiero on the base and the stang on the floor. Until then it's cobble up time.

Man, I worked those rivets with my air cut off tool and got no where. I can't believe they were that easy for you.

I'm getting back to my interior this weekend, post pics when it's all done.
 
I drilled the rivets out with a drill, it only took about 5min per rivet with a cordless drill and two sizes of drill bits. The metal is not too hard. My tracks hang over some in the rear when the seat is back but at that point I can not reach the pedals and am 5'11". I liked the stock tracks and they are easy to modify.
 
Just as an update, I finally got around to putting the interior back together on my car so here's a few shots of the seats installed. They fit like a glove and you pick up some much needed room between the steering wheel and your thighs.

Interior_006.sized.jpg


Interior_005.sized.jpg
 
Are there different types of Fiero seats that have the speakers in them? In this thread I see a couple that look slightly different. I like Pakrat's the most because the headrest appears to be separate (though it may not be). I've seen a few Fieros in the local wrecking yards, and the ones with the built-in speakers all look like the headrest is just a continuation of the seatback. Also, if you replace the speakers, how are you mounting them? The ones I've in junkyards aren't mounted to anything. The speakers are just floating in the foam.
 
If I recall correctly, the seats are all the same shape, they stopped putting speakers in the seats in 86'. So the 84-85 have speakers in the seats, and the last three years 86-88 do not.
 
That is all correct and the headrests are not seperate on any of them. They are built more like a Mach one high back seat than any of the stock seats with a raising headrest. Aside from only the first two years having the speakers in them the only other difference is that each year had different seat cover patterns, material options and colors. The speakers do just float BTW in the foam which is why they can be easily added to a later seat.

The kit car community does like I did but almost every hot rodder that uses these seats actually chops off the headrest and has a custom cover made for it (as opposed to say a factory fit one like Mr. Mikes). So basically they make it appear to look like a stock bucket only with better bolstering on the sides. They all use this seat simply because aside from it being comfortable it just happens to be narrow enough to fit almost any old confined floor pan design. I was mainly interested in the speaker function for my application but if you wanted I see no reason why you couldn't chop the top of like the hot rodders do, custom skin it and then add a stock adjustable head rest and make it your own variant.

I can attach some pictures of chopped ones if you want for reference, one of them is even on a riddler award winner.
 
I ordered my seat upholstery!

I'm bringing this thread back from the past. I finally finished my supercharged 349 so I am going to do the interior next. I called Mr.Mike's today and ordered my upholstery. I did the 88's in black. I'm having the speakers punched out and the seat belt slots cut in. I can't wait to finally have nice seats since I sold my factory seats this last winter. I've been driving around with one 73 high back:D . Any tips?​