
You are using an out of date browser. It may not display this or other websites correctly.
You should upgrade or use an alternative browser.
You should upgrade or use an alternative browser.
HELP no spark off coil!!
- Thread starter Teal_Deal
- Start date
-
Sponsors (?)
robert fugate
Active Member
Ok news update. so i did some more readings on my tps, and blk/w ohm reading with key off is 5.69. now ive moved the battery to my trunk so i cant get a negative lead straight from that but i went to motor. also pulled a wire straight from there and same reading. Ok now my volts from orange to blk/w was .15v but from orange to motor was 9.67. now my volts from blk/w to green was .13v. but from motor to green was 9.98v. i also did the blk/w to green and move the throttle and there was only a .8v change at wot.
Now obviously it seems theres a ground issue here. Ive check all the grounds i could find. Also my haynes manual says pin #20,40,60,49 are all grounds. So i did a ohm reading from them to my eec ground and 2,49 was .02 ohm. pin 40 and 60 are showing 47.5 ohm.. Can i just jump all these together for 1 known good ground. This tps issue would have to be the reason my injectors arnt firing since its reading so high?
Grounds
Revised 04-Oct-2012 to revise computer ground description into one paragraph
Grounds are important to any electrical system, and especially to computer controlled engines. In an automobile, the ground is the return path for power to get back to the alternator and battery.
1.) The main power ground is from engine block to battery: it is the power ground for the starter & alternator.
2.) The secondary power ground is between the back of the intake manifold and the driver's side firewall. It is often missing or loose. It supplies ground for the alternator, A/C compressor clutch and other electrical accessories such as the gauges.
Any car that has a 3G or high output current alternator needs a 4 gauge ground wire running from the block to the chassis ground where the battery pigtail ground connects. The 3G has a 130 amp capacity, so you wire the power side with 4 gauge wire. It stands to reason that the ground side handles just as much current, so it needs to be 4 gauge too.
The picture shows the common ground point for the battery , computer, & extra 3G alternator ground wire as described above in paragraph 2. A screwdriver points to the bolt that is the common ground point.
The battery common ground is a 10 gauge pigtail with the computer ground attached to it.
Picture courtesy timewarped1972

Correct negative battery ground cable.

3.) The computer's main power ground (the one that comes from the battery ground wire) uses pins 40 & 60 for all the things it controls internally: it comes off the ground pigtail on the battery ground wire. Due to its proximity to the battery, it may become corroded by acid fumes from the battery.
In 86-90 model cars, it is a black cylinder about 2 1/2" long by 1" diameter with a black/lt green wire.
In 91-95 model cars it is a black cylinder about 2 1/2" long by 1" diameter with a black/white wire.
You'll find it up next to the starter solenoid where the wire goes into the wiring harness.
4.) All the sensors have a common separate signal ground. This includes the TPS, ACT, EGR, BAP, & VSS sensors.
5.) The O2 sensor heaters have their own ground (HEGO ground) coming from the computer. This is different and separate from the O2 sensor ground. It is an orange wire with a ring terminal on it. It is located in the fuel injector wiring harness and comes out under the throttle body. It gets connected to a manifold or bolt on back of the cylinder head.
6.) The TFI module has 2 grounds: one for the foil shield around the wires and another for the module itself. The TFI module ground terminates inside the computer.
7.) The computer takes the shield ground for the TFI module and runs it from pin 20 to the chassis near the computer.
See http://assets.fluke.com/appnotes/automotive/beatbook.pdf for help for help troubleshooting voltage drops across connections and components. Be sure to have the maximum load on a circuit when testing voltage drops across connections. As current across a defective or weak connection, increases so does the voltage drop. A circuit or connection may check out good with no load or minimal load, but show up bad under maximum load conditions. .
Extra grounds are like the reserve parachute for a sky diver. If the main one fails, there is always your reserve.
The best plan is to have all the grounds meet at one central spot and connect together there. That eliminates any voltage drops from grounds connected at different places. A voltage drop between the computer ground and the alternator power ground will effectively reduce the voltage available to the computer by the amount of the drop.
Rear mounted battery ground wiring. Follow this plan and you will have zero
ground problems.
One 1 gauge or 1/0 gauge wire from battery negative post to a clean shiny spot
on the chassis near the battery. Use a 5/16” bolt and bolt it down to make the
rear ground. Use a 1 gauge or 1/0 gauge wire from the rear ground bolt to a clean
shiny spot on the block.
One 4 gauge wire from the block where you connected the battery ground wire to
the chassis ground where the battery was mounted up front. Use a 5/16” bolt
and bolt down the 4 gauge engine to chassis ground, make sure that it the metal
around the bolt is clean & shiny. This is the alternator power ground.
The computer has a dedicated power ground wire with a cylindrical quick connect
(about 2 ½”long by 1” diameter. It comes out of the wiring harness near the
ignition coil & starter solenoid (or relay). Be sure to bolt it to the chassis ground
in the same place as you bolted the alternator power ground. This is an
absolute don’t overlook it item for EFI cars
Note: The quick disconnect may have fallen victim to damage or removal by
a previous owner. However, it is still of utmost importance that the black/green
wires have a high quality ground..
Picture courtesy timewarped1972

Crimp or even better, solder the lugs on the all the wire. The local auto stereo
shop will have them if the auto parts store doesn't. Use some heat shrink tubing
to cover the lugs and make things look nice.[/quote]
robert fugate
Active Member
Your great jrichker! b4 i read this grounding post though i split the ground from the tps sensor to a new good ground, and BAM! car starts! rough as hell as i have so many new parts to work on, and get my timing set. But i ran out of light so another day tomorrow!
Mike86Stang
Advanced Member
Your great jrichker! b4 i read this grounding post though i split the ground from the tps sensor to a new good ground, and BAM! car starts! rough as hell as i have so many new parts to work on, and get my timing set. But i ran out of light so another day tomorrow!
I had that problem before.. one of your EEC grounds are bad (should be 2 or 3 if i remember correctly ). Double check your grounds, i'm sure one is bad.
@Mike86Stang
There are two ground wires for the computer wired together in parallel to a black plastic quick connector. At the quick connector they become one ground wire that connects to body ground as shown in the picture of the battery.
The other ground is internal to the computer and is the signal ground for all the engine mounted sensors. Here's how to check it.
The 86-93 are the same wiring, but the wiring colors are different.
Troubleshooting loss of signal ground
Revised 21-Aug-2013 to rewrite the MAP/Baro testing of the signal ground and moving the testing the computer’s internal signal ground test procedure to the last place.
1.) The computer pin 46 signal ground is a critical component: it provides ground for the
Map/Baro, TPS, ECT, EGR position sensor and ACT. Signal ground is used in many circuits that have analog inputs to isolate the electrical noise. It is always separate from power ground, although both may have a common connection origination point. Signal ground usually has some conditioning that reduces the electrical noise to prevent false readings. The black/white wire (pin 46) is signal ground for the computer. It provides a dedicated ground for the EGR, Baro, ACT, ECT, & TPS sensors as well as the ground to put the computer into self test mode. If this ground is bad, none of the sensors mentioned will work properly. That will severely affect the car's performance. You will have hard starting, low power and drivability problems. What sometimes happens is that the test connector black/white wire gets jumpered to power which either burns up the wiring or burns the trace off the pc board inside the computer. That trace connects pins 46 to pins 40 & 60.
2.) Troubleshooting signal ground problems:
Note that all resistance tests must be done with power off. Measuring resistance with a circuit powered on will give false readings and possibly damage the meter. That means disconnecting the battery positive cable since there is always some current draw due to the computer and radio circuits.[/b]
A.) With the power off, measure the resistance between the computer test ground
(black/white wire) on the self test connector and battery ground. You should see less than 1.5 ohms.

B.) MAP/Baro circuit: check the resistance between the black/white wire on the MAP/Baro sensor and the negative battery cable. It should be less than 1.5 ohms. If it isn’t you can figure that you have serious problems with the wiring for the computer or the computer’s internal signal ground. Check the resistance between the black/white wire on the MAP/Baro sensor and then the black/white wire on the EGR and the same wire on the TPS. Repeat the process with the black/white wire on the ACT & ECT sensors and the MAP/Baro sensor black/white wire It should be less than 1 ohms. Higher resistance than 1 ohms indicates a problem with the 10 pin connector or the splice inside the main harness where the wire from the 10 pin connectors joins the rest of the black/white wire
C.) Engine mounted sensor circuit: Check the resistance between the black/white wire on the TPS and battery ground. It should be less than 1.5 ohms. Higher resistance than 1.5 ohms indicates a problem with the 10 pin connector or the splice inside the main harness where the wire from the 10 pin connectors joins the rest of the black/white wire.
Repeat the process for the ACT and ECT sensors. Your results should have the same specifications.

See the graphic for the location of the 10 pin connectors:
Diagram courtesy of Tmoss & Stang&2birds
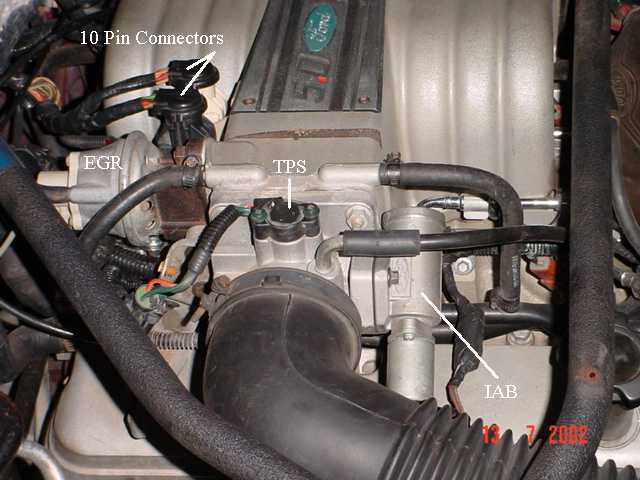
See the graphic for the 10 pin connector circuit layout.

The injector power pin is the VPWR pin in the black 10 pin connector.
3.) Testing the computer's internal signal ground:
Remove the passenger side kick panel and disconnect the computer connector. There is a 10 MM bolt that holds it in place. Measure the resistance between the black/white wire and pin 46 on the computer wiring connector: it should be less than 1.5 ohms. More that 1.5 ohms is a wiring problem. If it reads 1.5 ohms or less, then the computer is suspect. On the computer, measure the resistance between pin 46 and pins 40 & 60: it should be less than 1.5 ohms. More than that and the computer’s internal ground has failed, and the computer needs to be repaired or replaced.
See Computer issue? | Mustang Forums at StangNet for Joel5.0’s fix to the computer internal signal ground.
If the ground for the TPS goes bad, the TPS output voltage increases and the idle speed may fluctuate..

Your great jrichker! b4 i read this grounding post though i split the ground from the tps sensor to a new good ground, and BAM! car starts! rough as hell as i have so many new parts to work on, and get my timing set. But i ran out of light so another day tomorrow!
There are two ground wires for the computer wired together in parallel to a black plastic quick connector. At the quick connector they become one ground wire that connects to body ground as shown in the picture of the battery.
The other ground is internal to the computer and is the signal ground for all the engine mounted sensors. Here's how to check it.
The 86-93 are the same wiring, but the wiring colors are different.
Troubleshooting loss of signal ground
Revised 21-Aug-2013 to rewrite the MAP/Baro testing of the signal ground and moving the testing the computer’s internal signal ground test procedure to the last place.
1.) The computer pin 46 signal ground is a critical component: it provides ground for the
Map/Baro, TPS, ECT, EGR position sensor and ACT. Signal ground is used in many circuits that have analog inputs to isolate the electrical noise. It is always separate from power ground, although both may have a common connection origination point. Signal ground usually has some conditioning that reduces the electrical noise to prevent false readings. The black/white wire (pin 46) is signal ground for the computer. It provides a dedicated ground for the EGR, Baro, ACT, ECT, & TPS sensors as well as the ground to put the computer into self test mode. If this ground is bad, none of the sensors mentioned will work properly. That will severely affect the car's performance. You will have hard starting, low power and drivability problems. What sometimes happens is that the test connector black/white wire gets jumpered to power which either burns up the wiring or burns the trace off the pc board inside the computer. That trace connects pins 46 to pins 40 & 60.
2.) Troubleshooting signal ground problems:
Note that all resistance tests must be done with power off. Measuring resistance with a circuit powered on will give false readings and possibly damage the meter. That means disconnecting the battery positive cable since there is always some current draw due to the computer and radio circuits.[/b]
A.) With the power off, measure the resistance between the computer test ground
(black/white wire) on the self test connector and battery ground. You should see less than 1.5 ohms.
B.) MAP/Baro circuit: check the resistance between the black/white wire on the MAP/Baro sensor and the negative battery cable. It should be less than 1.5 ohms. If it isn’t you can figure that you have serious problems with the wiring for the computer or the computer’s internal signal ground. Check the resistance between the black/white wire on the MAP/Baro sensor and then the black/white wire on the EGR and the same wire on the TPS. Repeat the process with the black/white wire on the ACT & ECT sensors and the MAP/Baro sensor black/white wire It should be less than 1 ohms. Higher resistance than 1 ohms indicates a problem with the 10 pin connector or the splice inside the main harness where the wire from the 10 pin connectors joins the rest of the black/white wire
C.) Engine mounted sensor circuit: Check the resistance between the black/white wire on the TPS and battery ground. It should be less than 1.5 ohms. Higher resistance than 1.5 ohms indicates a problem with the 10 pin connector or the splice inside the main harness where the wire from the 10 pin connectors joins the rest of the black/white wire.
Repeat the process for the ACT and ECT sensors. Your results should have the same specifications.
See the graphic for the location of the 10 pin connectors:
Diagram courtesy of Tmoss & Stang&2birds
See the graphic for the 10 pin connector circuit layout.
The injector power pin is the VPWR pin in the black 10 pin connector.
3.) Testing the computer's internal signal ground:
Remove the passenger side kick panel and disconnect the computer connector. There is a 10 MM bolt that holds it in place. Measure the resistance between the black/white wire and pin 46 on the computer wiring connector: it should be less than 1.5 ohms. More that 1.5 ohms is a wiring problem. If it reads 1.5 ohms or less, then the computer is suspect. On the computer, measure the resistance between pin 46 and pins 40 & 60: it should be less than 1.5 ohms. More than that and the computer’s internal ground has failed, and the computer needs to be repaired or replaced.
See Computer issue? | Mustang Forums at StangNet for Joel5.0’s fix to the computer internal signal ground.
If the ground for the TPS goes bad, the TPS output voltage increases and the idle speed may fluctuate..
Similar threads
- Replies
- 14
- Views
- 1K
- Replies
- 4
- Views
- 378
- Replies
- 13
- Views
- 987
- Replies
- 22
- Views
- 1K
- Replies
- 25
- Views
- 2K