
You are using an out of date browser. It may not display this or other websites correctly.
You should upgrade or use an alternative browser.
You should upgrade or use an alternative browser.
Engine When All Tests Done, What Next?
- Thread starter globaltefl
- Start date
-
Sponsors (?)
Now I am suspecting the TFI. The tach jumps up and down and misses like crazy esp on acceleration.
I have a new Mallory dizzy and of course TFI. It's black if that means anything. But I also have replacement headers and suspect that the temperature get hotter than normal. I don't suppose it takes long to affect the TFI.
Does anyone know anything about the McCully TFI relocation kit?
I have a new Mallory dizzy and of course TFI. It's black if that means anything. But I also have replacement headers and suspect that the temperature get hotter than normal. I don't suppose it takes long to affect the TFI.
Does anyone know anything about the McCully TFI relocation kit?
I did another test on the TPS. it had checked out fine some time ago, but now it is reading something
crazy on the orange wire around 73 volts. On the green wire it starts at high voltage and increases as I
open the throttle but way out of line. The black wire reads 1.9 oms, so that seems fine.
So I bought a new TPS and the same thing. Orange wire reads 73 volts. So what gives. must be in
the wiring. now can I test that?
I did another test on the TPS. it had checked out fine some time ago, but now it is reading something
crazy on the orange wire around 73 volts. On the green wire it starts at high voltage and increases as I
open the throttle but way out of line. The black wire reads 1.9 oms, so that seems fine.
So I bought a new TPS and the same thing. Orange wire reads 73 volts. So what gives. must be in
the wiring. now can I test that?
If you are rearing 73 volts, you must have the meter set on the wrong range or are reading it incorrectly. A reading of .73 would be more in line with the expected results.
Setting the TPS at .98 volt is a Bozo Internet Myth. When the computer powers up and initializes the TPS sensor, whatever it reads is the zero starting point for it. In other words your .98 volt becomes 0 volts and the computer watches for increases in voltage from that point upward.
Setting the TPS: you'll need a good Digital Voltmeter (DVM) to do the job. Set the TPS voltage at .5- 1.1 range. Because of the variables involved with the tolerances of both computer and DVM, I would shoot for somewhere between .6 and 1.0 volts. Unless you have a Fluke or other high grade DVM, the second digit past the decimal point on cheap DVM’s is probably fantasy. Since the computer zeros out the TPS voltage every time it powers up, playing with the settings isn't an effective aid to performance or drivability. The main purpose of checking the TPS is to make sure it isn't way out of range and causing problems.
Wire colors & functions:
Orange/white = 5 volt VREF from the computer
Dark Green/lt green = TPS output to computer
Black/white = Signal ground from computer
TPS troubleshooting steps:
1.) Use the Orange/white & Black white wires to verify the TPS has the correct 5 volts source from the computer.
2.) Use the Dark Green/lt green & Black/white wires to set the TPS base voltage. Try this... All you need is less than 1.0 volt at idle and more than 4.25 at Wide Open Throttle (WOT). You'll need a voltmeter with a 1 or 3 volt low scale to do the job.
The Orange/White wire is the VREF 5 volts from the computer. You use the Dark Green/Lt green wire (TPS signal) and the Black/White wire (TPS ground) to set the TPS. Use a pair of safety pins to probe the TPS connector from the rear of the connector. You may find it a little difficult to make a good connection, but keep trying. Put the safety pins in the Dark Green/Lt green wire and Black/White wire. Make sure the ignition switch is in the Run position but the engine isn't running. Set the voltmeter on the 2 volt range if it doesn’t auto range.
Here’s a TPS tip I got from NoGo50
When you installed the sensor make sure you place it on the peg right and then tighten it down properly. Loosen the back screw a tiny bit so the sensor can pivot and loosen the front screw enough so you can move it just a little in very small increments. I wouldn’t try to adjust it using marks.
(copied from MustangMax, Glendale AZ)
A.) Always adjust the TPS and Idle with the engine at operating temp. Dive it around for a bit if you can and get it nice and warm.
B.) When you probe the leads of the TPS, do not use an engine ground, put the ground probe into the lead of the TPS. You should be connecting both meter probes to the TPS and not one to the TPS and the other to ground.
C.) Always reset the computer whenever you adjust the TPS or clean/change any sensors. I just pull the battery lead for 10 minutes.
D.) The key is to adjust the TPS voltage and reset the computer whenever the idle screw is changed.
The TPS is a variable resistor, must like the volume control knob on a cheap radio. We have all heard them crackle and pop when the volume is adjusted. The TPS sensor has the same problem: wear on the resistor element makes places that create electrical noise. This electrical noise confuses the computer, because it expects to see a smooth increase or decrease as the throttle is opened or closed.
TPS testing: most of the time a failed TPS will set code 23 or 63, but not always. Use either an analog meter or a DVM with an analog bar graph and connect the leads as instructed above. Turn the ignition switch to the Run position, but do not start the engine. Note the voltage with the throttle closed. Slowly open the throttle and watch the voltage increase smoothly, slowly close the throttle and watch the voltage decrease smoothly. If the voltage jumps around and isn’t smooth, the TPS has some worn places in the resistor element. When the throttle is closed, make sure that the voltage is the same as what it was when you started. If it varies more than 10%, the TPS is suspect of being worn in the idle range of its travel.
TPS will not go below 1 volt
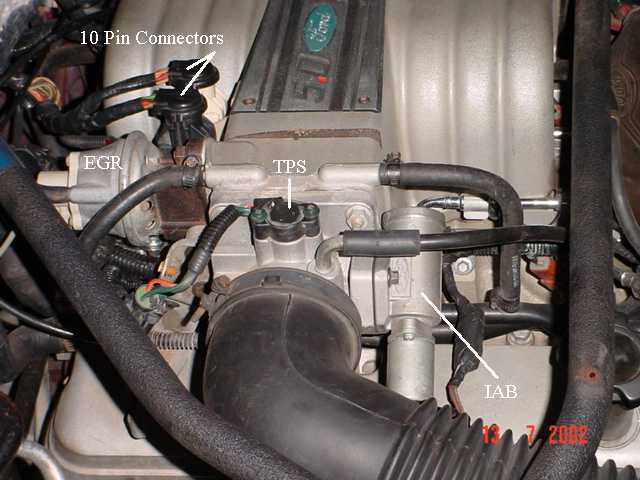
Engine mounted sensor circuit: Check the resistance between the black/white wire on the TPS and battery ground. It should be less than 1.5 ohms. Higher resistance than 1.5 ohms indicates a problem with the 10 pin connector, computer or the splice inside the main harness where the wire from the 10 pin connectors joins the rest of the black/white wire.
See the graphic for the location of the 10 pin connectors:
Diagram courtesy of Tmoss & Stang&2birds
See the graphic for the 10 pin connector circuit layout.
Unplug the white 10 pin connector to do some resistance testing. It is good time to clean the connector pins and examine the connector for corrosion, broken wire or other damage. See http://oldfuelinjection.com/?p=85 for help in this department.
If the resistance on the TPS Black/White wire and pin 1 of the white engine fuel injector harness 10 pin connector, is more than 1.0 ohm, you have bad connection or broken wiring. Repeat the test using the pin 1 of the white body side 10 pin connector and battery ground. You should have less that 1.5 ohm. More than that is a damaged signal ground inside the computer or bad connections or wiring.
Wow--duh. The key does have to be on. Sorry for the waste of your time. The TPS is fine, but I still now have the question about the TFI. Would the TFI have similar driveability issues? Missing, idling rough, tach jumping around, etc.?
My question now is, does a leak coming from the distributor housing constitute a vacuum leak. And would it set of the 41 and 91 codes?

It's great to have this comparison. I have both versions. Here is my question now. I am using the original Motorcraft TFI and have relocated it on the passenger side in a Cougar heat sink. I did a smoke test (several actually) and eliminated some major intake leaks in the front of the lower manifold. I also had a leak in of the headers--loose bolt. All taken care of. It's starts fine, but then wants to die. I give some gas and will keep going but with rough idle. I warm it up and it may or may not run really well. When operating temp, if it is running crappy I turn off the key and restart while coasting and then it runs great again. It seems there is a connection between the computer resetting something. Could be the TFI? I still get the 41 and 91 codes, and 21 until warm. I did check the ECT and it is fine.
It's great to have this comparison. I have both versions. Here is my question now. I am using the original Motorcraft TFI and have relocated it on the passenger side in a Cougar heat sink. I did a smoke test (several actually) and eliminated some major intake leaks in the front of the lower manifold. I also had a leak in of the headers--loose bolt. All taken care of. It's starts fine, but then wants to die. I give some gas and will keep going but with rough idle. I warm it up and it may or may not run really well. When operating temp, if it is running crappy I turn off the key and restart while coasting and then it runs great again. It seems there is a connection between the computer resetting something. Could be the TFI? I still get the 41 and 91 codes, and 21 until warm. I did check the ECT and it is fine.
Have you replaced the O2 sensors or tested them for proper operation?
Code 41 or 91 Three digit code 172 or 176 - O2 sensor indicates system lean. Look for a vacuum leak or failing O2 sensor.
Revised 20-Nov-2011 to include computer pin numbers for O2 sensor wiring for resistance checks
Code 41 is a RH side sensor,
Code 91 is the LH side sensor.
Code 172 is the RH side sensor
Code 176 is the LH side sensor
The computer sees a lean mixture signal coming from the O2 sensors and tries to compensate by adding more fuel. Many times the end result is an engine that runs pig rich and stinks of unburned fuel.
The following is a Quote from Charles O. Probst, Ford fuel Injection & Electronic Engine control:
"When the mixture is lean, the exhaust gas has oxygen, about the same amount as the ambient air. So the sensor will generate less than 400 Millivolts. Remember lean = less voltage.
When the mixture is rich, there's less oxygen in the exhaust than in the ambient air , so voltage is generated between the two sides of the tip. The voltage is greater than 600 millivolts. Remember rich = more voltage.
Here's a tip: the newer the sensor, the more the voltage changes, swinging from as low as 0.1 volt to as much as 0.9 volt. As an oxygen sensor ages, the voltage changes get smaller and slower - the voltage change lags behind the change in exhaust gas oxygen.
Because the oxygen sensor generates its own voltage, never apply voltage and never measure resistance of the sensor circuit. To measure voltage signals, use an analog voltmeter with a high input impedance, at least 10 megohms. Remember, a digital voltmeter will average a changing voltage." End Quote
Testing the O2 sensors 87-93 5.0 Mustangs
Measuring the O2 sensor voltage at the computer will give you a good idea of how well they are working. You'll have to pull the passenger side kick panel off to gain access to the computer connector. Remove the plastic wiring cover to get to the back side of the wiring. Use a safety pin or paper clip to probe the connections from the rear.
Disconnect the O2 sensor from the harness and use the body side O2 sensor harness as the starting point for testing. Do not measure the resistance of the O2 sensor , you may damage it. Resistance measurements for the O2 sensor harness are made with one meter lead on the O2 sensor harness and the other meter lead on the computer wire or pin for the O2 sensor.
Backside view of the computer wiring connector:
87-90 5.0 Mustangs:
Computer pin 43 Dark blue/Lt green – LH O2 sensor
Computer pin 29 Dark Green/Pink – RH O2 sensor
The computer pins are 29 (LH O2 with a dark green/pink wire) and 43 (RH O2 with a dark blue/pink wire). Use the ground next to the computer to ground the voltmeter. The O2 sensor voltage should switch between .2-.9 volt at idle.
91-93 5.0 Mustangs:
Computer pin 43 Red/Black – LH O2 sensor
Computer pin 29 Gray/Lt blue – RH O2 sensor
The computer pins are 29 (LH O2 with a Gray/Lt blue wire) and 43 (RH O2 with a Red/Black wire). Use the ground next to the computer to ground the voltmeter. The O2 sensor voltage should switch between .2-.9 volt at idle.
Testing the O2 sensors 94-95 5.0 Mustangs
Measuring the O2 sensor voltage at the computer will give you a good idea of how well they are working. You'll have to pull the passenger side kick panel off to gain access to the computer connector. Remove the plastic wiring cover to get to the back side of the wiring. Use a safety pin or paper clip to probe the connections from the rear. The computer pins are 29 (LH O2 with a red/black wire) and 27 (RH O2 with a gray/lt blue wire). Use pin 32 (gray/red wire) to ground the voltmeter. The O2 sensor voltage should switch between .2-.9 volt at idle.
Note that all resistance tests must be done with power off. Measuring resistance with a circuit powered on will give false readings and possibly damage the meter. Do not attempt to measure the resistance of the O2 sensors, it may damage them.
Testing the O2 sensor wiring harness
Most of the common multimeters have a resistance scale. Be sure the O2 sensors are disconnected and measure the resistance from the O2 sensor body harness to the pins on the computer. Using the Low Ohms range (usually 200 Ohms) you should see less than 1.5 Ohms.
87-90 5.0 Mustangs:
Computer pin 43 Dark blue/Lt green – LH O2 sensor
Computer pin 29 Dark Green/Pink – RH O2 sensor
Disconnect the connector from the O2 sensor and measure the resistance:
From the Dark blue/Lt green wire in the LH O2 sensor harness and the Dark blue/Lt green wire on the computer pin 43
From the Dark Green/Pink wire on the RH Os sensor harness and the Dark Green/Pink wire on the computer pin 43
91-93 5.0 Mustangs:
Computer pin 43 Red/Black – LH O2 sensor
Computer pin 29 Gray/Lt blue – RH O2 sensor
Disconnect the connector from the O2 sensor and measure the resistance:
From the Red/Black wire in the LH O2 sensor harness and the Red/Black wire on the computer pin 43
From the Dark Green/Pink Gray/Lt blue wire on the RH Os sensor harness and the Gray/Lt blue wire on the computer pin 29
94-95 5.0 Mustangs:
Computer pin 29 Red/Black – LH O2 sensor
Computer pin 27 Gray/Lt blue – RH O2 sensor
From the Red/Black wire in the LH O2 sensor harness and the Red/Black wire on the computer pin 29
From the Dark Green/Pink Gray/Lt blue wire on the RH Os sensor harness and the Gray/Lt blue wire on the computer pin 27
There is a connector between the body harness and the O2 sensor harness. Make sure the connectors are mated together, the contacts and wiring are not damaged and the contacts are clean and not coated with oil.
The O2 sensor ground (orange wire with a ring terminal on it) is in the wiring harness for the fuel injection wiring. I grounded mine to one of the intake manifold bolts
Make sure you have the proper 3 wire O2 sensors. Only the 4 cylinder cars used a 4 wire sensor, which is not compatible with the V8 wiring harness.
Replace the O2 sensors in pairs if replacement is indicated. If one is weak or bad, the other one probably isn't far behind.
If you get only code 41 and have changed the sensor, look for vacuum leaks. This is especially true if you are having idle problems. The small plastic tubing is very brittle after many years of the heating it receives. Replace the tubing and check the PVC and the hoses connected to it.
A secondary problem with only a code 41 is for cars with an intact smog pump and cats. If the tube on the back of the heads clogs up the driver’s side, all the air from the smog pump gets dumped into one side. This excess air upsets the O2 sensor calibration and can set a false code 41. The cure is to remove the crossover tube and thoroughly clean the insides so that there is no carbon blocking the free flow of air to both heads.
I did replace the 02 sensors. I also tested the old ones out of the car with torch process measuring the voltage change and they checked out okay. Would both go out at the same time? Also what would cause it to run bad then good?
Check the O2 Sensor voltages at the computer. Then check the O2 sensor wiring resistances form the O2 sensor harness to the computer. The instructions are in my Code 41/91 post above.
I checked the ohms on the two wires--pins 43 and 29 at the computer and harness. They test at .3 max ohms.
But when I checked the voltage while idling--grounding the meter to the body and clipping the other end to a safety
pin stuck through wires at the two pin numbers (separately, of course), the voltage just goes crazy, jumping all over the place.
What is this about?
This is what is written above: 87-90 5.0 Mustangs:
Computer pin 43 Dark blue/Lt green – LH O2 sensor
Computer pin 29 Dark Green/Pink – RH O2 sensor
The computer pins are 29 (LH O2 with a dark green/pink wire) and 43 (RH O2 with a dark blue/pink wire). Use the ground next to the computer to ground the voltmeter. The O2 sensor voltage should switch between .2-.9 volt at idle.9
Shouldn't it be 29 right and 43 left?
I found a very interesting phenomena. When I move the computer around--thus the wires--, the engine runs differently--from really good to stalling. A visual of the wires and connections doesn't come up with anything. I did some continuity testing--43 and 29 pins to O2 sensors, the ETC and the mass air sensor--and seemed to check out, though I still get 41 and 91 codes. Another interesting thing, when it is running lousy, but running, there is a whistling sound from the area of under the thermostat housing. I did a smoke test and found no vacuum leaks. When it runs good, the whistle disappears. Any idea what would cause this swing in behavior? or how to proceed?
gearheadboy
15 Year Member
Can you manipulate each individual wire at the computer slowly until you isolate the bad one? Check the pin tension on each pin/terminal. One may be spread open a bit causing an intermittent issue.
Yes, and I believe that the culprit is the 46 ground pin and/or wire. Now, how to fix it. How can I change the pin--that is, where the wire enters? I figure I can cut the wire and solder in a new piece, but I don't know how to get it out of the pin.
Here's what you are looking for:
http://oldfuelinjection.com/?p=74 It tells how to take the computer wiring connector apart.
Here's the source for replacement pins. http://www.rjminjectiontech.com/collections/ford-terminals and
http://www.rjminjectiontech.com/collections/ford-terminals/products/terminal-eec4
A diagram to show the wire side of the computer connector...
gearheadboy
15 Year Member
Ya what he said. You will have to take the connector apart carefully and replace or repair the terminal. I used to fix harnesses all the time but they were on um..GM cars. I have all the tools but not sure where you will get the terminal if you need one. Dealers are crappy when it comes to helping with these over the counter. If you talk to a tech maybe or find a harness with a good terminal and cut off the terminal and a length of wire and just solder it in. Not my preferred method but without being able to touch it myself that may be easiest for you.
Great advice and thank you for the link to the connector. Since I think I have isolated the wire culprit I will try to fix that one first. If that doesn't work then maybe a complete pin replacement is in order. Thanks. ")
I do have a further question. When I remove the red "cap" will the pins just fall out? I don't want to suddenly have all the wires and pins come out and then have to figure out where they all go.
gearheadboy
15 Year Member
Not generally. The terminal will have a metal tab on each one you have to push to release it, or the plastic part of the connector will have a tab that needs to be pushed or pulled to release each one. Just be careful as sometimes on or more will back out without the button being pushed. Better check with jrichker as he has more FOMOCO experience than I but that is how all I've ever seen have worked. P.S. sometimes the terminal isn't loose fitting, sometimes the metal part of the wire is broken inside its coating. So the wire insulation is all that is holding it together. If this is the case it will stretch like a rubber band when you pull on it.
Similar threads
- Replies
- 1
- Views
- 253
- Replies
- 4
- Views
- 1K
- Replies
- 21
- Views
- 3K
- Replies
- 20
- Views
- 5K