
hey folks I would like to share an interesting dilemma I am having with this 1992 LX coupe I bought a few weeks ago. its a 5.0 but was a four banger according to the vin and other than a little idle surge and a bit of bad fuel economy it runs well. a project it seems it has become due to certain things that don't add up. At first glance it looks like a maf equipped engine but the engine harness is routed wrong in some places and I found a MAP sensor on the drivers side firewall with vacuum hose attached to intake. O2's were non existent. I had my muffler guy weld a couple of bungs and found the sensor plugs and plugged in a pair of old O2's on. hooked up an OTC scan tools to pull some codes and received a few but being OBD1 could not view O2 values. heres the kicker, when I took the ecm down from the PS kick panel I find the computer is not an 9AP (mines auto) its a VM1 speed density EEC-IV computer. I check the plug that's plugged into the MAF and its intergrated to the harness that routes through the firewall. Now at this point I don't know if its running speed density or MAF which by what little I know the pinouts are different on both. any thoughts??? Ohh it has no electronic vacuum regulator for the EGR which I also noticed.
You are using an out of date browser. It may not display this or other websites correctly.
You should upgrade or use an alternative browser.
You should upgrade or use an alternative browser.
interesting dilema.
- Thread starter limegold92
- Start date
-
Sponsors (?)
It sounds like a botched conversion. If it's a speed density computer then you're running speed density. SD ECU's haven't the slightest idea what to do with input from a maf. Though, obd1 won't report 02 sensor values, it WILL throw a code for sensor out of range (high or low).
Were I in your situation, I would go through the wiring and revert the harness to SD. Once complete, ensure that that there's nothing plugged into the back of the ECU and pull codes again. If no codes, then disconnect the 02 sensors and see if you codes for those sensors. If you do get codes then plug them back in and press on with pride.
Try and do KOER and cylinder balance test.
Post up the part number from the EEC when you have the chance.
EEC-iv vm1
sfi-sd1 e6sf-12a650-mib
Performed cylinder balance test with OTC nemesis scan tool and test timed out every time with no results.
sfi-sd1 e6sf-12a650-mib
Performed cylinder balance test with OTC nemesis scan tool and test timed out every time with no results.
When you say obd1 won't read o2 sensors value (voltage range)' do you mean on vm1 ecm's? Can the value be picked up through the pin outs on the back of the ECM?
EEC-iv vm1
sfi-sd1 e6sf-12a650-mib
Performed cylinder balance test with OTC nemesis scan tool and test timed out every time with no results.
That's not good. You should get a code 11 if it's checking out good.
When you say obd1 won't read o2 sensors value (voltage range)' do you mean on vm1 ecm's? Can the value be picked up through the pin outs on the back of the ECM?
Yes, you could read the values with a DVM but I don't see a point in doing that. On a narrow band sensor, it's either in range or it's not. That's really all that the EEC is concerned with. When out of range, either the sensor is bad (can be determined with an ohm check) or the car has a rich/lean condition.
So you're not getting codes of any kind on KOEO or KOER tests, correct? Not a code 11 or any other?
81 Air diverter - nobody cares
85 canister purge solenoid - nobody cares
87 fuel pump primary circuit fault - I would track this one down
82 air diverter again - nobody cares
84 EGR - probably disabled nobody cares
21 Cooling temp sensor - trace this one down
41 No HO2s switching detected - Either your 02 sensors are not connected properly, wired to the wrong terminals, or flat out bad. This needs to be traced down.
91 HEGO sensor voltage low or system lean - Again... this needs to be fixed
33 EGR sensor - Again... not required to run properly
EEC-iv vm1
sfi-sd1 e6sf-12a650-mib
Performed cylinder balance test with OTC nemesis scan tool and test timed out every time with no results.
That is definitely a Speed Density EEC. So you can disconnect the MAF for the time being. It's not being used. IT sounds as if someone maybe converted to mass air at some point then put an SD computer back in it before selling it.
If that's the case then you have a couple of wires that are plugged into the wrong port (if they neglected to switch the wires back when they stuck the SD EEC back in the car)
The air diverter, canister purge, and EGR codes are all emissions codes. diverter and canister are of no use to you if you're not running OEM style two-way cats. EGR was probably removed and blocked. A visual check will confirm.
Somewhere around here (I'll find it and post the link here) there's a mass air conversion thread. With it, you can look to see what wires are swapped at the EEC (I don't remember which ones they are off the top of my head).
I'll locate and post the link here.
I'll locate and post the link here.
http://www.stangnet.com/tech/maf/massairconversion.html
You will need to undo these steps unless you purchase an A9L to put in place of that SD computer.
Stangnet MAF Conversion Tech Article said:4. THERMACTOR PUMP PIN MOVES
You will need to move the 2 signals for the thermactor pump to different locations in the EEC connector. The EEC pins are held in place by a hook shaped retainer that snaps into a groove in the EEC pin. To remove you must pry the hook back from the EEC side of the connector and either push on the pin or pull on the wire from the back. I used a paper clip and flattened one end but a small jewelers screwdriver would work also. The wire currently in position 51 tan/red needs to be moved to position 38. The wire currently in position 11 green/black must be moved to position 32. If there is not enough slack for this to reach the new location, you'll have to splice in some extra wire. Mine reached without doing this.
The next 2 steps some consider optional but will generate error codes in the EEC. Others have reported stalling problems without the VSS signals. In my opinion it's worth doing if only for piece of mind and no bogus error codes. In preparation for these signals, remove the driver's seat and the driver's side kick panel. There are 3 wires that will need to be added for these signals with EEC pins on one end. I suggest you tie them all together and route them as one cable over to the EEC on the passenger side. I took this opportunity to change the carpet at the same time so I had most of the interior out which made this fairly simple.
5. FUEL PUMP MONITOR SIGNAL
This signal called FPM2 is used to monitor the voltage going to the fuel pump. It will generate an error code in the EEC if it's not connected but "shouldn't" cause a problem. Splice into one of the 2 pink/black wires going to the relay located under the driver's seat and insert the other end into position 19 of the EEC connector. Refer to figure 1.

Figure 1 (Relay under driver's seat)
6. VEHICLE SPEED SENSOR SIGNALS
These signals are required for cruise control and as stated earlier, some have reported stalling problems on cars not equipped with cruise so avoid the head-ache and just do it. These will also generate an error code in the EEC if not installed. These signals come from a sensor that plugs into the transmission. The easiest place to tap into them is behind the driver's side kick panel. There is an 8 pin connector cable which runs back to the driver's seat, across the floor under the seat then back towards the front of the car and then goes through the transmission hump to the sensor. You will need to splice into the orange/yellow wire. The other end of this signal needs an EEC pin attached and this gets inserted into the EEC connector into position 6. You need to splice into the dark green/white wire for the other connection. The other end of this signal needs an EEC pin attached and this gets inserted into the EEC connector into position 3. Refer to figure 2.

Figure 2 (VSS signals behind driver's kick panel)
You will need to undo these steps unless you purchase an A9L to put in place of that SD computer.
Attachments


Hey noobz thanks a bunch and its been a while hence work doesn't share my love of this past time. anyways I have had a chance to get back on the coupe and ran into a no start issue recently and traced problem to EEC relay, (no 12 volts to injectors). it started and decided to attach scan tool and got this: KOER 23, 34, 41, 90 and 91. KOEO: 23, 34, 81, 85, 87, 82 and 84. on scan tool this time around searched codes as an 87 mustang 5.0 which is SD. code 90 according to OTC scan tool is cylinder balance test passed of which I performed during KOER and received code in KOEO. EGR valve is attached with vacuum capped. there is no electronic vacuum regulator so attaching idle vacuum to egr makes the engine stumble. Downloaded and printed MAF conversion procedure you recommended and will do that as soon as my stubborn old ass corrects these SD issues.
Code 87 means the fuel pump monitor wire wasn't hooked up during the maf conversion. The steps to fix its are in the maf conversion file.
http://www.stangnet.com/tech/maf/massairconversion.html
You will need to undo these steps unless you purchase an A9L to put in place of that SD computer.
Hello everyone back again and happy holidays to you guys.
Ok so busy busy this summer replacing front and rear suspention then work got in the way and now finally getting back to sorting the speed density issues I've had for quite a while.
Thus far I've done all the regular maintenance: plugs, wires, fuel filter and new O2's.
Also bought a used A9L ECM that came off of a running 91 hatch 5 speed that I haven't installed yet.
I also have a stock maff installed in my intake pipe but not connected.
Don't remember mentioning that my car is also automatic but I'm sure I did earlier in this thread last year.
So going over the info I posted regarding my car when I bought it, we are in agreement that it's a botched maff conversion.
My goal is to do this conversion correctly with the items needed of which I have.
Maff, A9L and maff harness that's been integrated or an actual 89-93 V8 harness installed.
I haven't checked for codes yet but will post new codes with its current VM1 ECM and we will go from there.
One question is since I did purchase a stick ECM for an auto, what are the dos and donts?
I know you can put an A9P or A9L in a stick car but how about an automatic?
ok back in April 2013 I ran my scan tool and got these codes.
KOEO: 81: thermactor air circuit
85: canister purge circuit or transmission shift control circuit.
87: fuel pump circuit
82: thermactor air circuit
84: EGR control circuit
KOER: 21: coolant temp. sensor out of range
41: lean fuel mixture/Oxygen sensor signal
91: oxygen sensor problem, fuel pressure out of specific range or injectors out of banace
33: canister or EGR valve.
this scan was done in Sept. 2013 after I fixed a no start condition with EEC relay at fault.
KOER: 23: TPS signal out of specific range
34: EVP voltage above closed unit
41: lean fuel mixture/oxygen sensor signal
90: cylinder balance test=pass
91: oxygen sensor problem, fuel pressure out of range or injectors out of balance
KOEO: 23: TPS signal out of specific range
34: EVP voltage above closed unit
81: thermactor air circuit
85:canister purge circuit or transmission shift control circuit.
87: fuel pump circuit
82: thermactor air circuit
84: EGR control circuit
this scan done on 12/23/2014 before new plugs, wires, fuel filter and new bosch O2's
KOEO: 23: TPS signal out of specific range
31: canister or EGR valve control system
81: thermactor air circuit
85: canister purge circuit or transmission shift control circuit.
87: fuel pump circuit
82: thermactor air circuit
84: EGRcontrol unit
KOER: 41: lean fuel mixture/oxygen sensor signal
91: oxygen sensor problem, fuel pressure out of range or injectors out of balance
31: canister or EGR valve control system
This scan was done Today Sun. Dec. 28 2014. now for reference I'l jot down everything i've done thus far. some stuff may be related to issues and some may not but it is for the purpose to elimate any possible connections. New fuel filter, remanufacured OEM distributor, new ICM, new plugs and wires, new O2' sensors, all grounds redone, new ECM relay, all emission components removed.
KOER: 94: Secondary air system inoperative
44: air management system inoperative
31: canister or EGR valve control system
KOEO: 23:TPS signal out of specified range (NOTE checked voltage on green wire KOEO and got 0.78v, adjusted as far as TPS screws would give to 0.94v.)
31: canister or EGR valve control system
81: thermactor air circuit
85: canister purge circuit or transmission shift control circuit.
87: fuel pump circuit
82: thermactor air circuit, intergrated controller circuit
84: EGR control circuit
So it seems that the lean condition codes are gone. the old plugs were snow white on the electrodes and cant explain the over 70 thousands gap on them. I know emissions codes not important but dont know what this code relates to ( 34: EVP voltage above closed unit).
sorry for the long IRS publication here guys.
TPS Troubleshooting and testing
Revised 2 July 2014 to reflect changes in resistance values for testing of TPS wiring.
Setting the TPS: you'll need a good Digital Voltmeter (DVM) to do the job. Set the TPS voltage at .5- 1.1 range. Because of the variables involved with the tolerances of both computer and DVM, I would shoot for somewhere between .6 and 1.0 volts. Unless you have a Fluke or other high grade DVM, the second digit past the decimal point on cheap DVM’s is probably fantasy.
Since the computer zeros out the TPS voltage every time it powers up, playing with the settings isn't an effective aid to performance or drivability. The main purpose of checking the TPS is to make sure it isn't way out of range and causing problems.
Wire colors & functions:
Orange/white = 5 volt VREF from the computer
Dark Green/lt green = TPS output to computer
Black/white = Signal ground from computer Always use the black/white wire when testing the TPS. This is the signal ground for the computer Use any other ground and you may get erroneous results.
TPS troubleshooting steps:
1.) Use the Orange/white & Black white wires to verify the TPS has the correct 5 volts source from the computer.
2.) Use the Dark Green/lt green & Black/white wires to set the TPS base voltage. Try this... All you need is less than 1.0 volt at idle and more than 4.25 at Wide Open Throttle (WOT). You'll need a voltmeter with a 1 or 3 volt low scale to do the job.
The Orange/White wire is the VREF 5 volts from the computer. You use the Dark Green/Lt green wire (TPS signal) and the Black/White wire (TPS ground) to set the TPS. Use a pair of safety pins to probe the TPS connector from the rear of the connector. You may find it a little difficult to make a good connection, but keep trying. Put the safety pins in the Dark Green/Lt green wire and Black/White wire. Make sure the ignition switch is in the Run position but the engine isn't running. Set the voltmeter on the 2 volt range if it doesn’t auto range.
Here’s a TPS tip I got from NoGo50
When you installed the sensor make sure you place it on the peg right and then tighten it down properly. Loosen the back screw a tiny bit so the sensor can pivot and loosen the front screw enough so you can move it just a little in very small increments. I wouldn’t try to adjust it using marks.
(copied from MustangMax, Glendale AZ)
A.) Always adjust the TPS and Idle with the engine at operating temp. Dive it around for a bit if you can and get it nice and warm.
B.) When you probe the leads of the TPS, do not use an engine ground, put the ground probe into the lead of the TPS. You should be connecting both meter probes to the TPS and not one to the TPS and the other to ground.
C.) Always reset the computer whenever you adjust the TPS or clean/change any sensors. I just pull the battery lead for 10 minutes.
D.) The key is to adjust the TPS voltage and reset the computer whenever the idle screw is changed.
The TPS is a variable resistor, must like the volume control knob on a cheap radio. We have all heard them crackle and pop when the volume is adjusted. The TPS sensor has the same problem: wear on the resistor element makes places that create electrical noise. This electrical noise confuses the computer, because it expects to see a smooth increase or decrease as the throttle is opened or closed.
TPS testing: most of the time a failed TPS will set code 23 or 63, but not always. Use either an analog meter or a DVM with an analog bar graph and connect the leads as instructed above. Turn the ignition switch to the Run position, but do not start the engine. Note the voltage with the throttle closed. Slowly open the throttle and watch the voltage increase smoothly, slowly close the throttle and watch the voltage decrease smoothly. If the voltage jumps around and isn’t smooth, the TPS has some worn places in the resistor element. When the throttle is closed, make sure that the voltage is the same as what it was when you started. If it varies more than 10%, the TPS is suspect of being worn in the idle range of its travel.
TPS will not go below 1 volt
Note: Make all resistance checks with the ignition switch in the OFF position. Failure to do so will result in incorrect results and may possibly damage the meter.
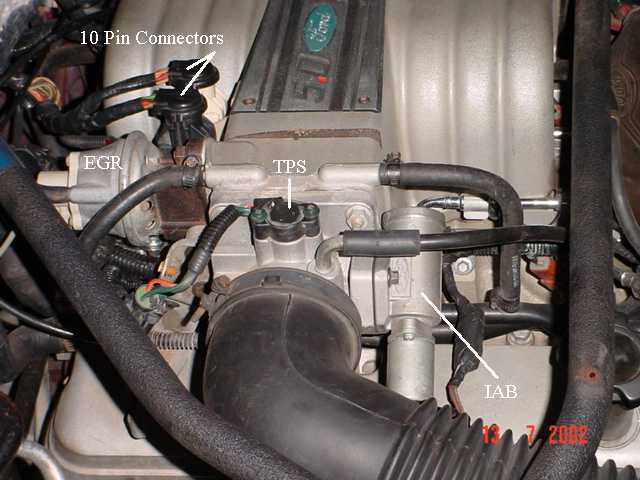
Engine mounted sensor circuit: Check the resistance between the black/white wire on the TPS and battery ground. It should be less than 1 ohm. Higher resistance than 1 ohm indicates a problem with the 10 pin connector, computer or the splice inside the main harness where the wire from the 10 pin connectors joins the rest of the black/white wire.

See the graphic for the location of the 10 pin connectors:
Diagram courtesy of Tmoss & Stang&2birds
See the graphic for the 10 pin connector circuit layout.

Unplug the white 10 pin connector to do some resistance testing. It is good time to clean the connector pins and examine the connector for corrosion, broken wire or other damage. See http://oldfuelinjection.com/?p=85 for help in this department.
If the resistance on the TPS Black/White wire and pin 1 of the white engine fuel injector harness 10 pin connector, is more than 1.0 ohm, you have bad connection or broken wiring. Repeat the test using the pin 1 of the white body side 10 pin connector and battery ground. You should have less that 1 ohm. More than that is a damaged signal ground inside the computer or bad connections or wiring.[/b]
Code 34 Or 334 - EGR voltage above closed limit –
Revised 26-Sep-2011 to add EGR cleaning and movement test for pintle when vacuum is applied to diaphragm
Failed sensor, carbon between EGR pintle valve and seat holding the valve off its seat. Remove the EGR valve and clean it with carbon remover. Prior to re-installing see if you can blow air through the flange side of the EGR by mouth. If it leaks, there is carbon stuck on the pintle valve seat clean or, replace the EGR valve ($85-$95).
Recommended procedure for cleaning the EGR:
Conventional cleaning methods like throttle body cleaner aren’t very effective. The best method is a soak type cleaner used for carburetors. If you are into fixing motorcycles, jet skis, snowmobiles or anything else with a small carburetor, you probably have used the one gallon soak cleaners like Gunk or Berryman. One of the two should be available at your local auto parts store for $22-$29. There is a basket to set the parts in while they are soaking. Soak the metal body in the carb cleaner overnight. Don’t immerse the diaphragm side, since the carb cleaner may damage the diaphragm. If you get any of the carb cleaner on the diaphragm, rinse it off with water immediately. Rinse the part off with water and blow it dry with compressed air. Once it has dried, try blowing through the either hole and it should block the air flow. Do not put parts with water on them or in them in the carb cleaner. If you do, it will weaken the carb cleaner and it won’t clean as effectively.
Gunk Dip type carb & parts soaker:

If you have a handy vacuum source, apply it to the diaphragm and watch to see if the pintle moves freely. Try blowing air through either side and make sure it flows when the pintle retracts and blocks when the pintle is seated. If it does not, replace the EGR.
If the blow by test passes, and you have replaced the sensor, then you have electrical ground problems. Check the resistance between the black/white wire on the MAP/BARO sensor and then the black/white wire on the EGR and the same wire on the TPS. It should be less than 1.5 ohm. Next check the resistance between the black/white wire and the negative battery post. It should be less than 1.5 ohm.
Note that all resistance tests must be done with power off. Measuring resistance with a circuit powered on will give false readings and possibly damage the meter.
Let’s put on our Inspector Gadget propeller head beanies and think about how this works:
The EGR sensor is a variable resistor with ground on one leg and Vref (5 volts) on the other. Its’ resistance ranges from 4000 to 5500 Ohms measured between Vref & ground, depending on the sensor. The center connection of the variable resistor is the slider that moves in response to the amount of vacuum applied. The slider has some minimum value of resistance greater than 100 ohms so that the computer always sees a voltage present at its’ input. If the value was 0 ohms, there would be no voltage output. Then the computer would not be able to distinguish between a properly functioning sensor and one that had a broken wire or bad connection. The EGR I have in hand reads 700 Ohms between the slider (EPV) and ground (SIG RTN) at rest with no vacuum applied. The EGR valve or sensor may cause the voltage to be above closed limits due to the manufacturing tolerances that cause the EGR sensor to rest at a higher position than it should.
The following sensors are connected to the white 10 pin connector (salt & pepper engine harness connectors)
This will affect idle quality by diluting the intake air charge
Revised 2 July 2014 to reflect changes in resistance values for testing of TPS wiring.
Setting the TPS: you'll need a good Digital Voltmeter (DVM) to do the job. Set the TPS voltage at .5- 1.1 range. Because of the variables involved with the tolerances of both computer and DVM, I would shoot for somewhere between .6 and 1.0 volts. Unless you have a Fluke or other high grade DVM, the second digit past the decimal point on cheap DVM’s is probably fantasy.
Since the computer zeros out the TPS voltage every time it powers up, playing with the settings isn't an effective aid to performance or drivability. The main purpose of checking the TPS is to make sure it isn't way out of range and causing problems.
Wire colors & functions:
Orange/white = 5 volt VREF from the computer
Dark Green/lt green = TPS output to computer
Black/white = Signal ground from computer Always use the black/white wire when testing the TPS. This is the signal ground for the computer Use any other ground and you may get erroneous results.
TPS troubleshooting steps:
1.) Use the Orange/white & Black white wires to verify the TPS has the correct 5 volts source from the computer.
2.) Use the Dark Green/lt green & Black/white wires to set the TPS base voltage. Try this... All you need is less than 1.0 volt at idle and more than 4.25 at Wide Open Throttle (WOT). You'll need a voltmeter with a 1 or 3 volt low scale to do the job.
The Orange/White wire is the VREF 5 volts from the computer. You use the Dark Green/Lt green wire (TPS signal) and the Black/White wire (TPS ground) to set the TPS. Use a pair of safety pins to probe the TPS connector from the rear of the connector. You may find it a little difficult to make a good connection, but keep trying. Put the safety pins in the Dark Green/Lt green wire and Black/White wire. Make sure the ignition switch is in the Run position but the engine isn't running. Set the voltmeter on the 2 volt range if it doesn’t auto range.
Here’s a TPS tip I got from NoGo50
When you installed the sensor make sure you place it on the peg right and then tighten it down properly. Loosen the back screw a tiny bit so the sensor can pivot and loosen the front screw enough so you can move it just a little in very small increments. I wouldn’t try to adjust it using marks.
(copied from MustangMax, Glendale AZ)
A.) Always adjust the TPS and Idle with the engine at operating temp. Dive it around for a bit if you can and get it nice and warm.
B.) When you probe the leads of the TPS, do not use an engine ground, put the ground probe into the lead of the TPS. You should be connecting both meter probes to the TPS and not one to the TPS and the other to ground.
C.) Always reset the computer whenever you adjust the TPS or clean/change any sensors. I just pull the battery lead for 10 minutes.
D.) The key is to adjust the TPS voltage and reset the computer whenever the idle screw is changed.
The TPS is a variable resistor, must like the volume control knob on a cheap radio. We have all heard them crackle and pop when the volume is adjusted. The TPS sensor has the same problem: wear on the resistor element makes places that create electrical noise. This electrical noise confuses the computer, because it expects to see a smooth increase or decrease as the throttle is opened or closed.
TPS testing: most of the time a failed TPS will set code 23 or 63, but not always. Use either an analog meter or a DVM with an analog bar graph and connect the leads as instructed above. Turn the ignition switch to the Run position, but do not start the engine. Note the voltage with the throttle closed. Slowly open the throttle and watch the voltage increase smoothly, slowly close the throttle and watch the voltage decrease smoothly. If the voltage jumps around and isn’t smooth, the TPS has some worn places in the resistor element. When the throttle is closed, make sure that the voltage is the same as what it was when you started. If it varies more than 10%, the TPS is suspect of being worn in the idle range of its travel.
TPS will not go below 1 volt
Note: Make all resistance checks with the ignition switch in the OFF position. Failure to do so will result in incorrect results and may possibly damage the meter.
Engine mounted sensor circuit: Check the resistance between the black/white wire on the TPS and battery ground. It should be less than 1 ohm. Higher resistance than 1 ohm indicates a problem with the 10 pin connector, computer or the splice inside the main harness where the wire from the 10 pin connectors joins the rest of the black/white wire.
See the graphic for the location of the 10 pin connectors:
Diagram courtesy of Tmoss & Stang&2birds
See the graphic for the 10 pin connector circuit layout.
Unplug the white 10 pin connector to do some resistance testing. It is good time to clean the connector pins and examine the connector for corrosion, broken wire or other damage. See http://oldfuelinjection.com/?p=85 for help in this department.
If the resistance on the TPS Black/White wire and pin 1 of the white engine fuel injector harness 10 pin connector, is more than 1.0 ohm, you have bad connection or broken wiring. Repeat the test using the pin 1 of the white body side 10 pin connector and battery ground. You should have less that 1 ohm. More than that is a damaged signal ground inside the computer or bad connections or wiring.[/b]
Code 34 Or 334 - EGR voltage above closed limit –
Revised 26-Sep-2011 to add EGR cleaning and movement test for pintle when vacuum is applied to diaphragm
Failed sensor, carbon between EGR pintle valve and seat holding the valve off its seat. Remove the EGR valve and clean it with carbon remover. Prior to re-installing see if you can blow air through the flange side of the EGR by mouth. If it leaks, there is carbon stuck on the pintle valve seat clean or, replace the EGR valve ($85-$95).
Recommended procedure for cleaning the EGR:
Conventional cleaning methods like throttle body cleaner aren’t very effective. The best method is a soak type cleaner used for carburetors. If you are into fixing motorcycles, jet skis, snowmobiles or anything else with a small carburetor, you probably have used the one gallon soak cleaners like Gunk or Berryman. One of the two should be available at your local auto parts store for $22-$29. There is a basket to set the parts in while they are soaking. Soak the metal body in the carb cleaner overnight. Don’t immerse the diaphragm side, since the carb cleaner may damage the diaphragm. If you get any of the carb cleaner on the diaphragm, rinse it off with water immediately. Rinse the part off with water and blow it dry with compressed air. Once it has dried, try blowing through the either hole and it should block the air flow. Do not put parts with water on them or in them in the carb cleaner. If you do, it will weaken the carb cleaner and it won’t clean as effectively.
Gunk Dip type carb & parts soaker:
If you have a handy vacuum source, apply it to the diaphragm and watch to see if the pintle moves freely. Try blowing air through either side and make sure it flows when the pintle retracts and blocks when the pintle is seated. If it does not, replace the EGR.
If the blow by test passes, and you have replaced the sensor, then you have electrical ground problems. Check the resistance between the black/white wire on the MAP/BARO sensor and then the black/white wire on the EGR and the same wire on the TPS. It should be less than 1.5 ohm. Next check the resistance between the black/white wire and the negative battery post. It should be less than 1.5 ohm.
Note that all resistance tests must be done with power off. Measuring resistance with a circuit powered on will give false readings and possibly damage the meter.
Let’s put on our Inspector Gadget propeller head beanies and think about how this works:
The EGR sensor is a variable resistor with ground on one leg and Vref (5 volts) on the other. Its’ resistance ranges from 4000 to 5500 Ohms measured between Vref & ground, depending on the sensor. The center connection of the variable resistor is the slider that moves in response to the amount of vacuum applied. The slider has some minimum value of resistance greater than 100 ohms so that the computer always sees a voltage present at its’ input. If the value was 0 ohms, there would be no voltage output. Then the computer would not be able to distinguish between a properly functioning sensor and one that had a broken wire or bad connection. The EGR I have in hand reads 700 Ohms between the slider (EPV) and ground (SIG RTN) at rest with no vacuum applied. The EGR valve or sensor may cause the voltage to be above closed limits due to the manufacturing tolerances that cause the EGR sensor to rest at a higher position than it should.
The following sensors are connected to the white 10 pin connector (salt & pepper engine harness connectors)
This will affect idle quality by diluting the intake air charge
Similar threads
- Replies
- 22
- Views
- 1K
- Replies
- 11
- Views
- 1K
- Replies
- 5
- Views
- 1K
- Replies
- 24
- Views
- 2K