| Lakewood
Strut Install By Lee50Guru After about 97 thousand miles, believe it or not, the stock shocks and struts don't absorb bumps and Detroit's trademark pot holes like they used to. Since the car is a street/strip beast, I decided to try the Lakewood drag shocks and struts. Lakewood offers two versions of the struts. The 90/10 version is for race only, as it can become unpredictable in street driving. But what about the 70/30? It's a street/strip strut, but would I lose cornering ability? How would it feel compared to the stockers? |
|||
 |
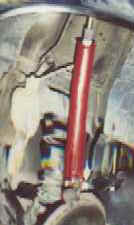
Stock vs. Lakewood. Any questions? |
||
| I decided to put the rear shocks on first, as they're the easier of the two. The first step is to safely support the rear of the car on jackstands. Once the back wheels are off the ground | |||
| remove them to get access to the shocks. Remove the nut and bolt holding the bottom of the shock in place ( after 97,000 miles mine needed just a LITTLE liquid wrench! ). Once removed, open the hatch/trunk to get at the upper part of the shock. Remove the plastic cover and directly below is the upper nut of the shock. Remove it and pull the shock out of the fenderwell. | |||
| Now for my favorite part of the whole thing,
discard the old shock. The new shocks come with a wide variety of hardware, don't worry about all the extra parts you'll have left over, it's normal. Put a light coating of wheel bearing grease ( I prefer synthetic ) or marring grease on the hourglass shaped bushing and push it in the bottom of the shock. Next, assemble the parts required to install the top portion. For a 1990 hatchback, I found the best combination is : shock-bushing-washer-bushing-cap-nut. Install the top of the shock being careful not to overcompress the top bushing. Once that's in place move to the bottom portion. Here you'll need a spacer on each side if the hourglass bushing inside of the factory shock bracket to prevent the shock from moving side to side. Install the nut and bolt and tighten. Re-install the wheels, plastic top covers, and lower the car. |
|||
|
|||
| Now for the fun part. Pop the hood and loosen
the power steering cap, for access to the strut bolts, you'll need to turn the wheels
without the power steering pump running so loosening the cap prevents it from spurting out
everywhere. Raise the front of the car and support with jack stands just behind the A-arms on the frame. Remove the front wheels, and turn the steering wheel all the way to the right ( for the left strut, and vise versa ). Remove the brake caliper and hang it safely out of the way. Never let it hang from the brake line. Loosen the top strut mounting bolt. It was put on using star torque and is incredibly hard to loosen. Find a BIG beefy screwdriver to put in the slot in the top of the strut, and apply massive amounts of torque to the nut. DO NOT remove the nut completely yet. Now, place a jack under the A-arm and raise the jack to support it. When the lower two strut bolts are removed that jack will be all that stands between you and a VERY heavy spring moving VERY quickly! |
|||
| Remove the two lower strut bolts. I used a
propane torch to heat the bolts and this made the job easier. If you do this though
remember that the strut is gas pressurized and does not take kindly to being heated ( AKA-
it can explode! ), also, the sway bar end links are close by and can be damaged by the
heat of a torch. Once the two bottom bolts are removed, finish taking off the top nut and remove the strut. Be careful because the spindle-rotor assembly can fall forward and damage the ball joint. Inspect the condition of the dust cover, upper, and lower bushing as these will be reused. Toss the old strut where it belongs! |
|||
| On the new strut, remove the strap that keeps it compressed.( The instructions follow a different path here, but trust me, this works good! ) Place the dust cover and lower bushing over the top of the strut and place it in the fenderwell. Here's where having a friend will come in REAL handy. Push the strut up into the strut tower and hold it there while your friend put the upper bushing on, followed by the sleeve, then the cap and nut. Once the nut is on a thread or two, move on to the bottom nuts. | |||
|
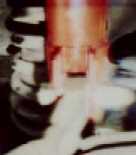
Spacers are used between strut and spindle |
||
| Align the bracket of the strut inside the spindle. For 1987 and newer spindles, you will need to place spacers between the strut and spindle for a proper fit ( I used 3 per side ). Have a | |||
| friend push the strut into place while you
align the holes, hold the spacers in place, and start the bolts ( sounds like a nightmare
but it's really not bad ). Tighten the bolts down with a little Lock-Tite for safety. Reinstall the brake caliper and wheel. Repeat on the other side. Once both sides are done, lower the car and tighten the top nuts. The Lakewood struts have 2 flats to allow a wrench to be placed on the strut for ease in tightening. Put the cap back on the power steering reservoir and the job is done. An alignment would be a good idea and is recommended by Lakewood. Without an alignment, the car floats a little at speed and I KNOW tire wear is going to be funky! |
|||
| On the street the Lakewood's are in a whole
different class than the stockers. They dampen all road imperfections with ease, but when
the pedal goes down, their true colors come out! Weight transfer is greatly improved and
acceleration seems better, but the track never lies so we shall see! Trying to get to the track, I felt like some great spirit was against me. The first day Milan ( www.milandragway.com ) was open I walked out to my car, turned the key, and---nothing. My starter was dead. The next day the track was open, I had a freshly installed FMS starter, walked out to my car---flat tire. The next week it rained. I thought I would never be able to really see what these things could do, then the rain stopped. Incredible humidity and heat followed, but i was determined to go and race! The air was thick and too hot for good racing but I tried to make the best of it. My first run netted a 14.58 @ 97.39. The MPH shows horsepower just wasn't there with the weather as it was. My next attempt pulled a nearly identical 14.56 @ 98.04. One thing I did notice was that the car WANTED to launch. Givin the opportunity my car would've wheelie for 1320 feet! That's how good it felt. Making that happen was a different subject! The next few runs were all almost the same. I decided to make one last pull against the red '97 Cobra that was in the staging lanes looking for prey. As we left the line and I left him behind, I realized eeryone was feeling the weather and although my times were bad, they were probably better than I ever would have gotten before. I ran a 14.41 @ 98.91 against the Cobra and went home for the night with a snake under my belt and a grin on my face! I really feel that the car grips better on take off now given the improved wieght transfer characteristics of the Lakewood pieces. Next time out, with better weather, hopefully they can launch my into the 13s! Definitely a modification worth the money.
|
|||
|
|||
| Stangnet nor Lee50Guru are not liable or can be held accountable from the above article. | |||