|
 In our never ending quest to raise the caliber of Bullitt #2580, we turned to popular
bolt-ons to see how the car responded. In stock trim with only a conical K&N, on
In our never ending quest to raise the caliber of Bullitt #2580, we turned to popular
bolt-ons to see how the car responded. In stock trim with only a conical K&N, on


|

|

|
The instructions call out watching
for clearance of the flange. In this car, the clearance looked good, but I installed
the supplied protective cover anyway (see blue arrow at left).
I knew going in that modifications like this were hard to test on the dyno. Ram air and cold air systems that relocate the air filter really need the car to be moving to show their full benefits. While sitting on the dyno, I didn�t know what to expect. The car was started and cycled a few times on the rollers to allow the computer to adjust. On the next run, I couldn�t believe that it was my car on the dyno still as the new sounds coming from the engine compartment above 4,000RPM were incredible! |
The car gained 2.4HP and the torque peak moved from 3900 to 4100 RPM, but remained unchanged. We unstrapped the car and I decided to get some street time on the mods before going any further. Over the next few days is were things really got interesting. After about 3 days, the car felt like it woke up from a nap. Power felt up and the car was much more responsive. Could we get any of this power to show on the dyno though? After cycling the car several times and doing a few more pulls, the results were the same. The dyno peaks refused to climb.
After about 4 days of driving the car something strange happened, the car woke up. It was night and day. The car felt like it had gained a decent amount of power. I used a G-Tech pro to test the car at this point as a baseline and got 222HP. I couldn�t wait to get back on the dyno.
Round 2
 |
Next, I installed a set of Denso Iridium plugs. The Denso plugs use a .4mm center electrode that requires less voltage to jump the gap (better performance), and has a U-groove to allow for a larger spark area. |
The install was the same as described for the NGK�s
above. The idle felt smoother was the Denso plugs than with the NGK�s, but there
was no clear night and day difference between them. A follow-up test with the G-tech
showed a gain of 2HP over the NGK�s and the car sat at 224HP. For a quick comparison
see the pictures below.
|

|

|
| Stock Motorcraft platinum plugs | NGK Iridium plugs | Denso Iridium plugs |
Round 3

Back on the dyno, a new baseline was established before adding any new parts. Given the above gains, I was expecting around 229HP. As the wheels turned the rollers, the dyno only read 202.7 HP. The car was down 27HP! Since my dyno time was limited I decided to continue on anyway.

|

|
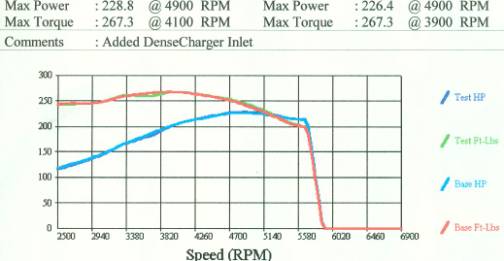
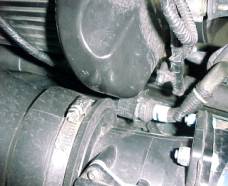
The next part to be added was the Densecharger throttle body tube. The tube is the same 100mm throughout as the rest of the Densecharger system. As you can see on the stock TB tube, there is a restriction to allow for clearance for a strut tower brace. The early SN-95 cars had one, but the Ford penny pinchers decided that better handling and chassis strength weren�t worth the extra $5 a car they probably paid for it. The 'dent' in the TB tube remains today so Ford doesn�t have to pay to have a new tube mold made. So, what is the HP cost of the dent?
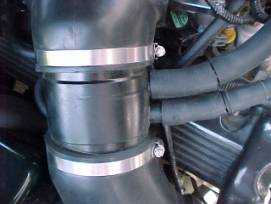
To find out we started installing the
Densecharger tube. The install is fairly
straight forward, with only hose clamps holding in the stocker and the
Densecharger tube.
|
|
The vacuum lines attached to the stock tube may
need to be trimmed slightly to fit the new fittings. The stock air charge temp sensor
can be swapped directly over to the newtube. See the install notes below for some
tips to help you along.

|

|
|
| Watch the tube to strut tower
clearance. If not adjusted properly, it could rub and create a loud squeak
|
Be sure to re-check the MAF flange
clearance to the A/C line after installing the TB tube. It may have shifted
slightly when pushing the TB tube on.
|
|
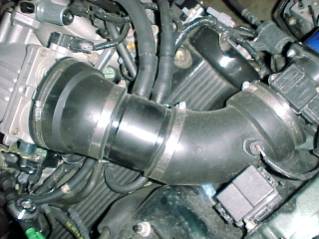
 Also, check the tube flange (at the MAF meter) clearance to the cam cover |
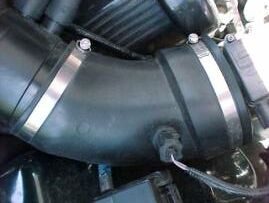
The tube when installed should look like this.

|

|
|

|

Once the tube was on and adjusted properly, the car was running again. The tube added 1.5 HP and 2.1 ftlbs peak to peak. As you can see in the graph above, the curves are almost identical with the Densecharger bettering the stocker more as the RPM�s climb. At 6000 RPM there is an 8HP difference. The G-tech results were 228HP in this configuration averaged over 4 runs.
Round 4
 Next
came March Performance�s underdrive pullies. The theory behind changing the pullies
is that it takes engine power to turn the accessories (alternator, power steering
pump, water pump). If the speed at which these accessories are turning is reduced,
then the usable engine power at the wheels goes up. The difference is typically
more noticeable at higher RPM�s.
Next
came March Performance�s underdrive pullies. The theory behind changing the pullies
is that it takes engine power to turn the accessories (alternator, power steering
pump, water pump). If the speed at which these accessories are turning is reduced,
then the usable engine power at the wheels goes up. The difference is typically
more noticeable at higher RPM�s.
In an underdrive pulley set, the crank pulley is smaller than the stock pulley and the alternator and water pump pulleys are larger than stock. The Bullitt has an underdriven water pump pulley (off of an F-150) straight from Ford. What this means is that regular GT�s should get see a slightly larger gain from this mod than a Bullitt.
The March crank pulley is a piggy-back design. What this means if that the stock pulley/damper setup, once removed from the crank is bolted onto the front of the new pulley. March does off an aluminum damper which allows complete removal of the stock set-up and frees up some rotating weight.
The pulley kit comes with all new hardware needed
for the swap. The installation is actually quite simple. After the belt is removed
by loosening the tensioner, the stock pulleys can be removed. I recommend doing
the crank pulley first, as it takes the longest. Once the stock crank pulleys bolt
is removed, throw it away. Not only will the stock bolt be too short to re-use,
it is a torque to yield bolt that is unreliable when reused. March supplies a new
longer bolt. After the bolt is removed, you�ll need a pulley puller to remove the
stock pulley. Once it�s off, you can begin the assembly of the new 2-piece set-up.

|
The instructions are quite clear
on how to do this, and as you can see at the left, it is just a matter of bolting
the stock pulley to the face of the new crank pulley. The only thing to watch
is to make sure the keyways are lined up on the two pulleys. Once they are assembled,
use a bit of silicon on the keyways to help seal it against leakage and reinstall
the assembly.
The water pump pulley is only held on be four bolts. It�s a simple matter of removing those and installing the new pulley. Lastly is the alternator pulley. Using a pulley puller, remove the stock pulley. Before installing the new pulley, check the height of the stock pulley and install the correct spacer to match the stock height. With the correct spacer behind the pulley, install the new pulley. |

|
One thing to mention is that many people worry that underdrive pulleys can cause charging or overheating problems due to slowing down the alternator and water pump. If you have high output amplifiers added to your stereo system this may be a concern, otherwise charging is fine under all driving conditions. When racing (high RPM�s), it�s actually safer to reduce the alternator speed, as they can come apart when overspun. As for the overheating I have never noticed any temperature change. I use a 50/50 mix of anti-freeze and water with a bottle of water wetter added in. If this is a problem, you can always swap to the stock Bullitt pulley, or the stock GT pulley to speed the water pump up and still use the other two pulleys. |
The dyno was not available to run the car again after the pullies were installed. Follow-up G-tech testing showed a 9HP increase (averaged over 4 runs) to put the car at 237HP at the wheels.
After this series of modifications drivability feels the same as stock, but the car is more responsive, and mid to high RPM power is changed considerably. When the car is above 4000RPM, it sounds like a 4-barrel when the secondaries open.
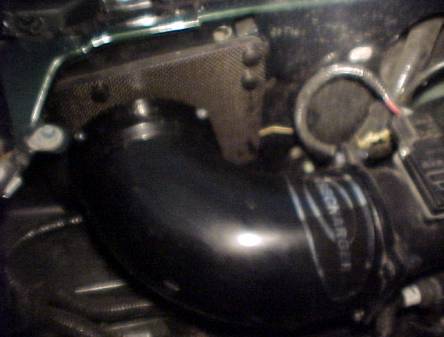
Densecharger now also offers an appearance upgrade
kit that comes with the fender plate made out of carbon fiber, covers for the plate
screws, a strip of carbon fiber for the pipe. With this dress-up kit installed,
the kit is in a league of it�s own. See pictures below:

|
 |
 |
You can purchase any of the modification installed here from:

Also, if you are in the Detroit area, you can contact Detroit Speedworks for all of your high-performance needs.
![]()
lee50guru