Home > Articles/Tech > Radiator Install |
Home > Articles/Tech > Radiator Install |
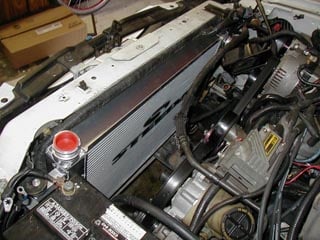
The upper radiator hose needs to come off next. Loosen the two screw clamps located on each end of the hose. Once loose, pull off the hose and set it aside. Move the drain pan for your coolant under the lower radiator hose located on the driver�s side of the radiator. The clamp holding the lower hose to the radiator requires some pliers to grasp and squeeze the clamp. Move the clamp to a different part of the hose to allow for the removal of the hose. Be careful, as some coolant will spill out of the radiator where the lower hose was attached.
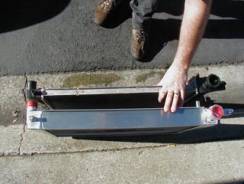
To remove the electric fan, if you have one, remove the 2 bolts on the driver�s side, which attach the fan to the radiator. Now the only thing holding the radiator in place are two bolts located above your driver�s side headlight. They are hidden so it may take some searching to find them. After their removal the radiator can be lifted straight out. Before you put in the new radiator, be sure to remove any plastic plugs or tape covering the openings. The radiator has two metal �feet� that slide into the rubber mountings on the bottom of your frame. Take special care to be sure that the feet are properly seated in the mounts. Insert and tighten the two bolts removed from above the headlight. Attach your fan shroud and bolt it into place. Add the radiator bracket on the left-hand side and tighten down. The overflow bottle can be inserted next� it may require a hard push to get it to snap into place. Once in place, bolt it to the mount, and attach the mount to your frame. On the Cobra there are 2 places on the overflow bottle mount to bolt it to the frame. We chose to use the holes closest to the overflow bottle to make sure that it was tight and secure. We didn�t want the bottle to come loose at a run at the drag strip and get caught in the belts! Inspect your upper and lower radiator hoses for possible cracks or small holes that can cause a leak after re-installing them. Your clamps may also be worn and may need to be replaced. Install the upper and lower radiator hoses and tighten down the clamps on both sides. Use Teflon tape on the new wing nut supplied with the new radiator and screw into place. In order to attach the rubber hose from your overflow bottle to the radiator neck, use the supplied npt plug and use a wrench or ratchet to tighten. Don�t forget to wrap it a couple of times with Teflon tape as well. DO NOT over-tighten the npt plug as it may strip the bung in the radiator neck!!! Reconnect the harness to your fan. Double-check everything! Make sure all of your hoses are properly installed and secured. To fill the radiator, first start the motor and then pour anti-freeze into the radiator using a funnel. Turn your heater on to high and run at full blast. This will help remove any air bubbles trapped in your coolant system. Keep in mind that the new radiator will hold more fluid than the stock one. Once the radiator is full, allow the motor to warm up to operating temperature. As the motor warms up the fluid in the radiator will rise so be careful not to let it overflow. If necessary give the upper radiator hose a few squeezes to be sure all the air pockets get pushed out the system. Carefully install the radiator cap and secure it. Use a rag to protect your hand because the cap will heat up rather quickly.
|

 The
radiator is a crucial part of your engine�s cooling system.
The
radiator is a crucial part of your engine�s cooling system. Replacing
a radiator is a fairly simple task and requires less than an hour and half.
Replacing
a radiator is a fairly simple task and requires less than an hour and half.