|
Home > Articles/Tech > Speed Sensitive Volume Mod |
|
Home > Articles/Tech > Speed Sensitive Volume Mod |
|
2001 Mustang Speed Sensitive Volume Mod By : BlackSnake2001, DMann and tms217How many times do you play with the volume cruising down the road? Ever wish your 2001 Mustang could adjust the radio volume automatically, like so many other Ford vehicles do? Well, for pennies and an hour of your time, you can add Speed Sensitive Volume to your car. First, the volume/on/off knob handles the control for SSV. To engage SSV:� Be sure unit is on (either radio or CD) � Press and hold the volume/on/off knob for 5 seconds� When you see "Speed Vol 0" you can change the setting from 0-7 by using the up/down arrows on the right of the unit.Now that you've played with that, it's time
to make SSV work! You can be creative... this is just one way to
accomplish this task. � 8mm, 7mm sockets and ratchet � One piggyback connector (style of your choice) � Wire � One female spade connector � Electrical tape or heatshrink � 3' 16-20ga wire � Soldering iron/flux/solder**see 8c1 for making DMann's CDAudio connector** 0) Unlock both doors , then use the 8mm socket to disconnect positive AND negative battery cable.1) Remove the shifter knob. Place the
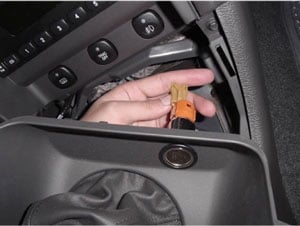
shifter in 2nd, 4th or Reverse (for clearance) 2) Remove the shifter shroud by pulling out, towards you. 3) Disconnect the accessory plug harness. 4) Place the shifter in 2nd, 4th or reverse (for clearance) 5) Remove the radio/AC/vent trim panel by pulling towards you 5a) Don�t forget to unplug the connectors from the backside of this panel before removing! 5b) Start from the bottom and work your way
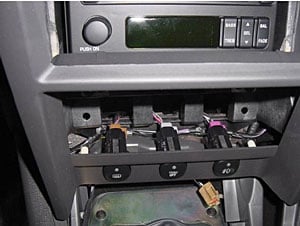
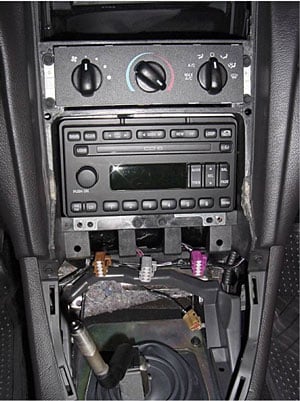
up. Panel clips hold in that panel. Be gentle, don't yank. 6) Remove head unit by removing the 2 outer
bolts with the 7mm socket. Set bolts aside. 7) Disconnect the 2 wiring harnesses and
antennae from the head unit. NOTE: Antennae simply pulls straight out.
8) Construct your wire 8a) Solder the spade connector to the 3' of wire in addition to crimping 8b) Be sure to use heat shrink or electrical tape
8.5a) Aquire a CDAudio cable. This cable is
used inside a computer for connecting a CDROM to a sound card. See photo
for appropriate connector style. 8.5b) Remove the wire from the connector
(see picture) 8.5c) Heat shrink the wire around the metal part 8.5d) Solder 3' of wire to this connector, making sure to use heat shrink or electrical tape for your connections 9) Hook the spade connector or CDAudio connector to pin 9 on the back of the radio as shown in the picture. 9a) You need to use the middle set of pins. This set of 20 pins is not used in the 2001 Mustangs; hence it will have no plug attached to it. 9b) While looking at your radio like this picture below, Pin #9, is the 2 nd pin from the right side of the middle row. The middle row only has 6 pins!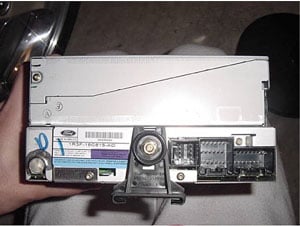
9c) The goal here is to have something that fits over the pin, does not touch any other pins, and remains secure. 9d) You can use a spade connector by cutting one side of the spade off and crimping one side to accommodate the pin. 9e) Be sure to either heat shrink or electrical tape the spade connector or the CDAudio connector to ensure it will not touch another pin. 10) Feed the wire through a hole in the
dash behind the carpet, halfway to the passenger kick panel. Leave
wire hanging. 11) Install head unit, being careful about your new wire. Installation is the reverse of removal. 12) Remove passenger kick panel 12a) Remove pushpin in kick panel 12b) Pull straight up on floor trim panel starting from the front of the car. The first 2 clips should pop. That is sufficient. 12c) Pull straight back on the kick panel and set it aside. Push the floor trim panel back down. 13) Pull carpet back to give yourself some work area, make sure there is plenty of light. 14) Locate the EEC wiring harness and
bundle (see pic). 15) Find WHITE wire with ORANGE stripe (WH/OR). There are a few different white wires with red stripes (WH/R), BE SURE you tap the correct wire. This will be the tricky part, since you are upside down and cramped, the colors look alike. Be patient, it will require you to peel back some of the black wrap. 15a) You may remove the plastic retainer on the EEC wiring harness to verify the correct wire. It is pin 68. Note that the top of the harness is marked as to wire #'s. Unless you are unable to find the correct wire, removing the EEC harness should not be done. 15b) It should be noted that on a 2001 Cobra, the WH/OR wire was tucked in the middle of the wiring bundle. On a 2001 GT, the wire was immediately accessible on the outside of the bundle. It is CRITICAL that you compare the WH/OR wire with WH/R 16) Attach a piggyback connector of your
choice to the wire you just found. In this picture we carefully peeled
back the wrapping and directly connected the wires. 17) Tuck the wire coming from the radio away using zip ties for a clean install! 18) Replace passenger kick panel. Installation is reverse of removal. 19) Reattach Positive then Negative battery cables.20) Set the SSV setting to 7 initially, and then adjust according to preference 21) Welcome to SSV-land! Enjoy!
This mod brought to you by: Shawn Hasan " BlackSnake2001" [email protected]Dom Orlando " DMann" [email protected]Terry Smith " tms217"
|