Engine Misfire only with headlights on

My 90 GT, basically stock 302 (has full exhaust) runs great in the daytime. As soon as the headlights come on, it hickups around 2500-3200 RPMs. "That's odd" is the only response I'm getting from others, so I figured if I passed the collective intelligence of members here.

New 130 amp alternator, IAC motor, distributor, Ford racing wires, motorcraft plugs, screaming demon coil, tps sensor, and motorcraft O2 sensors.

Any ideas what could cause my issue?

Thanks in advance!
 
  • Sponsors (?)


Dump codes sticky

Look at the top of the 5.0 Tech forum where the sticky threads are posted. One of them is how to dump the computer codes. Codes may be present even if the CEL (Check Engine Light) isn’t on. You don’t need a code reader or scanner – all you need is a paper clip, or if your lady friend has a hair pin, that will do the job.
I highly suggest that you read it and follow the instructions to dump the codes. http://www.stangnet.com/mustang-forums/threads/how-to-pull-codes-from-eec4.889006/
 
My 90 GT, basically stock 302 (has full exhaust) runs great in the daytime. As soon as the headlights come on, it hickups around 2500-3200 RPMs. "That's odd" is the only response I'm getting from others, so I figured if I passed the collective intelligence of members here.

New 130 amp alternator, IAC motor, distributor, Ford racing wires, motorcraft plugs, screaming demon coil, tps sensor, and motorcraft O2 sensors.

Any ideas what could cause my issue?

Thanks in advance!


The root cause is that your coil is not being properly saturated or that your coil is weak. What's left to do is to figure out why your electrical system and 130 amp alternator, are not handling the load. Given that your car is 29 years old, it may come down to a wiring harness or connection issue.
 
Dump codes sticky

Look at the top of the 5.0 Tech forum where the sticky threads are posted. One of them is how to dump the computer codes. Codes may be present even if the CEL (Check Engine Light) isn’t on. You don’t need a code reader or scanner – all you need is a paper clip, or if your lady friend has a hair pin, that will do the job.
I highly suggest that you read it and follow the instructions to dump the codes. http://www.stangnet.com/mustang-forums/threads/how-to-pull-codes-from-eec4.889006/
I read over that, but I have a scan tool. I tried dumping codes per the instructions. I get the 11 code with KOEO, but keep getting a 41r KOER. I read through the thread of another person who had a similar issue, and they found their solution by changing their TFI module. I'm gonna try that, too.
 
The root cause is that your coil is not being properly saturated or that your coil is weak. What's left to do is to figure out why your electrical system and 130 amp alternator, are not handling the load. Given that your car is 29 years old, it may come down to a wiring harness or connection issue.
After posting this I read about another member having a similar issue. Ended up being a bad tfi module. Picked one up today, will cross my fingers tomorrow. Thanks.
 
I read over that, but I have a scan tool. I tried dumping codes per the instructions. I get the 11 code with KOEO, but keep getting a 41r KOER. I read through the thread of another person who had a similar issue, and they found their solution by changing their TFI module. I'm gonna try that, too.

Wrong answer - you should have at least Googled the Ford 41 code before swapping any parts. A defective TFI would have affected both driver and passenger sides and might give you a 91 and a 41, but I doubt that.

You don't fix a leaking faucet by changing the lightbulb over the sink. The two are unrelated and there is no cause and effect link between them

If you are going to keep this Mustang, you definitely need to learn how an engine works and learn some diagnostic techniques. Otherwise you'll never get it fixed on the first try. Throwing time, labor, parts, and money at a problem will make you hate the car.

Having said that , here's some help.
Here's a book that will get you started with how the Ford electronic engine control or "computer" works.

Ford Fuel Injection & Electronic Engine Control 1988-1993 by Charles Probst :ISBN 0-8376-0301-3.

It's about $25-$50 from Borders.com see http://www.amazon.com/ . Select books and then select search. Use the ISBN number (without dashes or spaces) to do a search. Try searching using M-1832-Z1 instead of the ISBN number if you don’t get any positive results. You may only be able to find a used one, since the book is as old as the cars it covers. Or you order it from your Ford dealer as SVO part no. M-1832-Z1.

Use the ISBN number and your local library can get you a loaner copy for free. Only thing is you are limited to keeping the book for two weeks. It is very good, and I found it to be very helpful.


Code 41 or 91. Or 43 Three digit code 172 or 176 - O2 sensor indicates system lean. Look for a vacuum leak or failing O2 sensor.

Revised 24 Aug 2018
1.) To correct the RH & LH mismatch on 91-93 5.0 Mustangs
2.) To add Tmoss’ wiring diagrams for 88-95 Mustangs


Code 41 is the passenger side sensor, as viewed from the driver's seat.
Code 91 is the driver side sensor, as viewed from the driver's seat.

Code 172 is the passenger side sensor as viewed from the driver's seat.
Code 176 is the driver side sensor, as viewed from the driver's seat.

Code 43 is not side specific according to the Probst Ford Fuel injection book.

The computer sees a lean mixture signal coming from the O2 sensors and tries to compensate by adding more fuel. Many times the end result is an engine that runs pig rich and stinks of unburned fuel.

The following is a Quote from Charles O. Probst, Ford fuel Injection & Electronic Engine control:

"When the mixture is lean, the exhaust gas has oxygen, about the same amount as the ambient air. So the sensor will generate less than 400 Millivolts. Remember lean = less voltage.
When the mixture is rich, there's less oxygen in the exhaust than in the ambient air , so voltage is generated between the two sides of the tip. The voltage is greater than 600 millivolts. Remember rich = more voltage.
Here's a tip: the newer the sensor, the more the voltage changes, swinging from as low as 0.1 volt to as much as 0.9 volt. As an oxygen sensor ages, the voltage changes get smaller and slower - the voltage change lags behind the change in exhaust gas oxygen.

Because the oxygen sensor generates its own voltage, never apply voltage and never measure resistance of the sensor circuit. To measure voltage signals, use an analog voltmeter with a high input impedance, at least 10 megohms. Remember, a digital voltmeter will average a changing voltage." End Quote

Testing the O2 sensors 87-93 5.0 Mustangs

Measuring the O2 sensor voltage at the computer will give you a good idea of how well they are working. You'll have to pull the passenger side kick panel off to gain access to the computer connector. Remove the plastic wiring cover to get to the back side of the wiring. Use a safety pin or paper clip to probe the connections from the rear.


Disconnect the O2 sensor from the harness and use the body side O2 sensor harness as the starting point for testing. Do not measure the resistance of the O2 sensor, you may damage it. Resistance measurements for the O2 sensor harness are made with one meter lead on the O2 sensor harness and the other meter lead on the computer wire or pin for the O2 sensor.
Computer wiring harness connector, computer side.
88243.gif


Backside view of the computer wiring connector:
a9x-series-computer-connector-wire-side-view-gif.gif


87-90 5.0 Mustangs:
Computer pin 43 Dark blue/Lt green – LH O2 sensor
Computer pin 29 Dark Green/Pink – RH O2 sensor

The computer pins are 29 (RH O2 with a dark green/pink wire) and 43 (LH O2 with a dark blue/lt green wire). Use the ground next to the computer to ground the voltmeter. The O2 sensor voltage should switch between .2-.9 volt at idle.


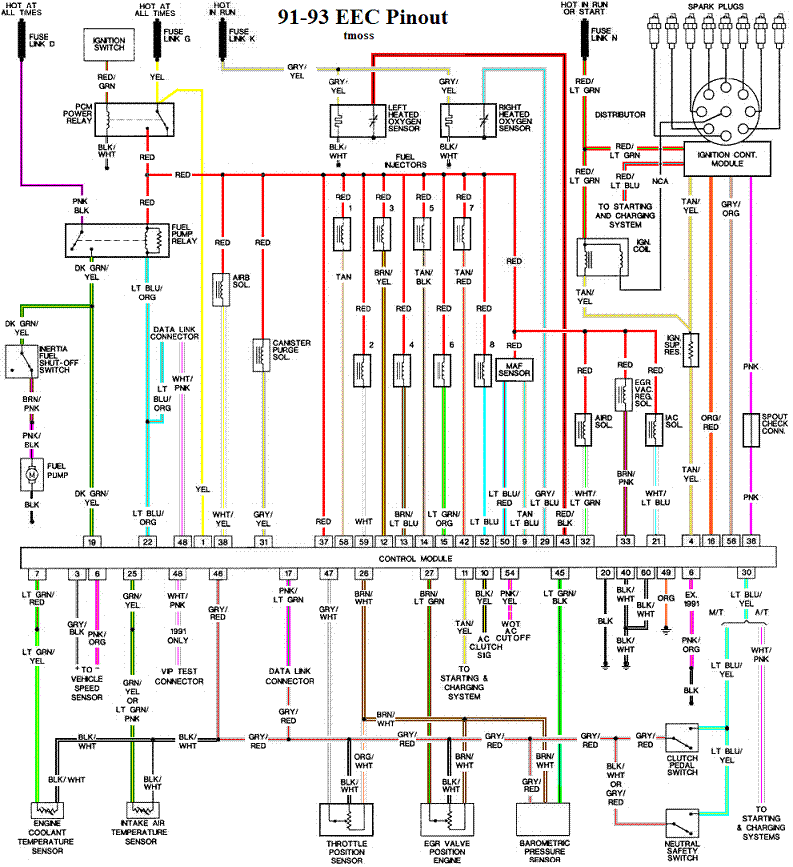
91-93 5.0 Mustangs:
Computer pin 43 Red/Black – LH O2 sensor
Computer pin 29 Gray/Lt blue – RH O2 sensor

The computer pins are 29 (RH O2 with a Gray/Lt blue wire) and 43 (LH O2 with a Red/Black wire). Use the ground next to the computer to ground the voltmeter. The O2 sensor voltage should switch between .2-.9 volt at idle.


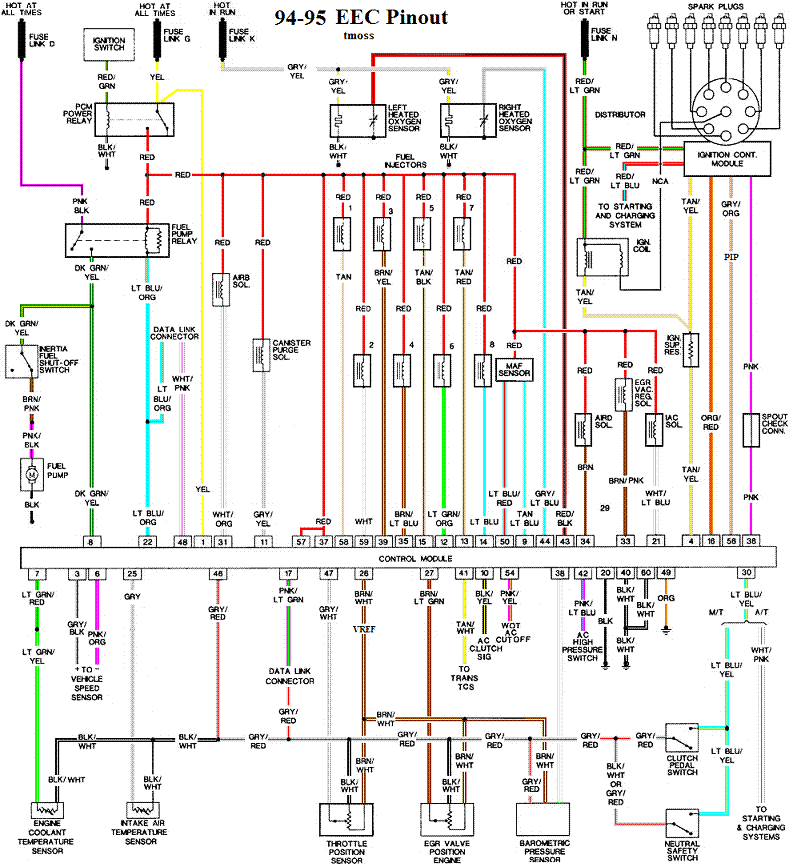
94-95 5.0 Mustangs; note that the 94-95 uses a 4 wire O2 sensor.
The computer pins are 29 (LH O2 with a red/black wire) and 27 (RH O2 with a gray/lt blue wire). Use pin 32 (gray/red wire) to ground the voltmeter. . The O2 sensor voltage should switch between .2-.9 volt at idle.


Note that all resistance tests must be done with power off. Measuring resistance with a circuit powered on will give false readings and possibly damage the meter. Do not attempt to measure the resistance of the O2 sensors, it may damage them.

Testing the O2 sensor wiring harness
Most of the common multimeters have a resistance scale. Be sure the O2 sensors are disconnected and measure the resistance from the O2 sensor body harness to the pins on the computer. Using the Low Ohms range (usually 200 Ohms) you should see less than 1.5 Ohms.


87-90 5.0 Mustangs:
Computer pin 43 Dark blue/Lt green – LH O2 sensor
Computer pin 29 Dark Green/Pink – RH O2 sensor
Disconnect the connector from the O2 sensor and measure the resistance:
From the Dark blue/Lt green wire in the LH O2 sensor harness and the Dark blue/Lt green wire on the computer pin 43
From the Dark Green/Pink wire on the RH O2 sensor harness and the Dark Green/Pink wire on the computer pin 29


91-93 5.0 Mustangs:
Computer pin 43 Red/Black – LH O2 sensor
Computer pin 29 Gray/Lt blue – RH O2 sensor
Disconnect the connector from the O2 sensor and measure the resistance:
From the Red/Black wire in the LH O2 sensor harness and the Red/Black wire on the computer pin 43
From the Gray/Lt blue wire on the RH O2 sensor harness and the Gray/Lt blue wire on the computer pin 29

94-95 5.0 Mustangs:
Computer pin 29 Red/Black – LH O2 sensor
Computer pin 27 Gray/Lt blue – RH O2 sensor
From the Red/Black wire in the LH O2 sensor harness and the Red/Black wire on the computer pin 29
From the Dark Green/Pink Gray/Lt blue wire on the RH O2 sensor harness and the Gray/Lt blue wire on the computer pin 27


There is a connector between the body harness and the O2 sensor harness. Make sure the connectors are mated together, the contacts and wiring are not damaged, and the contacts are clean and not coated with oil.

The O2 sensor ground (orange wire with a ring terminal on it) is in the wiring harness for the fuel injection wiring. I grounded mine to one of the intake manifold bolts

Check the fuel pressure – the fuel pressure is 37-41 PSI with the vacuum disconnected and the engine idling. Fuel pressure out of range can cause the 41 & 91 codes together. It will not cause a single code, only both codes together.

Make sure you have the proper 3 wire O2 sensors. Only the 4 cylinder cars used a 4 wire sensor, which is not compatible with the V8 wiring harness. The exception is that the 94-95 uses a 4 wire O2 sensor.

Replace the O2 sensors in pairs if replacement is indicated. If one is weak or bad, the other one probably isn't far behind.

Code 41 can also be due to carbon plugging the driver’s side Thermactor air crossover tube on the back of the engine. The tube fills up with carbon and does not pass air to the driver’s side head ports. This puts an excess amount of air in the passenger side exhaust and can set the code 41. Remove the tube and clean it out so that both sides get good airflow: this may be more difficult than it sounds. You need something like a mini rotor-rooter to do the job because of the curves in the tube. Something like the outer spiral jacket of a flexible push-pull cable may be the thing that does the trick.

If you get only code 41 and have changed the sensor, look for vacuum leaks. This is especially true if you are having idle problems. The small plastic tubing is very brittle after many years of the heating it receives. Replace the tubing and check the PVC and the hoses connected to it.

Complete computer, actuator & sensor wiring diagram for 94-95 Mustangs
94-95_5.0_EEC_Wiring_Diagram.gif


Complete computer, actuator & sensor wiring diagram for 91-93 Mass Air Mustangs
91-93_5.0_EEC_Wiring_Diagram.gif


Complete computer, actuator & sensor wiring diagram for 88-90 Mass Air Mustangs
88-91_5.0_EEC_Wiring_Diagram.gif
 
Last edited:
Well, when I bought the car, the engine light came on. Soon found out (after scanning codes, there was a missing passanger sensor. Put new sensor in, light stayed off.

Still showing a 41 code.

How to clear codes.
Clearing the codes by pressing a button on the scan tool or disconnecting the test jumper used to start the code dump does not erase the “learned settings”. All it does is erase the stored codes in memory.

You must clear the codes anytime you replace any sensor. The following tells you how and is different from the method above
Clear the computer codes by disconnecting the battery negative terminal and turn the headlights on. Turn the headlights off and reconnect the all sensors including the MAF and anything else you may have disconnected. Then reconnect the battery negative cable.. This clears all spurious codes may have been generated while troubleshooting problems. It also clears the adaptive settings that the computer "learns" as it operates. Clearing the codes does not fix the code problems, it just gives you a clean slate to start recording what the computer sees happening.

Run the car for at least 30 minutes of driving and dump the codes again to assure that you have fixed the code problem or sensor problem. This is necessary for the computer to relearn the adaptive settings that the computer uses for proper operation. The engine may run rough at first, but should smooth out as it runs for the 15-20 minute learning period.

If that doesn't fix it, then you have the test path, do the diagnostic work.
 
  • Like
Reactions: 1 user
It sound like you have a bad ground wire somewhere. I had an old Fairmont back in the day when I could cause it to stumbull whenever I put the heater motor fan on high. This caused a weak ground to steal from the ignition systems ground and the car would start to miss. Check all of the under hood ground wire connections which may have green colored screws. Also drive in daylight with the headlights on and see if you can reproduce the issue. It is worth a shot.
 
check the wiring on the headlight switch and also are the old 2G power wires hooked up to the 3G alternator or did you use a dedicated 4 gauge wire with a 150 amp inline fuse. Did you add an additional 4 gauge ground wire from the chassis to the block. Are all of the factory grounds intact and tight. You have one from the firewall to the back of the driver head or block, one behind the battery to the negative post. One from the neg battery to the block by the timing cover, one from teh firewall to the orange wire on the harness for the HEGO on the passerger firewall . and an EEC ground in the passenger kick panel .
 
It sound like you have a bad ground wire somewhere. I had an old Fairmont back in the day when I could cause it to stumbull whenever I put the heater motor fan on high. This caused a weak ground to steal from the ignition systems ground and the car would start to miss. Check all of the under hood ground wire connections which may have green colored screws. Also drive in daylight with the headlights on and see if you can reproduce the issue. It is worth a shot.
I have flipped the headlights on during the daytime, and it still misses. Not so bad when I feather the throttle, but if I snap it the worse it gets.
 
check the wiring on the headlight switch and also are the old 2G power wires hooked up to the 3G alternator or did you use a dedicated 4 gauge wire with a 150 amp inline fuse. Did you add an additional 4 gauge ground wire from the chassis to the block. Are all of the factory grounds intact and tight. You have one from the firewall to the back of the driver head or block, one behind the battery to the negative post. One from the neg battery to the block by the timing cover, one from teh firewall to the orange wire on the harness for the HEGO on the passerger firewall . and an EEC ground in the passenger kick panel .

I read your thread originally after watching LMR's how to. I did reslove the two orange/black wires by disconnecting them and wrapping them in tape. I do have a 4g power wire with fuse. I haven't installed the ground yet because I'm not sure exactly where it safely goes. I don't think I had this issue before the distributor kicked the bucket. I only noticed it after the repair was complete. The shop that installed the distributor had the timing WAY below 10 BTC and that's when I started learning how to do things. I'm not at an effective level yet, but I'm learning.

I assume for the 4g ground, I want one cable from the battery to the chassis, and the 2nd from the block to the firewall. (Or that's how it was explained by a fellow on the modified foxbodys page in Facebook).
 
when you checked the timing, did you remove the SPOUT connector to lock the timing and was the timing light on #1 spark plug wire... what distributor did they install...I recommend a Cardone replacement from Rock Auto which are repackaged Ford units.. cheap parts store ones use chinee made parts loike bearings, shutter wheels, etc.
 
when you checked the timing, did you remove the SPOUT connector to lock the timing and was the timing light on #1 spark plug wire... what distributor did they install...I recommend a Cardone replacement from Rock Auto which are repackaged Ford units.. cheap parts store ones use chinee made parts loike bearings, shutter wheels, etc.
My friend walked me through the process after it was fixed. Brand is whichever O'Riley's carries. At the time I was on my way to work in the car just died. I ended up having it towed to a shop. My friend set the timing to 14 degrees, but I recently bumped it back down to 10. I'll check out one of those distributors you mentioned. Thanks!
 
My friend walked me through the process after it was fixed. Brand is whichever O'Riley's carries. At the time I was on my way to work in the car just died. I ended up having it towed to a shop. My friend set the timing to 14 degrees, but I recently bumped it back down to 10. I'll check out one of those distributors you mentioned. Thanks!
Do you happen to know the right OEM part number or where to find one for the distributor? Looked on RA and there seems to be a few...
 
  • Like
Reactions: 1 user
Don't order from RockAuto :nonono:

It's sad to say but they are intentionally going out of their way to piss people off with absolutely ZERO customer support.

If something goes wrong with your order, they will tie you up in LIMBO for as long as they can manage it.

We have a discount code from these ass clowns and I refuse to use it.

However... If you are one of the many in today's society that needs to keep themselves in perpetual victim status, [then] order from RockAuto. They'll hook you up. :nice:
I appreciate it, but the advice is just a little late. Either way, it's a learning experience.
 
  • Like
Reactions: 1 user