
- Mar 5, 2006
- 468
- 3
- 0
Somebody stick this in the useful technical thread index please.
There are a lot of people out there giving bad information about how to install rocker arms. After answering many of these questions, I am convinced that rocker arms and the valvetrain in general is one of the most commonly misunderstood things in all of Stangnet. This is not meant to be a be-all, end-all explanation of rocker arms, just something for beginners who need a starting point.
Rocker Arms 101:
There are three main styles of rocker arms used on small block ford heads. These include pedestal mount, stud mount, and shaft mount. I don't care what anyone tells you, none of them are just a bolt-on-and-go deal.
Pedestal Mount: Pedestal mount rocker arms are the type of rocker arm most commonly found factory installed on late model 5.0L engines. On most standard 5.0L engines, the rocker arms were plain old stamped steel. The 1993-1995 Cobra 5.0L engines received pedestal mount Crane 1.7 ratio roller rocker arms. All pedestal mount rocker arms are fastened to the cylinder head with a small 5/16" bolt. There are many performance pedestal mount rocker arms available, but of the three types of rocker arms, the pedestal mount is considered the weakest because it is held in place with the smallest fastener.
A couple examples of pedestal mount rocker arms:
Factory:

1993-1995 Cobra/Crane 1.7 Ratio:

Ford Racing:

Pedestal Mount Installation Instructions: Only after you have ensured that you have the correct pushrod length, confirmed whether or not you need shims under the pedestals, that the rocker arm tip is centered on the valve stem tip, are you ready to install your pedestal mount rocker arms. One cylinder at a time, turn the motor over until that cylinder is at TDC on the compression stroke, and then slowly torque the rocker bolts for both rocker arms for that cylinder to 18-20/ft lbs. Pay attention to your torque wrench while you do this. You should be able to turn your torque wrench 1/4-1 full turn before it clicks at 18-20/ft lbs. If it clicks before 1/4 turn, or after 1 full turn, than you either have the wrong length pushrod or need to shim the pedestals and you need to figure out which before you start over.
For more comprehensive pedestal mount rocker arm instructions, please READ: http://cranecams.com/pdf/453e.pdf
Stud Mount: Stud mount rocker arms were factory installed on 1963-1968 Ford 289s, and early 302s any many other early engines. Most (not all) factory ford heads that came with studs were press in studs, which are not desirable for performance since those types of studs tend to pull out at high rpm with agressive cams and stiff valve springs. Screw-In Studs are the only type of stud used in performance aftermarket stud-mount heads. All small block ford 289/302 engines originally equipped with stud rockers had 3/8 studs. 3/8 referring to the section of the stud the rocker goes on. Studs commonly used in performance small block ford heads are available in either 3/8" or 7/16", both of which have a 7/16" thread that goes into the cylinder head's stud boss. Whenever you hear someone referring to a 3/8" or 7/16" stud, they are referring to the "top part" of the stud that the rocker arm goes on. The thicker the stud, the less prone they are to valvetrain flex. At high rpm, even studs can flex almost like trees in a windstorm. You can convert a head with 3/8" screw-in studs to 7/16" screw in studs without machining, but you will need different rocker arms since rocker arms are stud size specific, meaning you couldn't use a rocker arm for 3/8" studs on a 7/16" stud and vice versa. Stud mount rocker arms can be attached with a nylon lock nut or a poly lock. Poly locks are preffered because they are less likely to back the stud out of the head than nylon lock nuts are. If you have a really high revving motor, you can also tie all your studs together for increased stability with a stud girdle.
A couple examples of stud mount rocker arms/parts:
Factory:


Screw In Rocker Studs:

Comp Cams Magnum Roller Tip with Lock Nut:

Crane Gold Race with Poly Lock:
.jpg)
Stud Girdle:
Stud Mount Installation Instructions: Stud mount rocker arms, just like any other rocker arm, require correctly measured pushrod length and correct valvetrain geometry. To install them, you need to turn the motor over by hand in the direction of engine rotation. With the intake off, you can watch the lifters. When the exhaust lifter for a particular cylinder just starts to come out of its bore, you can now adjust the intake rocker arm for that cylinder. Why? Because if the exhaust valve is just opening, the intake valve is closed and on the base circle of the cam, where we need it to be to adjust it. After you've adjusted the intake valve, keep turning the motor over by hand and watch the intake lifter, once the intake lifter has come as far out of its bore as it can (max lift) and then starts going back down, pay attention. When the intake lifter reaches 1/2 way to 2/3 of the way back down, you can stop and adjust the exhaust rocker. The typical adjustment procedure is to spin the pushrod in your fingers as you tighten the rocker, when you start to feel resistance on the pushrod, the slack has been taken out of the pushrod and you are at zero lash. Make a 1/2-3/4 further of a turn on the lock nut or poly lock once you have done this (if using a poly lock, don't forget to tighten the allen head screw).
For more comprehensive instruction, please READ: http://compcams.com/Technical/Instructions/Files/151.pdf
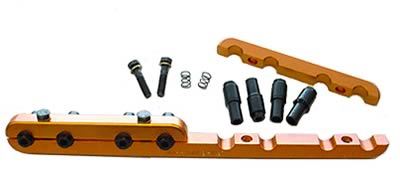
Shaft Mount: Shaft mount rocker arms are by far the most expensive type of rocker arms you can buy, and were never factory equipment on 289/302 based small block fords. There are a number of aftermarket manufacturers that make shaft mount rocker kits for popular small block ford heads, such as the Trick Flow Twisted Wedge, AFR 165/185/205/225, etc. They are the absolute best for valvetrain stability because they tie the rocker arm bodies together, and are even more stable than a stud girdle setup. The stands that the shaft mount rocker arms ride on are fastened to the cylinder head stud bosses where the rocker studs used to be, and the shaft mount rocker arms are then fastened to the stand. For extremely high revving race motor with only the best parts, there is no substitute for a shaft mount setup. Consider this: most factory muscle cars with big block engines, such as the Ford FE, Hemi, etc. came from the factory with shaft mount rocker arms. Shaft mount rocker arms for SBF's are available from Crane, Jesel, Comp, Harland Sharp, and others.
A couple examples of stud mount rocker arms:
Crane Shaft Mount:
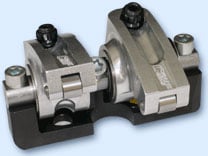
Jesel Shaft Mount:

Shaft Mount Installation Instructions: Just like with any other rocker system, you need to check to see if the rocker stand that the shaft rockers are mounted to need to be shimmed, and you also need to measure for proper pushrod length. The installation procedure is essentially identical to stud mount rocker arms, in that you turn the motor over by hand and adjust each rocker arm when its cam lobe is on the base circle. You also have a lash adjuster on the top of the rocker arm body that works in a semi-similar fashion to a poly lock that you would normally find on a stud mount rocker arm.
An example of Shaft Mount Installation Instructions: http://www.jeselonline.com/docs/instructions/INS-SS0051.pdf
There are a lot of people out there giving bad information about how to install rocker arms. After answering many of these questions, I am convinced that rocker arms and the valvetrain in general is one of the most commonly misunderstood things in all of Stangnet. This is not meant to be a be-all, end-all explanation of rocker arms, just something for beginners who need a starting point.
Rocker Arms 101:
There are three main styles of rocker arms used on small block ford heads. These include pedestal mount, stud mount, and shaft mount. I don't care what anyone tells you, none of them are just a bolt-on-and-go deal.
Pedestal Mount: Pedestal mount rocker arms are the type of rocker arm most commonly found factory installed on late model 5.0L engines. On most standard 5.0L engines, the rocker arms were plain old stamped steel. The 1993-1995 Cobra 5.0L engines received pedestal mount Crane 1.7 ratio roller rocker arms. All pedestal mount rocker arms are fastened to the cylinder head with a small 5/16" bolt. There are many performance pedestal mount rocker arms available, but of the three types of rocker arms, the pedestal mount is considered the weakest because it is held in place with the smallest fastener.
A couple examples of pedestal mount rocker arms:
Factory:
1993-1995 Cobra/Crane 1.7 Ratio:
Ford Racing:
Pedestal Mount Installation Instructions: Only after you have ensured that you have the correct pushrod length, confirmed whether or not you need shims under the pedestals, that the rocker arm tip is centered on the valve stem tip, are you ready to install your pedestal mount rocker arms. One cylinder at a time, turn the motor over until that cylinder is at TDC on the compression stroke, and then slowly torque the rocker bolts for both rocker arms for that cylinder to 18-20/ft lbs. Pay attention to your torque wrench while you do this. You should be able to turn your torque wrench 1/4-1 full turn before it clicks at 18-20/ft lbs. If it clicks before 1/4 turn, or after 1 full turn, than you either have the wrong length pushrod or need to shim the pedestals and you need to figure out which before you start over.
For more comprehensive pedestal mount rocker arm instructions, please READ: http://cranecams.com/pdf/453e.pdf
Stud Mount: Stud mount rocker arms were factory installed on 1963-1968 Ford 289s, and early 302s any many other early engines. Most (not all) factory ford heads that came with studs were press in studs, which are not desirable for performance since those types of studs tend to pull out at high rpm with agressive cams and stiff valve springs. Screw-In Studs are the only type of stud used in performance aftermarket stud-mount heads. All small block ford 289/302 engines originally equipped with stud rockers had 3/8 studs. 3/8 referring to the section of the stud the rocker goes on. Studs commonly used in performance small block ford heads are available in either 3/8" or 7/16", both of which have a 7/16" thread that goes into the cylinder head's stud boss. Whenever you hear someone referring to a 3/8" or 7/16" stud, they are referring to the "top part" of the stud that the rocker arm goes on. The thicker the stud, the less prone they are to valvetrain flex. At high rpm, even studs can flex almost like trees in a windstorm. You can convert a head with 3/8" screw-in studs to 7/16" screw in studs without machining, but you will need different rocker arms since rocker arms are stud size specific, meaning you couldn't use a rocker arm for 3/8" studs on a 7/16" stud and vice versa. Stud mount rocker arms can be attached with a nylon lock nut or a poly lock. Poly locks are preffered because they are less likely to back the stud out of the head than nylon lock nuts are. If you have a really high revving motor, you can also tie all your studs together for increased stability with a stud girdle.
A couple examples of stud mount rocker arms/parts:
Factory:
Screw In Rocker Studs:
Comp Cams Magnum Roller Tip with Lock Nut:
Crane Gold Race with Poly Lock:
Stud Girdle:
Stud Mount Installation Instructions: Stud mount rocker arms, just like any other rocker arm, require correctly measured pushrod length and correct valvetrain geometry. To install them, you need to turn the motor over by hand in the direction of engine rotation. With the intake off, you can watch the lifters. When the exhaust lifter for a particular cylinder just starts to come out of its bore, you can now adjust the intake rocker arm for that cylinder. Why? Because if the exhaust valve is just opening, the intake valve is closed and on the base circle of the cam, where we need it to be to adjust it. After you've adjusted the intake valve, keep turning the motor over by hand and watch the intake lifter, once the intake lifter has come as far out of its bore as it can (max lift) and then starts going back down, pay attention. When the intake lifter reaches 1/2 way to 2/3 of the way back down, you can stop and adjust the exhaust rocker. The typical adjustment procedure is to spin the pushrod in your fingers as you tighten the rocker, when you start to feel resistance on the pushrod, the slack has been taken out of the pushrod and you are at zero lash. Make a 1/2-3/4 further of a turn on the lock nut or poly lock once you have done this (if using a poly lock, don't forget to tighten the allen head screw).
For more comprehensive instruction, please READ: http://compcams.com/Technical/Instructions/Files/151.pdf
Shaft Mount: Shaft mount rocker arms are by far the most expensive type of rocker arms you can buy, and were never factory equipment on 289/302 based small block fords. There are a number of aftermarket manufacturers that make shaft mount rocker kits for popular small block ford heads, such as the Trick Flow Twisted Wedge, AFR 165/185/205/225, etc. They are the absolute best for valvetrain stability because they tie the rocker arm bodies together, and are even more stable than a stud girdle setup. The stands that the shaft mount rocker arms ride on are fastened to the cylinder head stud bosses where the rocker studs used to be, and the shaft mount rocker arms are then fastened to the stand. For extremely high revving race motor with only the best parts, there is no substitute for a shaft mount setup. Consider this: most factory muscle cars with big block engines, such as the Ford FE, Hemi, etc. came from the factory with shaft mount rocker arms. Shaft mount rocker arms for SBF's are available from Crane, Jesel, Comp, Harland Sharp, and others.
A couple examples of stud mount rocker arms:
Crane Shaft Mount:
Jesel Shaft Mount:
Shaft Mount Installation Instructions: Just like with any other rocker system, you need to check to see if the rocker stand that the shaft rockers are mounted to need to be shimmed, and you also need to measure for proper pushrod length. The installation procedure is essentially identical to stud mount rocker arms, in that you turn the motor over by hand and adjust each rocker arm when its cam lobe is on the base circle. You also have a lash adjuster on the top of the rocker arm body that works in a semi-similar fashion to a poly lock that you would normally find on a stud mount rocker arm.
An example of Shaft Mount Installation Instructions: http://www.jeselonline.com/docs/instructions/INS-SS0051.pdf