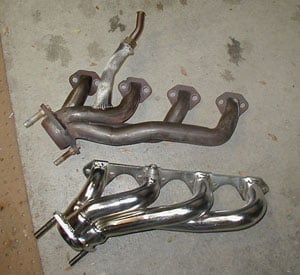
BBK Shorty Header Install
Before even attempting to install the headers, the engine must be completely cool. The best way to do this is to position the car up on jack stands the night before and start the install the next morning. However it is possible to let the car cool down a couple of hours before starting. Be very careful when working around the exhaust manifolds and the EGR, they can be extremely hot. Experienced mechanics claim to do a header swap in about 3 to 4 hours. The majority will quickly learn that it takes much longer than that. Depending on your skill level and amount of patience, expect the install to take anywhere from 6-8 hours. Invite a buddy over to help you out. An extra hand may be needed. Step 1. Start by removing the negative cable from the battery. In order to gain access to the header on the passenger side, the induction will need to be removed. Unscrew the two screw camps holding on the induction hose from the throttle body to the air box. Unhook the ventilation hose from the induction tubing, and disconnect and unscrew the Air Temperature Sensor. The air box is held in by a rubber mounted screw to the fender-well. Unscrew and remove. The hoses that run to the smog pump and catalytic converters will need to be removed. There are 3 screw clamps that will need to be loosened and two vacuum lines that will need to be disconnected before the hose(s) can be removed. Remember which vacuum line goes where. (see fig 3)
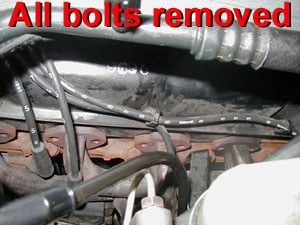
Step 2. To aid in the ease of loosening the header bolts, the spark plugs and wires need to be removed. To get the spark plugs out, use the removal socket found in most automotive tool sets. Once they have been take out, the H-pipe will need to be loosened. Step 3. Complete removal of the H-pipe is not necessary, but may aid in the installation of the headers. In our case, we did not want or need to remove the stock h-pipe, as it is quite heavy. Jack the car up on to 4 jack stands to give you plenty of room to work under the car. Using a �" socket or bigger, and a lot of extensions, remove the two nuts from the H-pipe flange. Repeat for both sides. In order to get access to one of the nuts on the passenger side, the oxygen sensor will need to be removed from the H-pipe. It can be removed with a special socket, or a 22mm open-ended wrench. Before loosening the oxygen sensor, unplug it from the wiring harness so the wires don't get twisted. Remove the two screws holding the H-pipe to the transmission cross-member. Loosening the brackets on the air tube may be wise as well. Now the H-pipe can be pulled down from the headers. This may take some strength, considering your H-pipe may have never been disconnected for the life of your car. Step 4. Using a socket, loosen and remove the header bolts. There should be 16 in total. (see fig 4) Some of the bolts may be hard to reach, so different length sockets and extensions may be needed. I had trouble removing the first header bolt on the driver's side, on cylinder 5. The power steering pump and A/C compressor would not allow me to use a socket wrench, nor would it allow for the travel of an open-ended wrench. I ended up using a swivel to get it out. Just as a heads up, on the driver's side, the dipstick tube is attached to a header bolt and on the passenger side, one of the metal air tubes is attached to the furthest most header bolt. (see fig 5) Now unscrew the top of the EGR tube from the EGR valve located on the throttle body. You will need a 1" wrench and need to turn it clockwise to loosen it. (see fig 6) Step 5. Removing the headers is not a simple task. It will take some bending and scraping. The dip stick tube will need to be removed from the block in order to remove the driver's side header. Once removed, remove the stock gaskets from the block. Some gasket removal/scraping may be necessary.
Step 5. Removing the headers is not a
simple task. It will take some bending and scraping. The dip stick will need
to be removed from the block in order to remove the driver's side header.
Once removed, remove the stock gaskets from the block. Some gasket
removal/scraping may be necessary. Step 7. Bolting up the headers to the block is a major pain. Trying to get the header to line up with the bolt holes can seem next to impossible at times. Before attempting to bolt up the headers, align the gasket to the header and put one bolt in at each end of the header to keep the gasket in place. This is where a friend comes in handy. Have a buddy hold the bolt in place on the other end of the header while you try to thread the first bolt. This is to prevent the gasket from slipping. As you are positioning the header into place, be careful not to tear the gasket or else it is unusable. (see fig 7) Once a bolt on each side has been threaded, you may notice a gap in the center of the header and the block. (see fig 8) This is normal. The header will completely mate with the block when all the bolts are put in place. You may need to take a couple of breaks as you try to thread the first couple of bolts. Sometimes changing roles with your buddy can be a valuable move. Once the rest of the bolts have been put in, make sure they are really tight. You my want to put some Anti-seize on the header bolts, to prevent them from getting stuck down the road, but it's optional. When bolting up the driver's side, be sure to include the dipstick tube, you don't want it to rattle around. For the passenger side, you don't need to bolt the air tube back to the block. You can always tie it up somewhere so it won't rattle around. We used some zip ties to do this.
Step 8. Now reconnect the H-pipe. This may be a bit difficult because the H-pipe needs to be lifted up towards the headers. Align the flange with the header studs and slide into place. Finger tighten the two nuts. Slowly tighten each side with the socket. You don't want to tighten up one bolt all the way and then do the next because this may bend the header collector and create an exhaust leak. Tighten each side incrementally then torque down. To prevent an exhaust leak make sure both nuts are tight. Repeat for the other side and screw in the oxygen sensor. Do not over tighten the nuts or the threads may strip. We broke two, brand new header studs and had to replace them. This was because BBK sent us header studs that came stripped, so be sure you check the studs before installing them. Step 9. The new set of headers may come with a different EGR tube (94 & 95). Ford Motorsport headers utilize the stock EGR tube, however manufacturers such as BBK include a new one. Align the EGR tube on the header bung and lightly screw in. Align the top of the EGR tube to the EGR valve coming from the Throttle Body. Use some high temperature Loc-tite on the threads to prevent the nut from backing out. Tighten the nut at the top of the EGR tube, apply the Loc-Tite the threads at the bottom and tighten.
Step 10. Install the spark plugs and attach the wires. Take special precaution that the plug wires are not resting on the headers or EGR tube. (see fig 9) Step 11. Go over each header bolt again to make sure they are nice and tight. Install the rubber air tubes to the smog pump and insert the air box. Insert the induction tubing and tighten down. The engine is ready to start up. Reattach the negative cable to the battery. Keep in mind that greasy hand prints on the H-pipe, headers, and miscellaneous equipment will smoke a bit and give off a foul stench. Once the car is started, listen for exhaust leaks, which sound like a ticking noise. The easiest way to locate an exhaust leak is to take a metal tube, put one end on your ear, and move the other end around the engine. Tighten up and exhaust leaks and then take it for a road test. It is common for the headers to smell for up to two weeks after the install. In our case, the headers produced a smell similar to Macaroni and Cheese. The next day the smell changed to burnt Macaroni and Cheese. Over all, I am not pleased with the quality of the BBK headers. Brother's Performance forgot to include the new EGR tubing and it took several phone calls to have a new tube shipped to us. On one of our many attempts to get a new EGR tube, we were told by a service representative that the EGR tube is not supposed to be included, even though the directions say that one is. His response was to cap off the EGR, rather than ship us a new tube. Aside from that, the chrome headers discolored from the heat within the first 5 minutes of starting the engine. One would think that the finish would be better than that. After about a week or so, it would be a good idea to retighten the header bolts so they don't back out. The last thing anyone wants to do is replace a header gasket because the header bolts backed out and caused a major exhaust leak. Some people feel that it is necessary to retighten the header bolts after a few days, then a week, then after two weeks, but each case is different. We only had to tighten the header bolts twice. There was not a huge power gain from the install of the shorty headers. The was a noticeable difference in the tone of the exhaust. The sound from the stock mufflers is much lower and noticeably deeper than MAC and Flowmaster mufflers and Jeremy is happy with his alternative sound. ~Scott |