

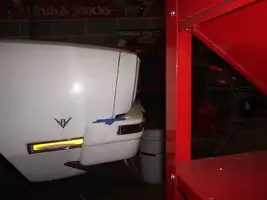
Like most, I'm not pleased with how far the stock bumpers stick out. So, I finally started working on mine to tuck them in a bit. I used an air saw to trim the urethane cover, and cut the round bar on the bumper mounting brackets. I realize they are now so short that the shock absorbing feature doesn't work, but since the 65-early 70's survived without it , then so can I. I didn't photo the original before cutting, but attached is how it looks after taking 2-1/4" out of the brackets and cover. My first cut only took 3/4" and was not very noticeable, so I kept cutting till I was happy with it. I still need to fix a couple of splits, re-attach the curved lip that goes up under the license plate and across the back, and shorten the sides by 2-1/4".
You are using an out of date browser. It may not display this or other websites correctly.
You should upgrade or use an alternative browser.
You should upgrade or use an alternative browser.
Bumper Tuck
- Thread starter welder4956
- Start date


dmoody
Founding Member
dmoody
Founding Member
I don't think it would look good flush with the tail lights. I think if you make the rear flush then you have to give the front the same treatment... and I haven't seen any II with flush front bumpers that I liked.... just my opinion though.
david
david
Thanks for the comments. I have not done the front yet. I'm pondering whether to shorten the bumper like the back or to install a modified Shelby style racing apron. I may do the Shelby apron first to see how it looks. I've cut a '65 grill to fit the II opening and will use the '65-66 parking lights in the apron.

roadsterII
Founding Member
the back looks good for depth, on the sides, I'd trim it so the side marker shows.
Up front see what you can do with tucking the stock bumper like you did out back. If anything, it won't cost anything to see what you think.
rII
Up front see what you can do with tucking the stock bumper like you did out back. If anything, it won't cost anything to see what you think.
rII
the back looks good for depth, on the sides, I'd trim it so the side marker shows.
Up front see what you can do with tucking the stock bumper like you did out back. If anything, it won't cost anything to see what you think.
rII
The second post shows the cut lines marked on the sides to uncover the side marker lights. I haven't made the cuts yet because I don't have the adhesive yet to put it back together after I shorten it. But, I'll get there eventually.
The front bumper should be much easier compared to the back. I'll probably do it this weekend and post some pics. I've already seen what the front looks like on a 74 after the same treatment, so I started in the back. I wish I had taken pics of the 74 to post here.
Up front see what you can do with tucking the stock bumper like you did out back. If anything, it won't cost anything to see what you think.
rII
OK, I finally got around to starting the tuck on the front bumper. Here's some shots of it mocked up. I took out 2-1/4", same as the rear. For mounting, I had to drill 2 new 5/8" holes located 2-1/4" forward from the existing mounting holes on each side. Had to grind a notch in the dimpled area to allow the bolt to pull up flush. Still have to trim the sides to uncover the side marker lights. Hopefully I can do that next weekend.
Attachments


Steel Steeds
New Member
I know I'm in the minority in that I've always liked the looks of the II bumpers. That said, what you've done looks really good. I thought the front bumper would like terrible shortened, but you've done a great job. I look forward to seeing more pictures with the sides shortened.
Wow - I see there's been over 100 views since I posted the front bumper pics! I didn't know we had that many people frequenting this forum. I'll be cutting the sides this weekend on front and rear.
UnbridledFury
Founding Member
1badII
Member
Still working on it. I bought a Bondo brand bumper patch kit to shorten the sides and glue back together, but it didn't hold. I'm going to try a professional grade Duramix adhesive to see if it will work better.
Blue coyote
Founding Member
This encourages me to try a similar mod, but using the cheap bastard/redneck method...
Remove bumper and trim the top and side sections of urethane, then remove the supports, put them in a vice, and push them in all the way with a rather large precision alignment tool. Re-install, and detail as desired...
I'm thinking that the Rat Snake would look better with this mod, along with a 74 header panel/hood assembly, and the chrome insert trim on the bumpers (I'm de-black-outing the chrome trim, since the car looks a bit too monotone with the black on black)
This encourages me to try a similar mod, but using the cheap bastard/redneck method...
Remove bumper and trim the top and side sections of urethane, then remove the supports, put them in a vice, and push them in all the way with a rather large precision alignment tool. Re-install, and detail as desired...
I'm thinking that the Rat Snake would look better with this mod, along with a 74 header panel/hood assembly, and the chrome insert trim on the bumpers (I'm de-black-outing the chrome trim, since the car looks a bit too monotone with the black on black)
Make the chrome red!!!

And OP, The bumpers look really good!!1
This encourages me to try a similar mod, but using the cheap bastard/redneck method...
Remove bumper and trim the top and side sections of urethane, then remove the supports, put them in a vice, and push them in all the way with a rather large precision alignment tool. Re-install, and detail as desired...
I'm thinking that the Rat Snake would look better with this mod, along with a 74 header panel/hood assembly, and the chrome insert trim on the bumpers (I'm de-black-outing the chrome trim, since the car looks a bit too monotone with the black on black)
The vice trick won't work. The shocks are sealed and spring back under pressure, so you will need to drill a hole to allow the pressure to bleed off. Even then, it will be tough to compress unless you use a hydraulic press. It's easier to just drill new mounting holes as I did.
Blue coyote
Founding Member
It'll all be trial, error, and boredom relief. The vice is simply to keep the bugger from jumping during repeated aplications of the precision alignment tool, BTW) Besides, I've probably got a dozen or so spares to mess around with
And no red trim on the Rat Snake. All black and silver except for lighting. Today I scored a complete 4-speed conversion, so that, the electric fan, and the manual steering swap will force the bumper tuck further down the list...
And no red trim on the Rat Snake. All black and silver except for lighting. Today I scored a complete 4-speed conversion, so that, the electric fan, and the manual steering swap will force the bumper tuck further down the list...
79PaceKar
Advanced Member
Been a while since this was posted. I am currently restoring a 1978 but converting to a Kind Cobra. Just started. I have wondered about doing this as I too don't like the way the bumpers stick out. Don't understand the limits using the new shorten bumpers now offered. Seems they have warning about this and that and they don''t conform. Hoping you have updated photos. Thanks
He's not been around these parts for about 8 years, so unfortunately I don't think we're going to see any updated pics. 
In fact, everyone who replied in this thread hasn't been around in quite some time. I wonder what they've been up to or if they're still involved with IIs....
In fact, everyone who replied in this thread hasn't been around in quite some time. I wonder what they've been up to or if they're still involved with IIs....
Similar threads
- Replies
- 4
- Views
- 373
- Replies
- 11
- Views
- 516
- Replies
- 12
- Views
- 288
- Replies
- 2
- Views
- 192
Progress Thread
LTD-ing
- Replies
- 8
- Views
- 379