Curious wet spot

other_shoe

Member
May 4, 2007
313
3
19
Today I found a moldy wet spot under the floor mat in the passenger footwell. The odd thing is that the two usual suspects -- heater core and cowl -- are ruled out since the heater is not plumbed in and I ran the garden hose into the cowl for two minutes with no leak into the cabin.

Any ideas on how this might be getting wet?
 
  • Sponsors (?)


Does the car have a/c? Could be the evaporator drain tube leaking. Rusted out floor pan? The cowl vent leaks can be sneaky.

No climate control whatsoever at the moment (I'm using a rag to deal with windshield fog on the quite rare occasions when I'm out in the rain). The floor pans are two years old and presumably solid.

All I can think is a cowl leak, but even that is hard to countenance since the car is garaged 97% of the time and does not show any indication of significant leaking (a single drop) when literally inundated via the hose.

I do leave the top down when parking it in the basement garage, so I'm wondering about humidity (though this seem unlikely since I would expect the same problem on the driver's side) and/or a freak leaking pipe.

It's a bummer since I'd planned on replacing the carpet tomorrow and now do not want to do so until I figure out the problem.
 
I think I've figured it out, at least in part.

There is a what appears to be a tiny cowl leak somewhere up by the firewall. Once I removed the carpet and repeated the garden hose experiment a tiny trickle ran down the firewall.

Given the rate that was getting in via the hose-cowl, I had a hard time believing that this could account for the quantity of water I found below the sound deadener. Then I noticed two screw holes in the firewall inboard from the fan motor. I'm not sure what used to be mounted there, but I'm pretty sure that I doused this part of the firewall while attempting to clean the rusty water stains that remain from last summer's thermostat failure. Between the cowl leak and inadvertently spraying water into these holes, that would do it.
 
Bad things, man. Bad things.

Today I went exploring. I took out the un-plumbed heater so that I could get a look at the leak. Then I applied the garden hose and got the same trickle, which was coming from the corner where the firewall intersects with the cowl and side panel. It appeared to be coming from behind some poorly applied seam sealer.

I took a screwdriver to the seam sealer and found a number of unfortunate things. First, the body guy who got in way over his head did such a poor job installing the side panel that there is a nickle sized gap in the corner that had been plugged with seam sealer. Second (and I already knew this), he had installed the splash shield before attaching the fender with the screws going the wrong direction, such that I could not remove the splash shield without removing the fender. At this point I was curious about the nature of this leak since it did not seem to be a result of the typical rusty cowl but rather some sort of problem in the immediate vicinity of the drain.

Thus, I took off the fender, so that I could get a better look at what was going on. After struggling through a number of obstacles, such as the front valance being held on with an assortment of metric bolts, I got the fender off without scratching anything, and I quickly saw the main problem.

There were indeed holes in the bottom of the cowl. Not from rust, but rather from a tool, probably an air chisel. The main hole is an inch+ tear maybe a quarter inch above the floor of the cowl about an inch inboard from the drain hole. The others are much smaller and higher and do not seem to be causing a problem. Because of the pitch on my driveway and garage floors, the water is pooling there and dripping into the cabin.

Unfortunately, a proper cowl replacement is not in the cards this year or the next, so I'm looking at stop-gaps (especially since the only time the car gets wet is when I wash it).

My first thought was to squeeze seam sealer into the main tear and then use a big screwdriver, chisels, and punches to bend the metal back into alignment so the hole is not so large. Then I'd likely add another layer of sealer and see if this helped.

My other though was to bend the metal back into shape and solder the seam. I doubt I have the skill or length on the iron to do this.

Any thoughts or suggestions are appreciated.

PS: I'm going to do a separate post on some other issues I discovered.
 
Could you use fiberglass for the temporary fix? Seam sealer is great but with a large gap I think this would fill and seal better.. I have not tried this so it is just a thought!
 
Thanks for the feedback, John and Jackson.

Today I went to the hardware store to gather some materials. I ended up with a couple of wire brushes and several options for sealing the hole.

I decided against putting seam sealer into the gap first since I figured it would take too much time to bend the metal back and I'd probably make a bloody mess getting the screwdriver and punch in the setting sealer. So instead I bought some solder for joining sheet metal and some JB WetWeld, figuring that I'd try the solder first and then plug the seam with JB's putty if that didn't work.

Bending the metal back took a long time but was a great success. What was a 1.5 inch by 3/8 inch gap became a tiny seam such that if the solder had worked it would have looked like a scar on a nicely knitted wound. I wanted to test how much this decreased the volume of water entering the car, but I silenced my inner experimenter and pushed on.

Sadly, the solder option did not work -- probably because I need a better iron for dealing with a material like steel.

So, I used the JB WetWeld. Tomorrow morning, when things are coolest, I'll shoot the seam sealer in behind. Hopefully, this will work to make the proper drain the path of least resistance.

I have some pictures and will look into posting them.
 
Great success with the JB WetWeld. All of the leaking along the firewall on the passenger side has been eliminated.

Here is a picture of the gouge after I had begun to work on it and closed each side by about 15 to 20 degrees.
5953327542_be62b81806_b.jpg


And here is a picture of the final product before I plugged it with the putty.
5953335746_d4ff9bce74_b.jpg


Note the additional gouge behind the part I bent back into shape. I have not been able to get the leverage to bend this back to my satisfaction. However, it appears to be high enough that it will not be a significant source of leakage, and I am hopeful that I can back fill seam sealer or JB WetWeld to entirely plug the hole.

I put the fender back in place so that I had room in the garage to take the other fender off and lay it down (more sloppy repair there :nonono:), so I will have to wait to take a picture of the plug tomorrow.

On the passenger side, there is still the problem of the gap at the corner below the cowl drain, which I will fill with seam sealer until such time as I can get the proper cowl panel installed correctly.

On the driver side, there is a slight leak along the seam between the cowl and the side panel. I'll have to wait for daylight to get a better look at the problem.
 

Attachments

  • 5953327542_be62b81806_b.jpg
    5953327542_be62b81806_b.jpg
    272 KB · Views: 74
  • 5953335746_d4ff9bce74_b.jpg
    5953335746_d4ff9bce74_b.jpg
    306.4 KB · Views: 94
Update

So this operation was somewhat interrupted by a broken bracket for my power steering ram cylinder.

When the bracket broke, I'd just discovered that the driver's side cowl was suffering from worse collateral damage than the passenger's. Again there were holes from an errant air chisel, but the complications came from much more welding detritus in the area and the major damage being behind the drain hole rather than directly accessible as with the passenger side which I bent back into rough shape.

Without the broken bracket, I might have tried to plug the holes with seam sealer and/or the JB product. After all, the car rarely gets wet other than the times I wash it. But it's funny how a seemingly non-related issue can put another over the top.

"Why?" you ask. Because the bracket was welded on and any solution was going to involve additional welding. Since my landlord's garage with the natural gas lines running overhead did not strike me as the best place to teach myself to weld, back the local Mustang shop the car went. Once it was there and I was paying for their awe-inspiring welder's work, it was worth it to me to dispense with the issue once and for all, especially since I was tired of messing around with the subpar workmanship from the earlier body work (a now out of business shop in Texas).

We went with a version of the "tin can" option. Generally this approach cuts the upper cowl in the area below the fenders and peels it back so that the repair work is minimally visible when the car is reassembled. Because we strongly suspected that there was damage under an area that might generally be obscured by peeling the metal back, the guys and the shop drilled out the spot welds to take the ends of the upper cowl completely off.

Here's a shot of the basic approach.
6054336911_ee31c9dd75_b.jpg


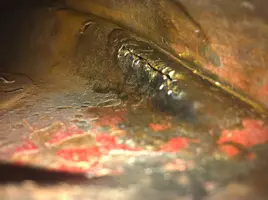
Here is what they found on the driver's side.
6054288443_2c21beff57_b.jpg


And here is another.
6054290101_1016054f60_b.jpg


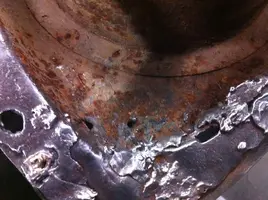
And here is a shot of the passenger's side removed with some of the damaged sheet metal removed in preparation for repair.
6054841664_d5576ddc27_b.jpg


That last picture is not the best but it also shows the hole on the side panel caused by misalignment of things in the earlier body work.

As you may be able to see from the pictures, the shop is resealing the hats, they are patching the holes, and they will also be treating the cowl gutters with a rust sealing paint so that if anyone has to deal with this again it will -- the good Lord willing and the creek don't rise -- be my kid.

Although the side panels are incorrect for '67 since the earlier panels were all that was available when the initial work was done and the passenger side will need to be patched, I'm planning on leaving this be since the stamping pattern on the steel is not important enough to me to tear the two sides out without a bigger problem.

Perhaps I can finally put in the new carpet, which is the weekend project I thought I was starting, and button things up properly.
 

Attachments

  • 6054336911_ee31c9dd75_b.jpg
    6054336911_ee31c9dd75_b.jpg
    363.7 KB · Views: 66
  • 6054288443_2c21beff57_b.jpg
    6054288443_2c21beff57_b.jpg
    402 KB · Views: 69
  • 6054290101_1016054f60_b.jpg
    6054290101_1016054f60_b.jpg
    420.1 KB · Views: 72
  • 6054841664_d5576ddc27_b.jpg
    6054841664_d5576ddc27_b.jpg
    364.2 KB · Views: 69
Update:

The shop patched everything together, and you can run a garden hose into the cowl and not get anything in the cabin. It works exactly like it is supposed to.

So imagine my surprise when I washed the car today and had wet floor mats. That's when I remembered dennis112's comment about the windshield gasket and found that indeed it is leaking at the corners.

Does anyone have suggestions/expertise on whether I should try it again with more sealant or I need to start over with a new gasket (the current one is two years old)?

As always, I appreciate the advice.

I would have a pro take take of it. It shouldn't cost very much, even if the pro decides to replace the gasket. No I don't think you should goo on more sealant. I'm all for DIY, but glass is one thing I generally leave to the pros.