A little late hope this helps.
Ok, this is what I did first: you do not have to remove the hood or even tie it off.
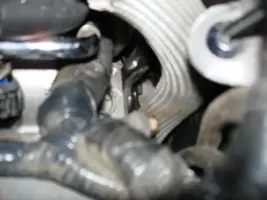
As you see in the picture I took off the driver side wiper and placed a towel over the connector so it did not scratch the hood. It stayed like that with no problem and never got in the way.
I then removed the bracket that holds the throttle cable and injector harness and moved it out of the way.
I also removed the plastic cover behind the motor.
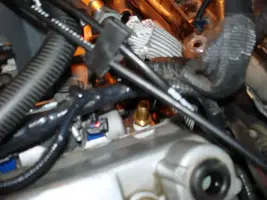
I went under the car to remove the EGR tube that was a no go for me I did not have a wrench big enough. However I removed the top EGR connector from the S/C and pulled it out it's a tough one but it will come out. There was enough room to maneuver(barely) but it worked because I had no other choice.
I then moved the wiring harness that sits right behind the S/C but near the top - it has two rubber connectors that go into the back of the S/C. Now the tough part was moving the wiring harness for the injectors; it is behind the S/C, but down under the fuel rails and there is not much slack. I managed to get a clear enough path that I could get my hand near the freeze out plug.
I disconnected the heater hose at the metal tube in the rear of the S/C.
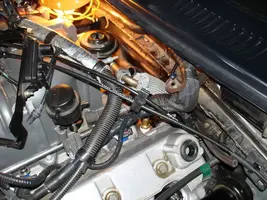
I used a flat head screw driver and a hammer and tried to spin the freeze out plug. It was tough so I got a great idea; I have a can of that dust off for keyboards to blow out the dirt and dust. The gas it uses is like freon it is damn cold well it comes out when the can is upside down. So I took the can turned it upside down and sprayed the hell out of the freeze out plug, it had frost on it. I then tapped it with the screwdriver and it spun with ease. The freon or what ever it is shrunk the freeze out plug. I then pulled it out with no problem and I was lucky because the sealant came out in one big ring so there was nothing to clean off. That was good because I really couldn't get my finger in there too easy.
I then put the unit together and used electrical tape to hold the brace on so it didn't fall off.
It didn't push all the way in and because of the small work area I used the rear of my screwdriver and a hammer to tap it the rest of the way in. It did however go in very easily. I then had the problem of getting the lock washer down there I just pushed it on the end of the flat head and when I taped it it fell off on to the bracket. I then needed to get the screw down there I used a piece of electrical tape to hold the screw in the socket and it went right in and I ground down the bracket corner. I then tightened everything up connected the hose and reversed the above instructions to put it all back together.
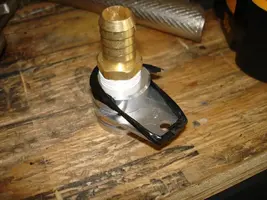
As far as the front T fitting I did nothing different from the instructions. You remove the hose clamp and hose then take a cut off wheel or hack saw and cut about 1.2 inch off the metal tube and about 2 inches off the rubber hose. What I did was put it together an measured how much I needed to remove to put the hose in the same position. When cutting stuff a paper towel or rag into the metal tube or all **** is going to get into it. When done tighten all clamps but leave the 1/2 in hose off just turn it up so no fluid leaks out and how ever you can plug the T-fitting hole. Now take off the overflow cap and fill it up till it is at the top. Remove the burp plug in the cross over tube next to the S/C. Fill until it is topped off put the plug in put the overflow cap on and now reattach the 1/2 in hose to the T-fitting your done let it heat cycle but I had no air in the system this way. I had no leaks I feel so much better now that this is done and my 7 and 8 pistons are getting proper cooling.