Code 81 – Secondary Air Injection Diverter Solenoid failure AM2.
The solenoid valve located on the back side of the passenger side
wheel well is not functional. Possible bad wiring, bad connections,
missing or defective solenoid valve. Check the solenoid valve for
+12 volts at the Red wire and look for the Lt Green/Black wire to
switch from +12 volts to 1 volt or less. The computer controls the
valve by providing a ground path on the LT Green/Black wire for
the solenoid valve.
With the engine running, stick a safety pin in the LT Green/Black wire for
the solenoid valve & ground it. That should turn the solenoid on and
cause air to flow out the port that goes to the pipe connected to the cats.
If it doesn't, the valve is bad. If it does cause the airflow to switch,
the computer or wiring going to the computer is not signaling the solenoid
valve to open.
To isolate the possible injector problems, follow these steps:
Cylinder balance test:
Warm the car's engine up to normal operating temperature. Use a
jumper wire or paper clip to put the computer into test mode. Start
the engine and let it go through the normal diagnostic tests, then
quickly press the throttle to the floor. The engine RPM should exceed
2500 RPM's for a brief second. The engine RPM's will increase to about
1450-1600 RPM and hold steady. The engine will shut off power to each
injector, one at a time. When it has sequenced through all 8 injectors,
it will flash 9 for everything OK, or the number of the failing cylinder
such as 2 for cylinder #2. Quickly pressing the throttle again up to
2500 RPM’s will cause the test to re-run with smaller qualifying figures.
Do it a third time, and if the same cylinder shows up, the cylinder is
weak and isn’t putting out power like it should. See the Chilton’s Shop
manual for the complete test procedure
Here's the link to dump the computer codes with only a jumper wire
or paper clip and the check engine light, or test light or voltmeter.
I’ve used it for years, and it works great.
See
http://www.troublecodes.net/Ford/
OR
See
http://www.dalidesign.com/hbook/eectest.html for more descriptive help
OR
See
http://www.mustangworks.com/articles/electronics/eec-iv_codes.html
For those who are intimidated by all the wires & connections,
see
http://www.actron.com/product_detail.php?pid=16153 for what a
typical hand scanner looks like. Normal retail price is about $30 or so
at Walmart.
Or for a nicer scanner see
http://www.midwayautosupply.com/detailedproductdescription.asp?3829 –
It has a 3 digit LCD display so that you don’t have to count flashes
or beeps.. Cost is $33.
Do a compression test on all the cylinders.
Take special note of any cylinder that shows up as weak in the cylinder
balance test. Low compression on one of these cylinders rules out the
injectors as being the most likely cause of the problem. Look at cylinders
that fail the cylinder balance test but have good compression. These
cylinders either have a bad injector, bad spark plug or spark plug wire.
Move the wire and then the spark plug to another cylinder and run the
cylinder balance test again. If it follows the moved wire or spark plug,
you have found the problem. If the same cylinder fails the test again,
the injector is bad. If different cylinders fail the cylinder balance test,
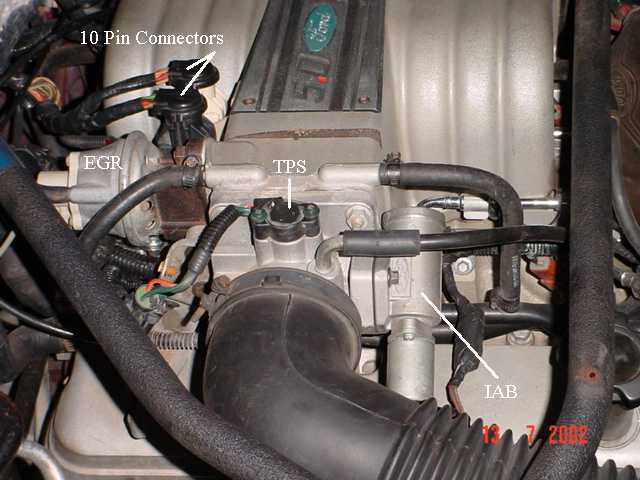
you have ignition problems or wiring problems in the 10 pin black &
white electrical connectors located by the EGR.
How to do a compression test:
Only use a compression tester with a screw in adapter for the spark
plug hole. The other type leaks too much to get an accurate reading.
Your local auto parts store may have a compression tester to rent.
If you do mechanic work on your own car on a regular basis, it would
be a good tool to add to your collection.
With the engine warmed up, remove all spark plugs and prop the
throttle wide open, crank the engine until it the gage reading stops
increasing. On a cold engine, it will be hard to tell what's good &
what's not. Some of the recent posts have numbers ranging from
140-170 psi. If the compression is low, squirt some oil in the cylinder
and do it again – if it comes up, the rings are worn. There should be
no more than 10% difference between cylinders. Use a blow down
leak test (puts compressed air inside cylinders) on cylinders that
have more than 10% difference.
Fuel injector testing
Tools needed: Noid light, Mulitmeter (volts & ohms), 10 MM socket &
extension, & ratchet.
Note: Do all of the steps and do them in order. The results of the
subsequent tests are based on the prior tests being sucessfully passed.
Some basics about the computer:
Remember that the computer does not supply power for any actuator or
relay, but provides the ground necessary to complete the circuit. That
means one side of the circuit will always be hot, and the other side will go
to ground or below 1 volt as the computer switches on that circuit.
1.) Get a noid light form AutoZone or other auto parts store, or even better
a set of them
This set is from
http://www.toolking.com/ProductInfo.aspx?productid=12492 and costs $12.
2.) Use the noid light to determine that the injector pulses and isn’t
stuck in the on position. It you have a set of them install all of them and
compare the pulse intensity. A light that doesn’t pulse and stays on has a
short to ground in the computer side of the circuit. That can be either a
wiring fault or a failed computer. If this is the case, remove the passenger
side lick panel and disconnect the computer connector. There is one 10
MM bolt holding it in place. Pull the connector all the way out of the
computer so that you can see the computer side pins.
Use the list from the graphic below to find the fuel injector pins for the
injectors that didn’t turn the noid light off.
3.) Set the multimeter to low scale Ohms and measure between the
computer ground located below the computer and the suspect fuel injector
pins. You should see greater than 100 K Ohms resistance. If you see less
than 100 Ohms, the wiring between the injector and the computer has a
short to ground and needs service. Check the harness and look for damage,
kinks or frayed spots.
4.) A light that never turns on is either a wiring fault, or a failed
computer. Either the injector has no DC power or the computer has failed
and cannot switch the injector circuit to ground. Determine if the injector
has power by using the multimeter to check for 12 volts on the red wire on
the suspect injector connector. No 12 volts and you have a wiring fault.
Check the harness and look for damage, kinks or frayed spots. Check the 10
pin salt & pepper shaker connectors for bent pins, corrosion and damage.
Next Check the fuel injector wiring end to end. Each fuel injector has a red
wire (power) and an non-read wire (computer controlled ground). Set the
multimeter to low ohms and measure each non red fuel injector wire from
the fuel injector connector to the matching pin on the computer connector.
You should see less than 2 Ohms. More than that means a bad connection
or bad wiring.
See the graphic for the location of the 10 pin connectors:
See the graphic for the 10 pin connector circuit layout.
Once you have determined that the suspect injectors have good power and
good wiring, the computer is the likely suspect, since a ground is required
to complete a circuit and make it function. The computer provides the
ground: if doesn’t, then the noid light will not flash.
5.) If you have gotten this far, then the problem is likely ignition
related. Remember the noid test using all of the noid lights? All of them
were supposed to be equally bright. Since you have already tested all the
electrical side of the fuel injector circuit, the one remaining common item is
the pip sensor inside the distributor. A failing pip sensor, damaged shutter
wheel or bent distributor shaft could all cause the pulse delivered to the
injectors to be faulty.
6.) Spark plugs indicate one or more cylinders not firing: use the
multimeter to measure the resistance of the spark plug wires. The wires
should measure 2000 ohms perfoot of length. A 2 foot wire would be 4000
ohms and a 3 foot wire would be 6000 ohms. Some Taylor and Accel wires
have metal cores and will measure much less: that’s OK.
Next examine the spark plug wires very carefully for burn spots, cracks and
damaged insulation. One good thing to try is to start the engine while the
car is a very dark area, open the hood and look for sparks or blue glow.
They indicate the electricity is leaking out of the spark plug wires.
Thanks to Tmoss & Stang&2birds at
www.veryuseful.com/mustang/tech/engine/ for some of the graphics
Thanks also to
www.fordfuelinjection.com for some of the graphics.