
You are using an out of date browser. It may not display this or other websites correctly.
You should upgrade or use an alternative browser.
You should upgrade or use an alternative browser.
Cylinder Balance Test
- Thread starter JBeenken
- Start date
-
Sponsors (?)
If you have a star tester, after it goes through the normal steps for reading codes...and starts flashing any codes you may have. You need to goose the throttle, just quickly pop the pedal to WOT. The star tester will do the rest, you will hear the engine rev up and one by one it will cut spark to each cylinder. After it goes through that cycle, it will flash a code...telling you which cylinder is having a problem or if no problem was found.
A repair manual is always helpful. The internet has things like Alldata but Stangnet has AllknowingJrichker instead. 
If you search his posts, you will find his cylinder balance test write-up. I recalled that he just posted his info within the last day or so.
Good luck.
If you search his posts, you will find his cylinder balance test write-up. I recalled that he just posted his info within the last day or so.
Good luck.
Cylinder balance test:
Warm the car's engine up to normal operating temperature. Use a
jumper wire or paper clip to put the computer into test mode. Start
the engine and let it go through the normal diagnostic tests, then
quickly press the throttle to the floor. The engine RPM should exceed
2500 RPM's for a brief second. The engine RPM's will increase to about
1450-1600 RPM and hold steady. The engine will shut off power to each
injector, one at a time. When it has sequenced through all 8 injectors,
it will flash 9 for everything OK, or the number of the failing cylinder
such as 2 for cylinder #2. Quickly pressing the throttle again up to
2500 RPM’s will cause the test to re-run with smaller qualifying figures.
Do it a third time, and if the same cylinder shows up, the cylinder is
weak and isn’t putting out power like it should. See the Chilton’s Shop
manual for the complete test procedure
Here's the link to dump the computer codes with only a jumper wire
or paper clip and the check engine light, or test light or voltmeter.
I’ve used it for years, and it works great.

See http://www.troublecodes.net/Ford/
OR
See http://www.mustangworks.com/articles/electronics/eec-iv_codes.html
IF your car is an 86-88 stang, you'll have to use the test lamp or voltmeter method. There is no functional check engine light on the 86-88's except possibly the Cali Mass Air cars.
For those who are intimidated by all the wires & connections,
see http://www.actron.com/product_detail.php?pid=16153 for what a
typical hand scanner looks like. Normal retail price is about $30 or so
at Walmart.
Or for a nicer scanner see http://www.midwayautosupply.com/detailedproductdescription.asp?3829 – It has a 3 digit LCD display so that you don’t have to count flashes
or beeps.. Cost is $33.
Do a compression test on all the cylinders.
Take special note of any cylinder that shows up as weak in the cylinder
balance test. Low compression on one of these cylinders rules out the
injectors as being the most likely cause of the problem. Look at cylinders
that fail the cylinder balance test but have good compression. These
cylinders either have a bad injector, bad spark plug or spark plug wire.
Move the wire and then the spark plug to another cylinder and run the
cylinder balance test again. If it follows the moved wire or spark plug,
you have found the problem. If the same cylinder fails the test again,
the injector is bad. If different cylinders fail the cylinder balance test,
you have ignition problems or wiring problems in the 10 pin black &
white electrical connectors located by the EGR.
How to do a compression test:
Only use a compression tester with a screw in adapter for the spark
plug hole. The other type leaks too much to get an accurate reading.
Your local auto parts store may have a compression tester to rent.
If you do mechanic work on your own car on a regular basis, it would
be a good tool to add to your collection.
With the engine warmed up, remove all spark plugs and prop the
throttle wide open, crank the engine until it the gage reading stops
increasing. On a cold engine, it will be hard to tell what's good &
what's not. Some of the recent posts have numbers ranging from
140-170 psi. If the compression is low, squirt some oil in the cylinder
and do it again – if it comes up, the rings are worn. There should be
no more than 10% difference between cylinders. Use a blow down
leak test (puts compressed air inside cylinders) on cylinders that
have more than 10% difference.
See the link to my site for details on how to build your own blow
down type compression tester.
Warm the car's engine up to normal operating temperature. Use a
jumper wire or paper clip to put the computer into test mode. Start
the engine and let it go through the normal diagnostic tests, then
quickly press the throttle to the floor. The engine RPM should exceed
2500 RPM's for a brief second. The engine RPM's will increase to about
1450-1600 RPM and hold steady. The engine will shut off power to each
injector, one at a time. When it has sequenced through all 8 injectors,
it will flash 9 for everything OK, or the number of the failing cylinder
such as 2 for cylinder #2. Quickly pressing the throttle again up to
2500 RPM’s will cause the test to re-run with smaller qualifying figures.
Do it a third time, and if the same cylinder shows up, the cylinder is
weak and isn’t putting out power like it should. See the Chilton’s Shop
manual for the complete test procedure
Here's the link to dump the computer codes with only a jumper wire
or paper clip and the check engine light, or test light or voltmeter.
I’ve used it for years, and it works great.
See http://www.troublecodes.net/Ford/
OR
See http://www.mustangworks.com/articles/electronics/eec-iv_codes.html
IF your car is an 86-88 stang, you'll have to use the test lamp or voltmeter method. There is no functional check engine light on the 86-88's except possibly the Cali Mass Air cars.
For those who are intimidated by all the wires & connections,
see http://www.actron.com/product_detail.php?pid=16153 for what a
typical hand scanner looks like. Normal retail price is about $30 or so
at Walmart.
Or for a nicer scanner see http://www.midwayautosupply.com/detailedproductdescription.asp?3829 – It has a 3 digit LCD display so that you don’t have to count flashes
or beeps.. Cost is $33.
Do a compression test on all the cylinders.
Take special note of any cylinder that shows up as weak in the cylinder
balance test. Low compression on one of these cylinders rules out the
injectors as being the most likely cause of the problem. Look at cylinders
that fail the cylinder balance test but have good compression. These
cylinders either have a bad injector, bad spark plug or spark plug wire.
Move the wire and then the spark plug to another cylinder and run the
cylinder balance test again. If it follows the moved wire or spark plug,
you have found the problem. If the same cylinder fails the test again,
the injector is bad. If different cylinders fail the cylinder balance test,
you have ignition problems or wiring problems in the 10 pin black &
white electrical connectors located by the EGR.
How to do a compression test:
Only use a compression tester with a screw in adapter for the spark
plug hole. The other type leaks too much to get an accurate reading.
Your local auto parts store may have a compression tester to rent.
If you do mechanic work on your own car on a regular basis, it would
be a good tool to add to your collection.
With the engine warmed up, remove all spark plugs and prop the
throttle wide open, crank the engine until it the gage reading stops
increasing. On a cold engine, it will be hard to tell what's good &
what's not. Some of the recent posts have numbers ranging from
140-170 psi. If the compression is low, squirt some oil in the cylinder
and do it again – if it comes up, the rings are worn. There should be
no more than 10% difference between cylinders. Use a blow down
leak test (puts compressed air inside cylinders) on cylinders that
have more than 10% difference.
See the link to my site for details on how to build your own blow
down type compression tester.
AbhorrentSpecies
Active Member
So I just ran a balance test for the first time. First run flashed 8 then 9. Second run flashed 9 then 9. Third run flashed 7 then 6 and flashed that twice. Should I just go straight to compression testing from here or what would you suggest?Cylinder balance test:
Warm the car's engine up to normal operating temperature. Use a
jumper wire or paper clip to put the computer into test mode. Start
the engine and let it go through the normal diagnostic tests, then
quickly press the throttle to the floor. The engine RPM should exceed
2500 RPM's for a brief second. The engine RPM's will increase to about
1450-1600 RPM and hold steady. The engine will shut off power to each
injector, one at a time. When it has sequenced through all 8 injectors,
it will flash 9 for everything OK, or the number of the failing cylinder
such as 2 for cylinder #2. Quickly pressing the throttle again up to
2500 RPM’s will cause the test to re-run with smaller qualifying figures.
Do it a third time, and if the same cylinder shows up, the cylinder is
weak and isn’t putting out power like it should. See the Chilton’s Shop
manual for the complete test procedure
Here's the link to dump the computer codes with only a jumper wire
or paper clip and the check engine light, or test light or voltmeter.
I’ve used it for years, and it works great.
See http://www.troublecodes.net/Ford/
OR
See http://www.mustangworks.com/articles/electronics/eec-iv_codes.html
IF your car is an 86-88 stang, you'll have to use the test lamp or voltmeter method. There is no functional check engine light on the 86-88's except possibly the Cali Mass Air cars.
For those who are intimidated by all the wires & connections,
see http://www.actron.com/product_detail.php?pid=16153 for what a
typical hand scanner looks like. Normal retail price is about $30 or so
at Walmart.
Or for a nicer scanner see http://www.midwayautosupply.com/detailedproductdescription.asp?3829 – It has a 3 digit LCD display so that you don’t have to count flashes
or beeps.. Cost is $33.
Do a compression test on all the cylinders.
Take special note of any cylinder that shows up as weak in the cylinder
balance test. Low compression on one of these cylinders rules out the
injectors as being the most likely cause of the problem. Look at cylinders
that fail the cylinder balance test but have good compression. These
cylinders either have a bad injector, bad spark plug or spark plug wire.
Move the wire and then the spark plug to another cylinder and run the
cylinder balance test again. If it follows the moved wire or spark plug,
you have found the problem. If the same cylinder fails the test again,
the injector is bad. If different cylinders fail the cylinder balance test,
you have ignition problems or wiring problems in the 10 pin black &
white electrical connectors located by the EGR.
How to do a compression test:
Only use a compression tester with a screw in adapter for the spark
plug hole. The other type leaks too much to get an accurate reading.
Your local auto parts store may have a compression tester to rent.
If you do mechanic work on your own car on a regular basis, it would
be a good tool to add to your collection.
With the engine warmed up, remove all spark plugs and prop the
throttle wide open, crank the engine until it the gage reading stops
increasing. On a cold engine, it will be hard to tell what's good &
what's not. Some of the recent posts have numbers ranging from
140-170 psi. If the compression is low, squirt some oil in the cylinder
and do it again – if it comes up, the rings are worn. There should be
no more than 10% difference between cylinders. Use a blow down
leak test (puts compressed air inside cylinders) on cylinders that
have more than 10% difference.
See the link to my site for details on how to build your own blow
down type compression tester.
So I just ran a balance test for the first time. First run flashed 8 then 9. Second run flashed 9 then 9. Third run flashed 7 then 6 and flashed that twice. Should I just go straight to compression testing from here or what would you suggest?
What did you get for the code dumps? Trying to to a cylinder balance with active fault codes is a guaranteed way to get bad results. Fix the fault codes BEFORE running a cylinder balance test.
if the engine will not idle at 650-725 under computer control, the cylinder balance will fail with random results. You cannot just screw the throttle stop in or out to get the engine in the desired RPM range. Fix any idle related problems before trying to run the cylinder balance test.
You guys with idle/stall problems could save a lot of time chasing your tails if you would go through the Surging Idle Checklist. Over 50 different people contributed information to it. The first two posts have all the fixes, and steps through the how to find and fix your idle problems without spending a lot of time and money. It includes how to dump the computer codes quickly and simply as one of the first steps. I continue to update it as more people post fixes or ask questions. You can post questions to that sticky and have your name and idle problem recognized. The guys with original problems and fixes get their posts added to the main fix.
It's free, I don't get anything for the use of it except knowing I helped a fellow Mustang enthusiast with his car. At last check, it had more than 250,000 hits, which indicates it does help fix idle problems quickly and inexpensively.
AbhorrentSpecies
Active Member
koer I got a 41 and 91 then ran the balance test. I also have no idle problems at all. I'm thinking of replacing both o2 sensors and the wiring harness cause it looks like someone hacked into it and wired it all themselves down there.What did you get for the code dumps? Trying to to a cylinder balance with active fault codes is a guaranteed way to get bad results. Fix the fault codes BEFORE running a cylinder balance test.
if the engine will not idle at 650-725 under computer control, the cylinder balance will fail with random results. You cannot just screw the throttle stop in or out to get the engine in the desired RPM range. Fix any idle related problems before trying to run the cylinder balance test.
You guys with idle/stall problems could save a lot of time chasing your tails if you would go through the Surging Idle Checklist. Over 50 different people contributed information to it. The first two posts have all the fixes, and steps through the how to find and fix your idle problems without spending a lot of time and money. It includes how to dump the computer codes quickly and simply as one of the first steps. I continue to update it as more people post fixes or ask questions. You can post questions to that sticky and have your name and idle problem recognized. The guys with original problems and fixes get their posts added to the main fix.
It's free, I don't get anything for the use of it except knowing I helped a fellow Mustang enthusiast with his car. At last check, it had more than 250,000 hits, which indicates it does help fix idle problems quickly and inexpensively.
Code 41 or 91. Or 43 Three digit code 172 or 176 - O2 sensor indicates system lean. Look for a vacuum leak or failing O2 sensor.koer I got a 41 and 91 then ran the balance test. I also have no idle problems at all. I'm thinking of replacing both o2 sensors and the wiring harness cause it looks like someone hacked into it and wired it all themselves down there.
Revised 01 Sep 2019 1.) To emphasize do not attempt to measure the O2 sensor resistance. Disconnect the O2 sensor from the wiring before doing any resistance checking of the sensor to computer wiring.
Code 41 is the passenger side sensor, as viewed from the driver's seat.
Code 91 is the driver side sensor, as viewed from the driver's seat.
Code 172 is the passenger side sensor as viewed from the driver's seat.
Code 176 is the driver side sensor, as viewed from the driver's seat.
Code 43 is not side specific according to the Probst Ford Fuel injection book.
The computer sees a lean mixture signal coming from the O2 sensors and tries to compensate by adding more fuel. Many times the end result is an engine that runs pig rich and stinks of unburned fuel.
The following is a Quote from Charles O. Probst, Ford fuel Injection & Electronic Engine control:
"When the mixture is lean, the exhaust gas has oxygen, about the same amount as the ambient air. So the sensor will generate less than 400 Millivolts. Remember lean = less voltage.
When the mixture is rich, there's less oxygen in the exhaust than in the ambient air , so voltage is generated between the two sides of the tip. The voltage is greater than 600 millivolts. Remember rich = more voltage.
Here's a tip: the newer the sensor, the more the voltage changes, swinging from as low as 0.1 volt to as much as 0.9 volt. As an oxygen sensor ages, the voltage changes get smaller and slower - the voltage change lags behind the change in exhaust gas oxygen.
Because the oxygen sensor generates its own voltage, never apply voltage and never measure resistance of the O2 sensor. Before checking the O2 sensor circuit wiring resistance, disconnect the O2 sensor from the rest of the circuit wiring. To measure voltage signals, use an analog voltmeter with a high input impedance, at least 10 megohms. Remember, a digital voltmeter will average a changing voltage. End Quote
Testing the O2 sensors 87-93 5.0 Mustangs
Measuring the O2 sensor voltage at the computer will give you a good idea of how well they are working. You'll have to pull the passenger side kick panel off to gain access to the computer connector. Remove the plastic wiring cover to get to the back side of the wiring. Use a safety pin or paper clip to probe the connections from the rear.
Disconnect the O2 sensor from the harness and use the body side O2 sensor harness as the starting point for testing. Do not measure the resistance of the O2 sensor, you may damage it. Resistance measurements for the O2 sensor harness are made with one meter lead on the O2 sensor harness and the other meter lead on the computer wire or pin for the O2 sensor.
Computer wiring harness connector, computer side.

Backside view of the computer wiring connector:

87-90 5.0 Mustangs:
Computer pin 43 Dark blue/Lt green – LH O2 sensor
Computer pin 29 Dark Green/Pink – RH O2 sensor
The computer pins are 29 (RH O2 with a dark green/pink wire) and 43 (LH O2 with a dark blue/lt green wire). Use the ground next to the computer to ground the voltmeter. The O2 sensor voltage should switch between .2-.9 volt at idle.
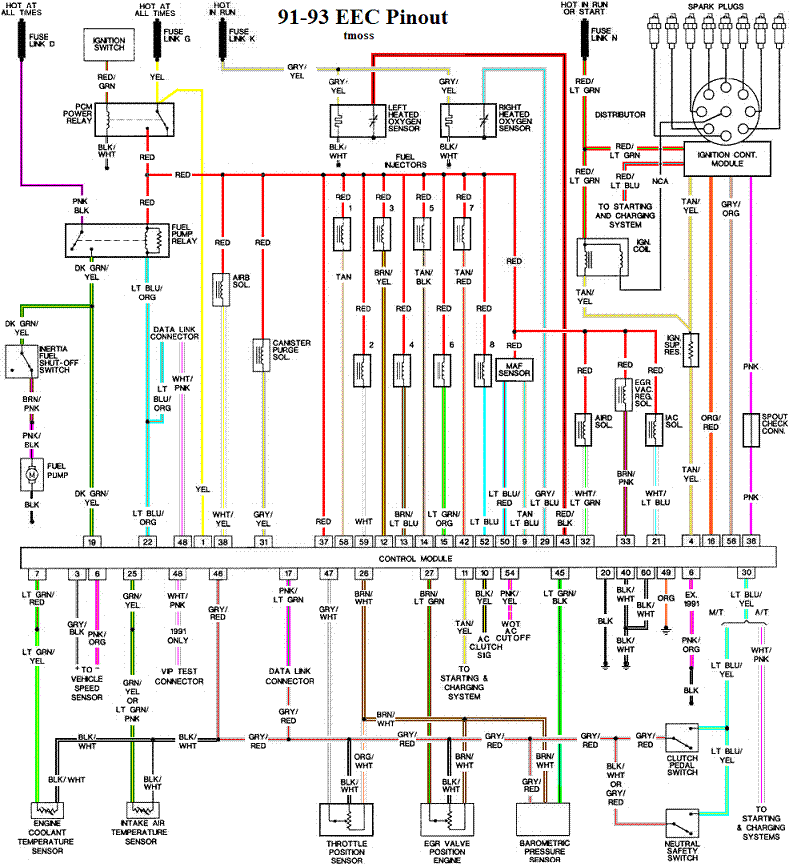
91-93 5.0 Mustangs:
Computer pin 43 Red/Black – LH O2 sensor
Computer pin 29 Gray/Lt blue – RH O2 sensor
The computer pins are 29 (RH O2 with a Gray/Lt blue wire) and 43 (LH O2 with a Red/Black wire). Use the ground next to the computer to ground the voltmeter. The O2 sensor voltage should switch between .2-.9 volt at idle.
94-95 5.0 Mustangs; note that the 94-95 uses a 4 wire O2 sensor.
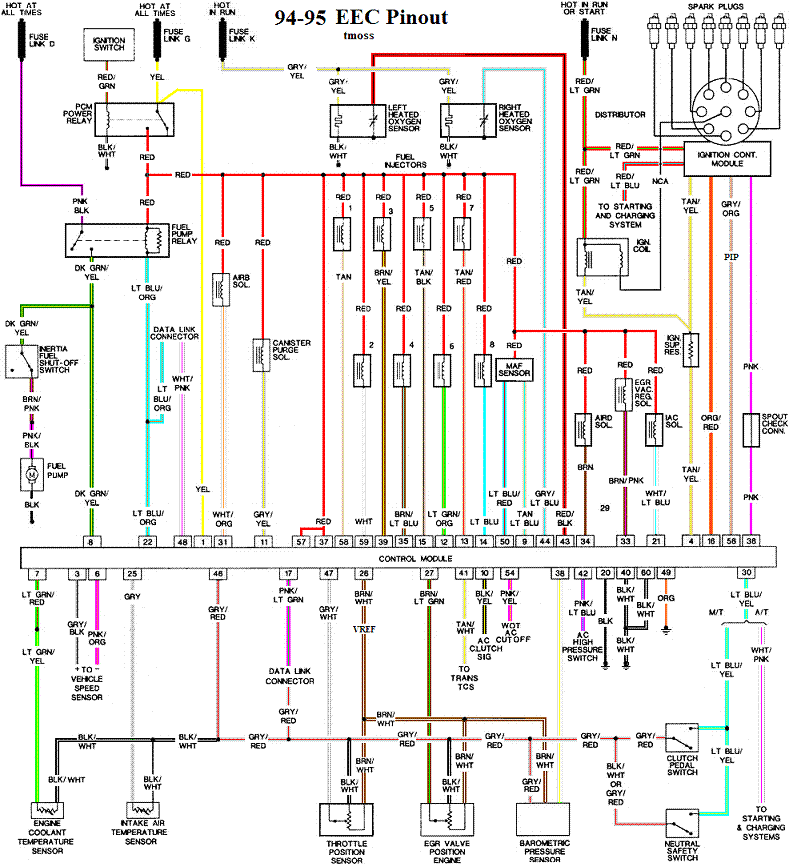
The computer pins are 29 (LH O2 with a red/black wire) and 27 (RH O2 with a gray/lt blue wire). Use pin 32 (gray/red wire) to ground the voltmeter. . The O2 sensor voltage should switch between .2-.9 volt at idle.
Note that all resistance tests must be done with power off. Measuring resistance with a circuit powered on will give false readings and possibly damage the meter. Do not attempt to measure the resistance of the O2 sensors, it may damage them.
Testing the O2 sensor wiring harness
Most of the common multimeters have a resistance scale. Be sure the O2 sensors are disconnected and measure the resistance from the O2 sensor body harness to the pins on the computer. Using the Low Ohms range (usually 200 Ohms) you should see less than 1.5 Ohms.
87-90 5.0 Mustangs:
Computer pin 43 Dark blue/Lt green – LH O2 sensor
Computer pin 29 Dark Green/Pink – RH O2 sensor
Disconnect the connector from the O2 sensor and measure the resistance:
From the Dark blue/Lt green wire in the LH O2 sensor harness and the Dark blue/Lt green wire on the computer pin 43
From the Dark Green/Pink wire on the RH O2 sensor harness and the Dark Green/Pink wire on the computer pin 29
91-93 5.0 Mustangs:
Computer pin 43 Red/Black – LH O2 sensor
Computer pin 29 Gray/Lt blue – RH O2 sensor
Disconnect the connector from the O2 sensor and measure the resistance:
From the Red/Black wire in the LH O2 sensor harness and the Red/Black wire on the computer pin 43
From the Gray/Lt blue wire on the RH O2 sensor harness and the Gray/Lt blue wire on the computer pin 29
94-95 5.0 Mustangs:
Computer pin 29 Red/Black – LH O2 sensor
Computer pin 27 Gray/Lt blue – RH O2 sensor
From the Red/Black wire in the LH O2 sensor harness and the Red/Black wire on the computer pin 29
From the Dark Green/Pink Gray/Lt blue wire on the RH O2 sensor harness and the Gray/Lt blue wire on the computer pin 27
There is a connector between the body harness and the O2 sensor harness. Make sure the connectors are mated together, the contacts and wiring are not damaged, and the contacts are clean and not coated with oil.
The O2 sensor ground (orange wire with a ring terminal on it) is in the wiring harness for the fuel injection wiring. I grounded mine to one of the intake manifold bolts
Check the fuel pressure – the fuel pressure is 37-41 PSI with the vacuum disconnected and the engine idling. Fuel pressure out of range can cause the 41 & 91 codes together. It will not cause a single code, only both codes together.
Make sure you have the proper 3 wire O2 sensors. Only the 4 cylinder cars used a 4 wire sensor, which is not compatible with the V8 wiring harness. The exception is that the 94-95 uses a 4 wire O2 sensor.
Replace the O2 sensors in pairs if replacement is indicated. If one is weak or bad, the other one probably isn't far behind.
Code 41 can also be due to carbon plugging the driver’s side Thermactor air crossover tube on the back of the engine. The tube fills up with carbon and does not pass air to the driver’s side head ports. This puts an excess amount of air in the passenger side exhaust and can set the code 41. Remove the tube and clean it out so that both sides get good airflow: this may be more difficult than it sounds. You need something like a mini rotor-rooter to do the job because of the curves in the tube. Something like the outer spiral jacket of a flexible push-pull cable may be the thing that does the trick.
If you get only code 41 and have changed the sensor, look for vacuum leaks. This is especially true if you are having idle problems. The small plastic tubing is very brittle after many years of the heating it receives. Replace the tubing and check the PVC and the hoses connected to it.
Complete computer, actuator & sensor wiring diagram for 94-95 Mustangs
Complete computer, actuator & sensor wiring diagram for 91-93 Mass Air Mustangs
Complete computer, actuator & sensor wiring diagram for 88-90 Mass Air Mustangs

AbhorrentSpecies
Active Member
This was incredibly insightful. Thank you! So instead of going through the trouble of removing the thermacter crossover tubing could I do a test of that by just bypassing the air pump or temporarily plugging the tubing to the H pipe or both?
That won't do anything to fix the 91 code, so the problem needs you to do the testing as it is written ...This was incredibly insightful. Thank you! So instead of going through the trouble of removing the thermacter crossover tubing could I do a test of that by just bypassing the air pump or temporarily plugging the tubing to the H pipe or both?
AbhorrentSpecies
Active Member
Understood. Thanks again man!!That won't do anything to fix the 91 code, so the problem needs you to do the testing as it is written ...
AbhorrentSpecies
Active Member
Understood. Thanks again man!!
So I've dug a bit deeper. I tested fuel pressure and it was 33-34 with vacuum connected and stuck solid at 41 with vacuum off and plugged. I found where that orange wire connects to and it's incredibly caked in dirt as well as you can visibly see it's loose. I can only imagine that's the problem. Anyway, it's pretty difficult to get back there without removing the entire upper manifold. Is there any way I can just cut that, solder in a new ring terminal and ground it some place else? The body?That won't do anything to fix the 91 code, so the problem needs you to do the testing as it is written ...
That wire needs to be grounded to the block.
Pulling the upper intake is a piece of cake, and if affords the opportunity to inspect and replace any vacuum lines as needed, and clean the crap off the lower too.
Pulling the upper intake is a piece of cake, and if affords the opportunity to inspect and replace any vacuum lines as needed, and clean the crap off the lower too.
AbhorrentSpecies
Active Member
Yeah, I figured that's what I was going to hear haha. I'm just being impatient and want to actually know if that's what's wrong. I guess I'll be pulling the intake next week. I'll let you know how it goes. Thanks for every one's help!!That wire needs to be grounded to the block.
Pulling the upper intake is a piece of cake, and if affords the opportunity to inspect and replace any vacuum lines as needed, and clean the crap off the lower too.
Patience, young Padawan. The Diagnostics you must use in right order, or Dark Side parts replacement you will fall to.

 www.wikihow.com
By following the steps for the EEC IV with OBD I, you are doing what newer mechanics are only trained to do in OBDII.
By jumping in at the Cyl bal test, I think I missed what problem you are really trying to chase down. Is that in a different thread?
How to Meditate for Beginners: Tips, Benefits & More
Expert-backed steps and benefits of starting a meditation practiceBreathe in. Breathe out. Man, you've had one rough day, and your mind is racing. If only there was something you could do to relax! Well, have you tried meditation?...
www.wikihow.com
By following the steps for the EEC IV with OBD I, you are doing what newer mechanics are only trained to do in OBDII.
By jumping in at the Cyl bal test, I think I missed what problem you are really trying to chase down. Is that in a different thread?
Similar threads
- Replies
- 26
- Views
- 3K
- Replies
- 1
- Views
- 368
- Replies
- 27
- Views
- 2K
- Replies
- 11
- Views
- 806
Resolved
Vibration issues
- Replies
- 11
- Views
- 1K