
You are using an out of date browser. It may not display this or other websites correctly.
You should upgrade or use an alternative browser.
You should upgrade or use an alternative browser.
Computer identification..
- Thread starter Codydubb
- Start date
-
Sponsors (?)
Bobby from 757
Member
If I adjust the TPS it will start but shut right down. If I keep hitting the gas it will run but real bad and keeps making like a backfiring noise.
- Mar 2, 2015
- 6,822
- 5,859
- 203
Are you sure the engine is actually a 5.0 ho engine ? The intakes can swap between the two...so just reading the top won't tell you.
I suspect its a crown vic engine, harness, and computer. Not sure when the switch happened between batch fire and sequential fuel injection.
On the later cars ( i think ) 87 and up had sequential injection.
You've got a hard one to figure out.
I suspect its a crown vic engine, harness, and computer. Not sure when the switch happened between batch fire and sequential fuel injection.
On the later cars ( i think ) 87 and up had sequential injection.
You've got a hard one to figure out.

Bobby from 757
Member

Bobby from 757
Member
I'm really not sure car came like it is. It's firing order is 5.0 HO,I tried changing it to other 5.0 and didn't work. Anyway to find out what the motor is.Are you sure the engine is actually a 5.0 ho engine ? The intakes can swap between the two...so just reading the top won't tell you.
I suspect its a crown vic engine, harness, and computer. Not sure when the switch happened between batch fire and sequential fuel injection.
On the later cars ( i think ) 87 and up had sequential injection.
You've got a hard one to figure out.
Bobby from 757
Member
I'm really not sure car came like it is. It's firing order is 5.0 HO,I tried changing it to other 5.0 and didn't work. Anyway to find out what the motor is.
Attachments


Bobby from 757
Member
Newport news, va.23605. The big vacuum port on ds on intake in back is blocked. There's nothing going to pcv valve and the map sensor vacuum runs around to front of intake.What part of va are you in ?
Attachments


Just for shins and grins, pull th3 codes. You'll need to use a test light unless you have an obd1 scanner handy.
I'm curious what the ECU sees is in fault even without starting it. I see a relocated ACT.
Those are orange 19pound injectors. Nothing I see says it's not an HO motor. I believe that compressor is a "dealer air" installed AC compressor and not a non-ho compressor
Some of the injector harness plugs are side by side and can be installed on wrong cylinder. Keep this in mind if easier troubleshooting doesn't pan out.
I'm really not sure car came like it is. It's firing order is 5.0 HO,I tried changing it to other 5.0 and didn't work. Anyway to find out what the motor is.
This doesn’t prove that the block is a HO block. Some trucks evidently use a HO firing order with a low lift cam (this will result in less than the desired HP output). However, it will definitely prove that a block can’t be HO because the firing order is wrong.
Remove the #1 & #3 spark plugs. Put your finger in #1 spark plug hole. Crank the engine over until you feel compression on #1 cylinder. Slowly turn the engine until the TDC mark and the timing pointer line up. Mark TDC on the balancer with chalk or paint. Put your finger in #3 spark plug hole and crank the engine 90 degrees. You should feel pressure trying to blow past your finger. If you do not feel pressure, repeat the process again. If you feel pressure, it is a HO engine.
No pressure the second time, remove spark plug #5. Put your finger in #1 spark plug hole. Crank the engine over until you feel compression on #1 cylinder. Put your finger in #5 spark plug hole and crank the engine 90 degrees. If you feel pressure now, the engine is not a HO model, no matter what it says on the engine.
Using a small carpenter or machinist square to mark the harmonic balancer off into 90 degree sections may be helpful here.
A 15/16 deep socket & breaker bar or ratchet may be used to turn the engine.
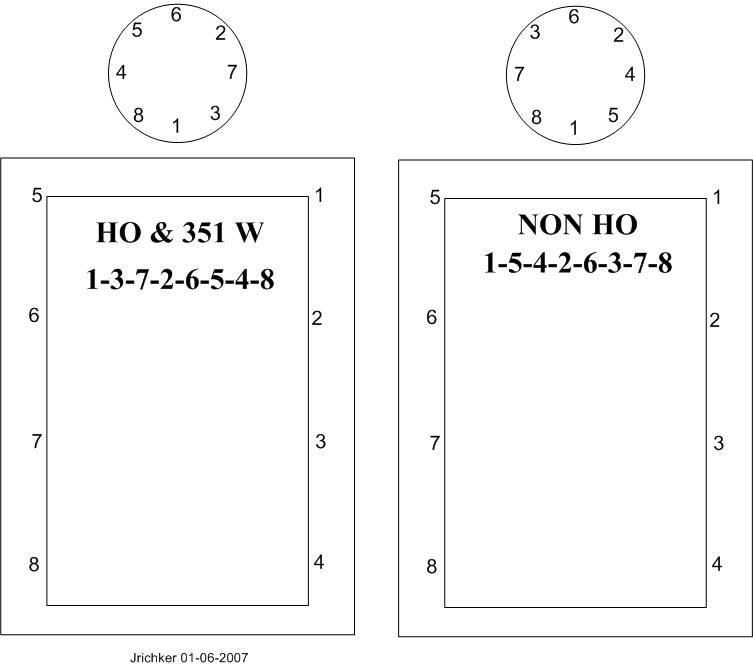
The HO firing order is 1-3-7-2-6-5-4-8.
Non HO firing order is 1-5-4-2-6-3-7-8
Do an end to the injector wring test to make sure that the injectors are properly sequenced for a HO engine and computer
Disconnect the main connector from the computer and pull it down so that you have good access to the computer side of the connector.
Place one voltmeter lead in pin 40 or 60 - they are both the main computer power ground. This lead does not change for any of the tests
Disconnect all the injector connectors from the injectors.
You will re-connect them one at a time to do the testing. Once you have checked an injector lead, disconnect it before testing the next injector. Fail to do this and you will get incorrect results
Turn the ignition switch to Run
Check pins 37 & 57; you should see 12 volts.
Computer wiring harness connector, wire side

Computer wiring harness connector, computer side

Here are the HO injector wires that are different; check to see that you have 12 volts on them one at a time.
Connect injector #3, look for 12 volts on pin 12 on the computer. Disconnect the injector connector from the injector before testing the next wire.
Connect injector #7, look for 12 volts on pin 42 on the computer. Disconnect the injector connector from the injector before testing the next wire.
Connect injector #5, look for 12 volts on pin 14 on the computer. Disconnect the injector connector from the injector before testing the next wire.
Connect injector #4. look for 12 volts on pin 13 on the computer. You are finished now and can reconnect all the injector connectors to the injectors.
Bobby from 757
Member
I will do this and get back to you. A relocated ACT sensor?Just for shins and grins, pull th3 codes. You'll need to use a test light unless you have an obd1 scanner handy.
I'm curious what the ECU sees is in fault even without starting it. I see a relocated ACT.
Those are orange 19pound injectors. Nothing I see says it's not an HO motor. I believe that compressor is a "dealer air" installed AC compressor and not a non-ho compressor
Some of the injector harness plugs are side by side and can be installed on wrong cylinder. Keep this in mind if easier troubleshooting doesn't pan out.
Bobby from 757
Member
I will do this soon and let you know my results. Thanks for the info.This doesn’t prove that the block is a HO block. Some trucks evidently use a HO firing order with a low lift cam (this will result in less than the desired HP output). However, it will definitely prove that a block can’t be HO because the firing order is wrong.
Remove the #1 & #3 spark plugs. Put your finger in #1 spark plug hole. Crank the engine over until you feel compression on #1 cylinder. Slowly turn the engine until the TDC mark and the timing pointer line up. Mark TDC on the balancer with chalk or paint. Put your finger in #3 spark plug hole and crank the engine 90 degrees. You should feel pressure trying to blow past your finger. If you do not feel pressure, repeat the process again. If you feel pressure, it is a HO engine.
No pressure the second time, remove spark plug #5. Put your finger in #1 spark plug hole. Crank the engine over until you feel compression on #1 cylinder. Put your finger in #5 spark plug hole and crank the engine 90 degrees. If you feel pressure now, the engine is not a HO model, no matter what it says on the engine.
Using a small carpenter or machinist square to mark the harmonic balancer off into 90 degree sections may be helpful here.
A 15/16 deep socket & breaker bar or ratchet may be used to turn the engine.
The HO firing order is 1-3-7-2-6-5-4-8.
Non HO firing order is 1-5-4-2-6-3-7-8
Do an end to the injector wring test to make sure that the injectors are properly sequenced for a HO engine and computer
Disconnect the main connector from the computer and pull it down so that you have good access to the computer side of the connector.
Place one voltmeter lead in pin 40 or 60 - they are both the main computer power ground. This lead does not change for any of the tests
Disconnect all the injector connectors from the injectors.
You will re-connect them one at a time to do the testing. Once you have checked an injector lead, disconnect it before testing the next injector. Fail to do this and you will get incorrect results
Turn the ignition switch to Run
Check pins 37 & 57; you should see 12 volts.
Computer wiring harness connector, wire side
Computer wiring harness connector, computer side
Here are the HO injector wires that are different; check to see that you have 12 volts on them one at a time.
Connect injector #3, look for 12 volts on pin 12 on the computer. Disconnect the injector connector from the injector before testing the next wire.
Connect injector #7, look for 12 volts on pin 42 on the computer. Disconnect the injector connector from the injector before testing the next wire.
Connect injector #5, look for 12 volts on pin 14 on the computer. Disconnect the injector connector from the injector before testing the next wire.
Connect injector #4. look for 12 volts on pin 13 on the computer. You are finished now and can reconnect all the injector connectors to the injectors.
Act sensor is located in your intake tube, they are usually in the intake manifold on the left (drivers) side #5 intake runner. I would guess you have a explorer intake, they do not have a hole for the act.
Bobby from 757
Member
It is a explorer intake. I assume the ACT sensor is important. Could it be part of my rich problem. I guess I need to find out what it looks like.Act sensor is located in your intake tube, they are usually in the intake manifold on the left (drivers) side #5 intake runner. I would guess you have a explorer intake, they do not have a hole for the act.
The ACT (Air Charge Temp) sensor will probably need to be moved. The GT 40 lower manifold isn't drilled & tapped for it to go into the intake like the stock manifold was. There is a boss cast into the GT 40, but a machine shop will have to drill & tap the new manifold. The best spot for the ACT is the air box if you don't do the drill and tap thing. You get to cut and splice the 2 ACT wires in order to make them long enough to reach the air box. Solder the wire extensions on the existing wires & use heat shrink tubing to cover the splices. Offset the place where you cut the wires so that you don't have a big bulge when you put heat shrink over the 2 wires to cover & protect them. The air box gets a hole (5/8" or so) for the ACT drilled about 1 1/4" down & 1/1/4" in on the front top side near the upper radiator hose. A brass fitting nut from Home Depot or Ace Hardware secures the ACT into the air box.It is a explorer intake. I assume the ACT sensor is important. Could it be part of my rich problem. I guess I need to find out what it looks like.
If you are very clever, you will find that the ACT connector comes apart so that you can remove the pins. A very small screwdriver releases the lock in the front of the center insert, while another small screwdriver inserted in the back pushes it out. Once the center insert is out of the connector shell, the pins come out easily. New pins are available from AutoZone in a $5 electrical pin kit for Fords. Crimping the pins on the extender wires saves you from having to splice them twice: once to put the connector on and once to extend the wires.
6 ft black 18 gauge wire
6 ft green 18 gauge wire
6 ft 1/4" heat shrink tubing
1 ft 3/16" heat shrink tubing
Measure the 2 extender wires & cut them to length, crimp one set of pins on them. Then mate up the extender pins with the wiring harness & slide the 3/16" heat shrink tubing over them & shrink the tubing. Then slide the 1/4" heat shrink tubing over the pair of wires and shrink the tubing. When you are done you'll have about 1" of wire left without heat shrink tubing on it to strip & crimp the new pins on. Stick the new pins in the old connector shell, assemble it and you are done. It looks as good as factory. Some wire loom can be used to enhance the "Factory Look".


- Mar 2, 2015
- 6,822
- 5,859
- 203
Newport news is a big drive from me. I just moved to Fredericksburg but i have a farm in Courtland by Petersburg.
The PCV should be in the back center of the lower intake. Almost impossible to see. The hose should run from there to the bottom of the upper intake plenum. The port on the throttle body should go to the oil filler neck on the passenger valve cover.
You might need to pull the upper intake plenum to check how they routed the vacuum lines.
If you were closer I'd come by and help you figure it out. I've seen a lot worse. Looks like the routing is correct from the pics.
The ten pin connectors ( salt and pepper shakers ) where the injector harness connects to the computer harness are known for issues. It really helps to disconnect them and de- pin them. Advance and Autozone sells electrical cleaner in a can. Clean the pins and use a generous amount of dielectric grease during reassembly. It's a good thing to do regardless. Who knows how old the old harness is.
Blown88GT
Founding Member
The location of the TFI connector at the distributor appears to be clocked way around from normal base timing of 10degBTC.
Closer inspection of the pic doesn't look like the proper distributor at all or it looks like the grey plastic backshell with the cap hold down clamps is missing. What's underneath the blue rag?


Closer inspection of the pic doesn't look like the proper distributor at all or it looks like the grey plastic backshell with the cap hold down clamps is missing. What's underneath the blue rag?
Last edited:
The location of the TFI connector at the distributor appears to be clocked way around from normal base timing of 10degBTC.
Closer inspection of the pic doesn't look like the proper distributor at all or it looks like the grey plastic backshell with the cap hold down clamps is missing. What's underneath the blue rag?
I think the cap is actually removed and the TFI unplugged in this pic. In fact, it's possible there is no dist in the pic and the blue rag is just blocking the hole[/QUOTE]

Similar threads
- Replies
- 24
- Views
- 2K
- Replies
- 2
- Views
- 441
- Replies
- 39
- Views
- 3K
- Replies
- 11
- Views
- 1K