Mongoose + Intercooler install progress pics

Discussion in 'SN95 4.6 Talk' started by SilverBullet00, Nov 24, 2007.

  1. SilverBullet00 New Member

    Member Since:
    Jul 5, 2004
    Message Count:
    1,162
    Likes Received:
    0
    Trophy Points:
    0
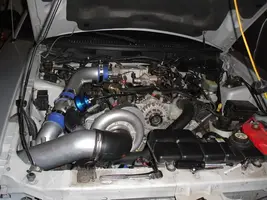
    I started yesterday with my install. I was originally just going to run the mongoose kit with out the intercooler, but then I realized that I didnt have all the piping I needed to make it work. So I said F it, and started mounting the intercooler :nice:

    Finding the 3/8" NPT tap was hard as hell. Finding a punch large enough to fit the tap was impossible. I ended up having to make one out 1/2 in steel rod. This city doesnt have anything you need to get a project done, it really sucks. Routing the belt was a nightmare... How in the hell are you suppose to change that thing if it breaks?? Take everything apart?

    Another question- do you have to extend the MAF harness to reach all the way down in the fender well? it doesnt seem long enough....

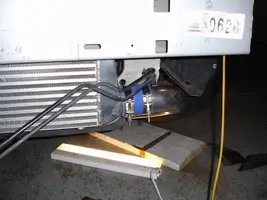
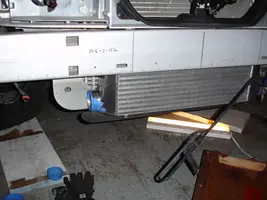
    Anyways, here is some progress pics of the install. Average temp today was 20-25 degress in the garage. And unfortunetly, it just started flurrying- it better clear up for tomorrow, I need to go on a test drive!

    [IMG]
    [IMG]
    [IMG]
    [IMG]
    [IMG]
  2. jivepepper Founding Member

    Member Since:
    Jun 19, 2002
    Message Count:
    822
    Likes Received:
    0
    Trophy Points:
    0
    Looking good.
  3. CobraRed_96_GT Active Member

    Member Since:
    May 20, 2006
    Message Count:
    1,642
    Likes Received:
    0
    Trophy Points:
    36
    beautiful! have you cut the frame for the IC fitting yet?
  4. SilverBullet00 New Member

    Member Since:
    Jul 5, 2004
    Message Count:
    1,162
    Likes Received:
    0
    Trophy Points:
    0
    cutting the hole for the IC piping tomorrow
  5. LaserSVT black cloud overhead on a sunny day

    Member Since:
    Jun 19, 2007
    Message Count:
    10,855
    Likes Received:
    128
    Trophy Points:
    113
    Is it just the light or did your car used to be white? BTW nice job, looks like a helluva lota work:nice:
  6. 1low03gt New Member

    Member Since:
    May 25, 2004
    Message Count:
    682
    Likes Received:
    0
    Trophy Points:
    0
    On the silver mustangs,the engine bay is a light grey. :nonono:

    Nice job,looking good. :nice:
  7. SXYXC New Member

    Member Since:
    Apr 23, 2007
    Message Count:
    86
    Likes Received:
    0
    Trophy Points:
    0
    It looks very nice... and clean
  8. CENTENNIALSTANG New Member

    Member Since:
    Apr 15, 2005
    Message Count:
    170
    Likes Received:
    0
    Trophy Points:
    0
  9. 98GTfromGA Founding Member

    Member Since:
    Mar 17, 2002
    Message Count:
    297
    Likes Received:
    0
    Trophy Points:
    0
    nice work, the belt setup on the '02 - '04 is horrendous....maybe you can find a timing cover from a '98 and swap that on there. you would need a new blower mount but changing the belt would be no problem with the earlier setup
  10. BennyBlown2v New Member

    Member Since:
    Dec 10, 2004
    Message Count:
    1,294
    Likes Received:
    0
    Trophy Points:
    0
    Sweet! Yeah routing the belt the first couple times is pretty lame...heh. You'll love boost, it's great stuff :)
  11. lazerred02 New Member

    Member Since:
    Nov 20, 2004
    Message Count:
    196
    Likes Received:
    0
    Trophy Points:
    0
    Looks very nice, bet you can't wait to get on it!
  12. LaserSVT black cloud overhead on a sunny day

    Member Since:
    Jun 19, 2007
    Message Count:
    10,855
    Likes Received:
    128
    Trophy Points:
    113
    Hey SilverBullit00, did you get the lights I sent you yet?
  13. mazen189 Member

    Member Since:
    Aug 1, 2007
    Message Count:
    436
    Likes Received:
    0
    Trophy Points:
    16
    i want to make sweet sweet love to your car
  14. SilverBullet00 New Member

    Member Since:
    Jul 5, 2004
    Message Count:
    1,162
    Likes Received:
    0
    Trophy Points:
    0
  15. SilverBullet00 New Member

    Member Since:
    Jul 5, 2004
    Message Count:
    1,162
    Likes Received:
    0
    Trophy Points:
    0

    Yes I did buddy, Thanks a lot. Unfortunetly 99-04's use 9007, not 9004s. But its all good, I still appreciate it!
  16. SilverBullet00 New Member

    Member Since:
    Jul 5, 2004
    Message Count:
    1,162
    Likes Received:
    0
    Trophy Points:
    0
    Crappy vid, but its something..

    This is when I was limping back into the garage
    [IMG]

    This was first start up...
    [IMG]
  17. CobraRed_96_GT Active Member

    Member Since:
    May 20, 2006
    Message Count:
    1,642
    Likes Received:
    0
    Trophy Points:
    36
    At least that's not an internal problem. Something's unhooked/disconnected/faulty/or clogged.
  18. LaserSVT black cloud overhead on a sunny day

    Member Since:
    Jun 19, 2007
    Message Count:
    10,855
    Likes Received:
    128
    Trophy Points:
    113
    Oh man I am sorry to hear that :( Same thing happened to my buddies 2000 GT when we put in a procharger kit with a front mount IC. It took us three days to figure it out (we did have to work) and the symptoms were exactly the same, hell the car sounded just like your video. Turned out the output on the IC was the problem. The silicone connector had the smallest little cut in it and threw the MAF readings way off. After replacing it all was good :nice: I hope yours is something simple like that, small chance your head gasket is blown but I doubt it. Check the oil and water to see if they mixed at all. I am also sorry about the lights, I thought I sent the 9007's. Make a few bucks and sell them to someone with a Fox :shrug: This is the reason (besides I am broke :rlaugh:) that I have not done anything radical yet on my Cobra, I need another car first :) Good luck and keep us posted buddy.
  19. urban96 bubb rubb says:"woo woooooo"

    Member Since:
    Sep 25, 2002
    Message Count:
    4,233
    Likes Received:
    0
    Trophy Points:
    66
    pressure test the intake tubing/ i/c

    you can make one pretty simply, just need a PVC pipe end (get it the same size as the opening of your air filter. you may also need to get a coupler to attact it to your intake tubing

    [IMG]

    basically drill out a small hole on the end of the PVC cap so that its only big enough to fit the valve stem in there, i used a set of calipers to get the size of the drill bit to match the size of the valve stem.

    pump some air in there and listen for leaks
  20. SilverBullet00 New Member

    Member Since:
    Jul 5, 2004
    Message Count:
    1,162
    Likes Received:
    0
    Trophy Points:
    0
    damn man, thats a really good setup. Thanks!

Share This Page