
I have a LX mustang convertable 5.0 HO. I am not getting any injector pulse. If the cars sits over night I can start it the next morning. As soon as I turn the car off it will not start again. What can cause this? I have been told to change my fuel pump so I did that and I have checked all my relays and fuses. Also have checked for spark and fuel pressure. Car will start with starter fluid being sprayed. Can somebody please help me with this problem?
You are using an out of date browser. It may not display this or other websites correctly.
You should upgrade or use an alternative browser.
You should upgrade or use an alternative browser.
No Injector Pulse????
- Thread starter msisk14
- Start date
-
Sponsors (?)
WHen it acts up:
Ensure the TPS signal is not showing more than 3.7 volts.
See if you have KOEO 12 volts to the positive side of the injector connectors.
Check the wiring harness and connectors.
If you end up not having spark when this occurs, there's a good chance the PIP went bad.
Good luck.
Ensure the TPS signal is not showing more than 3.7 volts.
See if you have KOEO 12 volts to the positive side of the injector connectors.
Check the wiring harness and connectors.
If you end up not having spark when this occurs, there's a good chance the PIP went bad.
Good luck.
Sorry to ask!!!!
I hate to bother you but could you tell me what the PIP is. I just dont know that much about cars and I am learning as I am going here.
I hate to bother you but could you tell me what the PIP is. I just dont know that much about cars and I am learning as I am going here.
Fuel injectors inoperative, one or more injectors either on all the time or will not squirt.
Tools needed: Noid light, Multimeter (volts & ohms), 10 MM socket &
extension, & ratchet.
Note: Do all of the steps and do them in order. The results of the
subsequent tests are based on the prior tests being successfully passed.
1.) Use an ohmmeter set on the low resistance scale and measure the resistance of
each injector across the two contacts inside the electrical connector. You should
see between 11-16 ohms. More or less than that is a bad injector. Next measure
between either one of the contacts and the metal on the injector body. You should
see greater than 100,000 ohms. Don’t hold the metal probe tips with your bare
hands when you make this measurement. It will give incorrect results if you do.
Some basics about the computer:
Remember that the computer does not supply power for any actuator or
relay. It provides the ground necessary to complete the circuit. That
means one side of the circuit will always be hot, and the other side will go
to ground or below 1 volt as the computer switches on that circuit.
2.) Get a noid light form AutoZone or other auto parts store, or even better
a set of them

This set is from http://www.toolking.com/ProductInfo.aspx?productid=12492 and costs $12.
3.) Use the noid light to determine that the injector pulses and isn’t
stuck in the on position. It you have a set of them install all of them and
compare the pulse intensity. Install the noid lights, turn the ignition switch to
Run and crank the engine. A light that doesn’t pulse and stays on has a
short to ground in the computer side of the circuit. That can be either a
wiring fault or a failed computer. If this is the case, remove the passenger
side lick panel and disconnect the computer connector. There is one 10
MM bolt holding it in place. Pull the connector all the way out of the
computer so that you can see the computer side pins.

Use the list from the graphic below to find the fuel injector pins for the
injectors that didn’t turn the noid light off.

4.) Set the multimeter to low scale Ohms and measure between the
computer ground located below the computer and the suspect fuel injector
pins. You should see greater than 100 K Ohms resistance. If you see less
than 100 Ohms, the wiring between the injector and the computer has a
short to ground and needs service. Check the harness and look for damage,
kinks or frayed spots.
5.) A single noid light that never turns on is either a wiring fault, or a
failed computer. Either the injector has no DC power or the computer has
failed and cannot switch the injector circuit to ground. Determine if the
injector has power by using the multimeter to check for 12 volts on the red
wire on the suspect injector connector. No 12 volts and you have a wiring fault.
Check the harness and look for damage, kinks or frayed spots. Check the 10
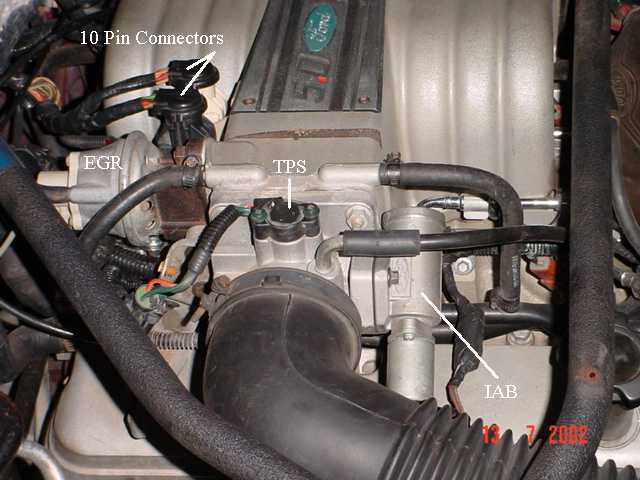
pin salt & pepper shaker connectors for bent pins, corrosion and damage.
If none of the noid lights flash and you have 12 volts at each injector, check
to see that you have good spark. Before you even think about replacing the
computer, see step 6.
Next Check the fuel injector wiring end to end. Each fuel injector has a red
wire (power) and an non-read wire (computer controlled ground). Set the
multimeter to low ohms and measure each non red fuel injector wire from
the fuel injector connector to the matching pin on the computer connector.
You should see less than 2 Ohms. More than that means a bad connection
or bad wiring.
See the graphic for the location of the 10 pin connectors:
See the graphic for the 10 pin connector circuit layout.

Once you have determined that the suspect injectors have good power and
good wiring, the computer is the likely suspect, since a ground is required
to complete a circuit and make it function. The computer provides the
ground: if doesn’t, then the noid light will not flash.
6.) If you have gotten this far, then the problem is likely ignition
related. Remember the noid test using all of the noid lights? All of them
were supposed to be equally bright. Since you have already tested all the
electrical side of the fuel injector circuit, the one remaining common item is
the pip sensor inside the distributor. A failing pip sensor, damaged shutter
wheel or bent distributor shaft could all cause the pulse delivered to the
injectors to be faulty. A bad pip sensor will cause all the injectors not to fire
and you will have no spark. Dumping the codes will show a code 14.
7.) Spark plugs indicate one or more cylinders not firing: use the
multimeter to measure the resistance of the spark plug wires. The wires
should measure 2000 ohms perfoot of length. A 2 foot wire would be 4000
ohms and a 3 foot wire would be 6000 ohms. Some Taylor and Accel wires
have metal cores and will measure much less: that’s OK.
Next examine the spark plug wires very carefully for burn spots, cracks and
damaged insulation. One good thing to try is to start the engine while the
car is a very dark area, open the hood and look for sparks or blue glow.
They indicate the electricity is leaking out of the spark plug wires.
Thanks to Tmoss & Stang&2birds at www.veryuseful.com/mustang/tech/engine/ for some of the graphics
Thanks also to www.fordfuelinjection.com for some of the graphics.
Tools needed: Noid light, Multimeter (volts & ohms), 10 MM socket &
extension, & ratchet.
Note: Do all of the steps and do them in order. The results of the
subsequent tests are based on the prior tests being successfully passed.
1.) Use an ohmmeter set on the low resistance scale and measure the resistance of
each injector across the two contacts inside the electrical connector. You should
see between 11-16 ohms. More or less than that is a bad injector. Next measure
between either one of the contacts and the metal on the injector body. You should
see greater than 100,000 ohms. Don’t hold the metal probe tips with your bare
hands when you make this measurement. It will give incorrect results if you do.
Some basics about the computer:
Remember that the computer does not supply power for any actuator or
relay. It provides the ground necessary to complete the circuit. That
means one side of the circuit will always be hot, and the other side will go
to ground or below 1 volt as the computer switches on that circuit.
2.) Get a noid light form AutoZone or other auto parts store, or even better
a set of them
This set is from http://www.toolking.com/ProductInfo.aspx?productid=12492 and costs $12.
3.) Use the noid light to determine that the injector pulses and isn’t
stuck in the on position. It you have a set of them install all of them and
compare the pulse intensity. Install the noid lights, turn the ignition switch to
Run and crank the engine. A light that doesn’t pulse and stays on has a
short to ground in the computer side of the circuit. That can be either a
wiring fault or a failed computer. If this is the case, remove the passenger
side lick panel and disconnect the computer connector. There is one 10
MM bolt holding it in place. Pull the connector all the way out of the
computer so that you can see the computer side pins.
Use the list from the graphic below to find the fuel injector pins for the
injectors that didn’t turn the noid light off.
4.) Set the multimeter to low scale Ohms and measure between the
computer ground located below the computer and the suspect fuel injector
pins. You should see greater than 100 K Ohms resistance. If you see less
than 100 Ohms, the wiring between the injector and the computer has a
short to ground and needs service. Check the harness and look for damage,
kinks or frayed spots.
5.) A single noid light that never turns on is either a wiring fault, or a
failed computer. Either the injector has no DC power or the computer has
failed and cannot switch the injector circuit to ground. Determine if the
injector has power by using the multimeter to check for 12 volts on the red
wire on the suspect injector connector. No 12 volts and you have a wiring fault.
Check the harness and look for damage, kinks or frayed spots. Check the 10
pin salt & pepper shaker connectors for bent pins, corrosion and damage.
If none of the noid lights flash and you have 12 volts at each injector, check
to see that you have good spark. Before you even think about replacing the
computer, see step 6.
Next Check the fuel injector wiring end to end. Each fuel injector has a red
wire (power) and an non-read wire (computer controlled ground). Set the
multimeter to low ohms and measure each non red fuel injector wire from
the fuel injector connector to the matching pin on the computer connector.
You should see less than 2 Ohms. More than that means a bad connection
or bad wiring.
See the graphic for the location of the 10 pin connectors:
See the graphic for the 10 pin connector circuit layout.
Once you have determined that the suspect injectors have good power and
good wiring, the computer is the likely suspect, since a ground is required
to complete a circuit and make it function. The computer provides the
ground: if doesn’t, then the noid light will not flash.
6.) If you have gotten this far, then the problem is likely ignition
related. Remember the noid test using all of the noid lights? All of them
were supposed to be equally bright. Since you have already tested all the
electrical side of the fuel injector circuit, the one remaining common item is
the pip sensor inside the distributor. A failing pip sensor, damaged shutter
wheel or bent distributor shaft could all cause the pulse delivered to the
injectors to be faulty. A bad pip sensor will cause all the injectors not to fire
and you will have no spark. Dumping the codes will show a code 14.
7.) Spark plugs indicate one or more cylinders not firing: use the
multimeter to measure the resistance of the spark plug wires. The wires
should measure 2000 ohms perfoot of length. A 2 foot wire would be 4000
ohms and a 3 foot wire would be 6000 ohms. Some Taylor and Accel wires
have metal cores and will measure much less: that’s OK.
Next examine the spark plug wires very carefully for burn spots, cracks and
damaged insulation. One good thing to try is to start the engine while the
car is a very dark area, open the hood and look for sparks or blue glow.
They indicate the electricity is leaking out of the spark plug wires.
Thanks to Tmoss & Stang&2birds at www.veryuseful.com/mustang/tech/engine/ for some of the graphics
Thanks also to www.fordfuelinjection.com for some of the graphics.

Gods50isclean
New Member
- Jul 13, 2015
- 3
- 0
- 1
I had he same problem!!! Beat my head against a wall for days. Car would fire up on starting fluid but no injector pulse. Turns out it was the PIP (inside the distributor). I replaced the ICM as well but it didn't help. 60 bucks for the ICM or *****80 bucks for the entire distributor PIP, ICM, even a cap and rotor included!***** From the sound of it I would replace the distributor as a whole!!! I can't stress that enough! I wouldn't wish the "no pulse no start" crap on my mother in law!
Michael vazquez
New Member
I have a 89 gt very have spark no injector pales did check list for crank no start. I have 12v one the red wire . and .3 between red- to whit/Lt blue .car will not run with spud out if I have spark the pip is working I have run out of things to check . Help
.[/b]
You may or may not have a code14, since the computer doesn't do a good job of recognizing it when it happens, but the PIP sensor is probably your problem.
Code 14 - Ignition pickup (PIP) was erratic – the Hall Effect sensor in the distributor is failing. Bad sensor, bad wiring, dirty contacts. Factory tach will sometimes read erratically.
Revised 8-Apr-2017 to correct SPOUT problem symptoms wording
The PIP is a Hall Effect magnetic sensor that triggers the TFI and injectors. There is a shutter wheel alternately covers and uncovers a fixed magnet as it rotates. The change in the magnetic field triggers the sensor. They are often heat sensitive, increasing the failure rate as the temperature increases.
PIP Sensor functionality, testing and replacement:
The PIP is a Hall Effect magnetic sensor that triggers the TFI and injectors. There is a shutter wheel alternately covers and uncovers a fixed magnet as it rotates. The change in the magnetic field triggers the sensor. A failing PIP sensor will often set code 14 in the computer. They are often heat sensitive, increasing the failure rate as the temperature increases.
Some simple checks to do before replacing the PIP sensor or distributor:
You will need a Multimeter or DVM with good batteries: test or replace them before you get started.. You may also need some extra 16-18 gauge wire to extend the length of the meter’s test leads.
Visual check first: look for chaffed or damaged wiring and loose connector pins in the TFI harness connector.
Check the IDM wiring – dark green/yellow wire from the TFI module to pin 4 on the computer. There is a 22K Ohm resistor in the wiring between the TFI and the computer. Use an ohmmeter to measure the wire resistance from the TFI to the computer. You should see 22,000 ohms +/- 10%.
Check the PIP wiring - dark blue from the TFI module to pin 56 on the computer. Use an ohmmeter to measure the wire resistance from the TFI to the computer. You should see 0.2-1.5 ohms.
Check the SPOUT wiring – yellow/lt green from the TFI module to pin 36 on the computer. Use an ohmmeter to measure the wire resistance from the TFI to the computer. You should see 0.2-1.5 ohms.
Check the black/orange wire from the TFI module to pin 16 on the computer. Use an ohmmeter to measure the wire resistance from the TFI to the computer. You should see 0.2-1.5 ohms.
Check the red/green wire; it should have a steady 12-13 volts with the ignition switch on and the engine not running.
Check the red/blue wire; it should have a steady 12-13 volts with the ignition switch in Start and the engine not running. Watch out for the fan blades when you do this test, since the engine will be cranking.
If you do not find any chaffed or broken wires, high resistance connections or loose pins in the wiring harness, replace the PIP sensor or the distributor.
The PIP sensor is mounted in the bottom of the distributor under the shutter wheel. In stock Ford distributors, you have to press the gear off the distributor shaft to get access to it to replace it. Most guys just end up replacing the distributor with a reman unit for about $75 exchange
PIP problems & diagnostic info
Spark with the SPOUT out, but not with the SPOUT in suggests a PIP problem. The PIP signal level needs to be above 6.5 volts to trigger the computer to pulse the fuel injectors, but only needs to be 5.75 volts to trigger the TFI module. Hence with a weak PIP signal, and the SPOUT in, you could get spark but no injector pulse. You will need an oscilloscope or graphing DVM to measure the output voltage since it is not a straight DC voltage.
See http://www.wellsmfgcorp.com/pdf/counterp_v8_i2_2004.pdf and http://www.wellsmfgcorp.com/pdf/counterp_v8_i3_2004.pdf for verification of this little detail from Wells, a manufacturer of TFI modules and ignition system products
I have a 89 gt very have spark no injector pales did check list for crank no start. I have 12v one the red wire . and .3 between red- to whit/Lt blue .car will not run with spout out if I have spark the pip is working I have run out of things to check . Help
You may or may not have a code14, since the computer doesn't do a good job of recognizing it when it happens, but the PIP sensor is probably your problem.
Code 14 - Ignition pickup (PIP) was erratic – the Hall Effect sensor in the distributor is failing. Bad sensor, bad wiring, dirty contacts. Factory tach will sometimes read erratically.
Revised 8-Apr-2017 to correct SPOUT problem symptoms wording
The PIP is a Hall Effect magnetic sensor that triggers the TFI and injectors. There is a shutter wheel alternately covers and uncovers a fixed magnet as it rotates. The change in the magnetic field triggers the sensor. They are often heat sensitive, increasing the failure rate as the temperature increases.
PIP Sensor functionality, testing and replacement:
The PIP is a Hall Effect magnetic sensor that triggers the TFI and injectors. There is a shutter wheel alternately covers and uncovers a fixed magnet as it rotates. The change in the magnetic field triggers the sensor. A failing PIP sensor will often set code 14 in the computer. They are often heat sensitive, increasing the failure rate as the temperature increases.
Some simple checks to do before replacing the PIP sensor or distributor:
You will need a Multimeter or DVM with good batteries: test or replace them before you get started.. You may also need some extra 16-18 gauge wire to extend the length of the meter’s test leads.
Visual check first: look for chaffed or damaged wiring and loose connector pins in the TFI harness connector.
Check the IDM wiring – dark green/yellow wire from the TFI module to pin 4 on the computer. There is a 22K Ohm resistor in the wiring between the TFI and the computer. Use an ohmmeter to measure the wire resistance from the TFI to the computer. You should see 22,000 ohms +/- 10%.
Check the PIP wiring - dark blue from the TFI module to pin 56 on the computer. Use an ohmmeter to measure the wire resistance from the TFI to the computer. You should see 0.2-1.5 ohms.
Check the SPOUT wiring – yellow/lt green from the TFI module to pin 36 on the computer. Use an ohmmeter to measure the wire resistance from the TFI to the computer. You should see 0.2-1.5 ohms.
Check the black/orange wire from the TFI module to pin 16 on the computer. Use an ohmmeter to measure the wire resistance from the TFI to the computer. You should see 0.2-1.5 ohms.
Check the red/green wire; it should have a steady 12-13 volts with the ignition switch on and the engine not running.
Check the red/blue wire; it should have a steady 12-13 volts with the ignition switch in Start and the engine not running. Watch out for the fan blades when you do this test, since the engine will be cranking.
If you do not find any chaffed or broken wires, high resistance connections or loose pins in the wiring harness, replace the PIP sensor or the distributor.
The PIP sensor is mounted in the bottom of the distributor under the shutter wheel. In stock Ford distributors, you have to press the gear off the distributor shaft to get access to it to replace it. Most guys just end up replacing the distributor with a reman unit for about $75 exchange
PIP problems & diagnostic info
Spark with the SPOUT out, but not with the SPOUT in suggests a PIP problem. The PIP signal level needs to be above 6.5 volts to trigger the computer to pulse the fuel injectors, but only needs to be 5.75 volts to trigger the TFI module. Hence with a weak PIP signal, and the SPOUT in, you could get spark but no injector pulse. You will need an oscilloscope or graphing DVM to measure the output voltage since it is not a straight DC voltage.
See http://www.wellsmfgcorp.com/pdf/counterp_v8_i2_2004.pdf and http://www.wellsmfgcorp.com/pdf/counterp_v8_i3_2004.pdf for verification of this little detail from Wells, a manufacturer of TFI modules and ignition system products
Similar threads
- Replies
- 3
- Views
- 757
- Replies
- 2
- Views
- 363
- Replies
- 12
- Views
- 1K
- Replies
- 5
- Views
- 1K