Metallic Paint Problems, Please HELP!!!

jikelly

Dirt-Old 20+Year Member
Jul 9, 2003
872
54
99
Lubbock Tx
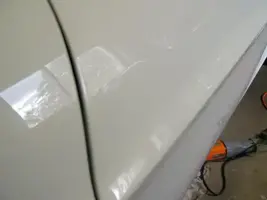
So I thought I was done with painting the main body of my 73 and pulled it out to cure in the sun when I noticed something funny.

driprobarea.jpg


You can see a light spot just beyond where the nose piece is attached to the front fender. I had touched up the crease between the two body pieces, and I guess where the basecoat wasn't as thick, at the edges of the spray pattern, the flake looks different and makes that spot look like it changes shades. Can't see it real good in the picture, but boy does it show in the sun. Damn I wish I'd noticed it before I shot the final clear coat.

SUCKS!!!!!!

How do I fix it if that's even possible?
 
  • Sponsors (?)


I don't think that's fixable. That's one of the reasons metallics, pearls and candies are less desireable for less experienced painters (like me!) is because they are a little more of a challenge to touch up. What I've done on metallic touch ups is to first realize you need to spread the repair over a larger panel. For instance, if you need to touch up just a bit of that edge, hold the gun a bit farther back (like a foot) and gently mist the paint on until it's a close enough match as far as mettalic content and color. Also, you know how you're supposed to keep the gun parallel with the surface when painting? Well, touch ups are just the opposite, that is move the gun farther from the surface as you exit the repair area. I've had good luck with these methods, but maybe someone else can offer another plan.
 
should've painted it orange, lol.

Its tough to paint metallics because the grain can stripe. I don't think your problem is fixable unless you sand it all the way back down and redo the basecoat.
 
the main reason most people have trouble doing repairs with bc/cc is because the base reducer is so aggresive, and it bites back into the clear (this is why base will lift clear until the clear has fully cured) try this: wet sand the entire fender with 600 wet or dry, cut it flat, dont just knock the dirt out.mask the rest of the car, and wipe the fender down with prepsol...now the fun begins! mix up enough base to do your repair, assuming you dont have any already reduced (with a high metallic, you want the same reducer as the car was painted with to start with, as it does make a difference how the metallic lays down) fill your cup about half full, and to this add just a splash (1 ounce or so) clear reducer. stir it up, and just dust the color on the area that needs it... dont get carried away, it will still lift the clear! dont just keep dusting, as you will get a dry area around the repair. after each coat, tack the whole fender, and add another dusting. after you are satisfied the repair is covered,blend your color back into the panel, tack one more time, then clear. one thing to remember, silvers and high metallic bases need to be sprayed just as they were to begin with, if you dusted color on when you painted the car, thats how you need to do your repair
 
Yeah I was thinking I'd have to redo the whole panel again if I want to fix that little spot.:bang:

So C-Dog you're saying laydown a number of coats of the base with a little bit of the clear activator, then do a heavy?? color coat before another coat of clear? I used no reducer in the clear when I sprayed it BTW.

Since the offending repair base was sprayed on scuffed clear is it possible that I could just sand that layer off? Or did ti blend with the clear down into the old Base you think? Even if I can do that it's going to be hard to guarantee I can match the rest of the panel.

On top of that I'm nearly out of base. I know the paint guy used the same formula to make the new pint I purchased but It'd be my luck for the shade to be a hair off.
 
jikelly said:
I used no reducer in the clear when I sprayed it BTW.
Why? Doesn't the clear coat instruction label require reducer?

jikelly said:
I had touched up the crease between the two body pieces...
For best results, always remove every component possible. Not removing the front and rear fender moldings is a mistake. The base coat will be attracted to both sides of the seam leaving the area just inside the seam too lightly coated. Same with the clear coat, plus it's more likely to cause a web between the two parts that will crack later when the cast aluminum fender molding expands at a different rate than the steel fender.
 
Platonic Solid said:
Why? Doesn't the clear coat instruction label require reducer?

For best results, always remove every component possible. Not removing the front and rear fender moldings is a mistake. The base coat will be attracted to both sides of the seam leaving the area just inside the seam too lightly coated. Same with the clear coat, plus it's more likely to cause a web between the two parts that will crack later when the cast aluminum fender molding expands at a different rate than the steel fender.

Right you are.

I removed all other pieces, but those from the car, because I didn't think to take them off before I primed it. Pretty shocking oversight, but there had been no problems created by that till the little discoloration reared up.

Oh and the clear I used allowed for reduction, but didn't need it.
 
short on base... oh noooooo!!! actually, you should be ok to have another pint mixed up, just stay away from the hood, and any other panel. YOU COULD use the new base to get the repair covered, and then use the first mix for the last, say two coats,,, how much color do you have, anyway? did you shoot it with a gravity feed gun? you could use a handful of clean marbles to displace a bit of paint if you are using a siphon gun (been there, done that!!!)your last coat should cover all the base youve applied, and medium wet, not heavy. btw, most clears allow for reduction with the proper reducer to help the clear to level itself. (less orange peel)
 
I actually over-reduced my clear by about 10% to help prevent orange peel. I'm not sure what brand of clear you used, but I've never heard of one that was simply shot straight out of the can. Does the catalyst act as reducer as well? Anyway, here's a shot what my door and fender look like before buffing, and laying on very wet with HoK clear.
 

Attachments

  • drivers door.jpg
    drivers door.jpg
    14.7 KB · Views: 171
jikelly does the whole car have orange peel as bad as pictured? Not only is smoothing orange peel an incredible amount of labor, but you'll end up removing most of your clear and likely hitting base coat in the process.
 
chromedog said:
you could use a handful of clean marbles to displace a bit of paint if you are using a siphon gun (been there, done that!!!)

Never heard of that trick before. Brilliant!!! That would have been useful back when I used siphon guns. Running low on base truely sucks...
 
Well this whole painting experience has been a lot of fun, Not.

I guess I could have reduced the clear, but I didn't want to take a chance on screwing it up so I didn't. I recon the result of that decision is the orange peel. It was actually worse until I figured out the right pressure and volume adjustments on the gun.

My gun is gravity fed.

I keep going out there and looking at the bad spot, and thinking I really should just leave it. So much work to fix it and I am risking the panel not matching no matter what. It's weird that the repairs I did on the other side of the car didn't give me the same problem.

Maybe I had the gun at the wrong angle or something.

I think I sprayed the last clearcoat layer last thursday, so I'm at the point where I'd have to scuff the panel before I can spray anything else.

I think I'm going to get out there and start the wetsanding process, which is required to remove all that orange peel anyway, and maybe play with a little spot on the front there to see if I can take off that top layer of base where it looks funny. Probably I'll wind up reshooting the whole panel anyway though.

I need a time machine, and a clone to send to work so I can stay home and work on the stang.
 
Another possible problem is wrong tip size an/or too low of air pressure. Clear is typically very thin and requires a small tip. I use a 1.3 tip and 23 lbs of pressure at the gun, which on my gun equates to 10 lbs at the cap. Before you try again, spray a scrap panel with a bit of base and then clear and try slowing your gun speed down, moving a bit closer to your work and thinning your clear to see what the results would be and how far you can go without creating a run. I'll bet you'd be amazed at how wet you can get it, provided you let the previous coat flash.
 
chromedog said:
the main reason most people have trouble doing repairs with bc/cc is because the base reducer is so aggresive, and it bites back into the clear (this is why base will lift clear until the clear has fully cured) try this: ....... dust the color on the area that needs it... dont get carried away, it will still lift the clear!

What you are saying may be a problem with low quality paint products, but good urethane clears will not lift with new basecoat applied over them. The problem with lifting is when you have sanded through the clear and the existing basecoat is re-wet by a new application of basecoat. The re-wetting of the existing basecoat causes it to lift under the clear. We do spot repairs all the time over fresh clear using Sikkens paint and do not have lifting problems.
 
i know im going to p@%% someone off, but here goes anyway...:rolleyes: ive shot sikkens for one of the largest chain bodyshops on the east coast (NOT MAACO, or EARL SHEIB!) and had this same discussion with a local chemist who formulates coatings for the restoration market. the reason sikkens base doesnt lift fresh clear is because it is laquer based. dont ask me how it works, because i didnt understand it when it was explaned to me, but it is.I do know that sherwin williams, and dupont base will lift clear if not properly cured, and, while im not all that fond of s.w. products, dupont makes some of the best refinishing products on the market. (btw, if you like sikkens, give DeBeers a try!):nice:
 
chromedog said:
the reason sikkens base doesnt lift fresh clear is because it is laquer based. .............. (btw, if you like sikkens, give DeBeers a try!):nice:

It sounds like you have a lot of experience with many refinish products. However, the first statement is absolutely not true--I work for Akzo Nobel, we formulated and manufacture Sikkens paint. There is no lacquer here. Lacquer is as aggressive as you get--that is why we clean our guns with it. As for chemical differences, many of the solvents used by the paint manufacturers are from the same sources and are the same. Formulation is generally different, but many of the basic raw materials are the same. The ingredients for Sikkens basecoat reducer are (from our MSDS): Isopropanol, methyl isobutyl ketone, 2-heptanone, butanol, hydrotreated light naphtha, ethyl alcohol, and butyl acetate. The first four items are the main ingrediants. Butyl acetate is between 1 and 5 percent of the volume by weight. The lacquer thinner in my garage is primarily butyl acetate and is a non-compliant product for California. Other cleaners are often methyl ethyl ketone. Compare the ingrediants for the Sikkens reducer to what you are using and I will wager they are very similar. I have, in a very desperate moment, used BASF R-M reducer in my Sikkens basecoat without a problem.

As for DeBeers, when a company hires a whole bunch of chemists from Sikkens (such as DeBeers did), the resulting products are going to be very similar. Our recent patents for our 5 minute curing clearcoat and waterborne products will be the separater as we move into the future.

One thing we do agree on is that the basecoat reducer is quite aggressive (even Sikkens), in fact, I occassionally use it as gun cleaner if I run out of lacquer thinner. Works great, but would probably be too expensive if I had to buy it specifically for use as gun cleaner. :D